전체 소스는 밑에..하지만 책과는 좀 다름..내 나름대로 끝에 마음대로 짠것임..T.T

위 기능을 분리해서 담당할 클래스를 만들어보자.

우선 UserDaoTest 클래스다

public class UserDaoTest { 
 public static void main(String[] args) {
  UserDao user = new DaoFactory().userDao();
 }
}


Factory에서 연결될 오브젝트를 정의를 한다.
public class DaoFactory { 
 public UserDao userDao(){
  ConnectionMaker connectionMaker = new DConnectionMaker();  
  UserDao dao = new UserDao(connectionMaker);  
  return dao;
 }
}

만약 여러개의 DAO가 있다고 하면

Factory에서
public UserDao getUserDao(ConnectionMaker connectionMaker){
   
  return new UserDao(connectionMaker);  
  
 }

public AccountDao accountDao(){
return new AccountDao(new DConnectionMaker());
}
....


DConnectionMaker에선 따로 커넥션 부분만 정의해서 하면 된다.

마지막 Client에서는

 //main
 public static void main(String[] args) throws ClassNotFoundException,SQLException{
  
  UserDao dao = new DaoFactory().getUserDao(new MyConnectionMaker());
  
  User user = new User();
  user.setId("hello");
  user.setName("김말통");
  user.setPassword("1234");
  
  dao.add(user);
  
  User user2 = dao.get("hello");
  System.out.println("id:"+user2.getId());
  System.out.println("name:"+user2.getName());
  System.out.println("password:"+user2.getPassword());
  
  
 }
}

이런식으로 UserDao를 사용하면 된다.
그럼 아예 이런식으로 독립시켜버리자.

UserDaoTest라는 클래스를 만들어서 여기안에서 실행및 테스트를 할수 있다.

UserDao의 생성자
public UserDao(ConnectionMaker connectionMaker){
  //초기화 ID 및 PASSWORD
  this.connectionMaker = connectionMaker;
 }

public class UserDaoTest {
 
 public static void main(String[] args) {

  ConnectionMaker connectionMaker = new DConnectionMaker();
  
  UserDao dao = new UserDao(connectionMaker);  
 }

이렇게 나누어 지면 거의 끝이다.

하지만 위의 코드에서 문제점은 UserDaoTest라는 클라이언트 클래스는 예전 UserDao가 맡던 connectionMaker 구현클래스 사용할지 안할지 기능까지 맡고 있는 셈이다.

원래목적이 UserDaoTest는 UserDao의 기능이 잘 동작하는 지만 테스트할려고 만든거다.

그래서 또 하나의 관심을 줌으로써 또 한번 더 리팩토링을 해야 한다.

다음 마지막 과정은 팩토리 과정이다.

-토니의 스프링 책참고
위 경우의 해결책은 두개의 클래스가 서로 긴밀하게 연결되어 있지 않도록 중간에 추상적인 느슨한 연결고리를 만들어주는 것이다.추상화란 어떤 것들의 공통적인 성격을 뽑아내어 이를 따로 분리해내는 작업이다.자바가 추상화를 위해 제공하는 가장 유용한 도구는 바로 인터페이스이다.

인터페이스의 최대장점은 추상화가 되는 동시에 실제 이걸이용해서 구현하는 클래스는 밑 바탕 클래스를 몰라도 된다.. 이 바탕 클래스가 별 스트립쇼를 부리든 난동을 부리든.. 인터페이스만 신경쓰면 된다.

아래는 인터페이스 설정이다.
public interface ConnectionMaker {
public Connection makeNewConnection() throws ClassNotFoundException,SQLException;
}

그리고 이걸 실제 독자적으로 구현하는 고객 클래스는 

-D사
public class DConnectionMaker implements ConnectionMaker {

@Override
public Connection makeNewConnection() throws ClassNotFoundException,
SQLException {
return null;// D사가 개별적으로 생성한 커넥션;
}

}
-N사
public class NConnectionMaker implements ConnectionMaker {

@Override
public Connection makeNewConnection() throws ClassNotFoundException,
SQLException {
return  null;// N사가 개별적으로 생성한 커넥션;
}

}

이고..바탕클래스에선 이 인터페이스를 이용해 이렇게 작성할 수 있다.하지만 문제점이 있는데 빨간 줄로 된 걸 보면 된다.

-바탕클래스 : UserDao

private ConnectionMaker connectionMaker;
public UserDao(){
//초기화 ID 및 PASSWORD
connectionMaker = new DConnectionMaker();
}
public void add(User user) throws ClassNotFoundException,SQLException{
Connection c = connectionMaker.makeNewConnection();
.....

저 코드를 보면 결국 클라이언트 구현클래스를 이용해서 UserDao를 구현하고 있다.

결국 UserDao의 완전 독립이라는 나의 최종목표에서 벗어나 버렸다.

그래서 다음 단계인 "관계설정 책임의 분리"에서 해결해보자.


앞에서 잠시 언급했듯이 다중상속이 허용되지 않는 자바에선 위와 같은 방법은 별로 좋지 못하다.

그래서 우선 Connection 를 주는 클래스를 아예 따로 떼어버리자.

그럼 상속받을 필요도 없고 그냥 생성해서 쓰면 그만이다. abstact일 필요도 없어진다.

자세한 코드는 다음과 같다.

Connection만 관리하는 클래스 추출

public class SimpleConnectionMaker {
public Connection makeNewConnection() throws ClassNotFoundException,SQLException{
return 만들어질 커넥션;
}
}

그럼 add와 get 메소드 안에서는 

Connection c = simpleConnectionMaker.makeNewConnection();

이 한줄로 간단히 예전과 똑같이 사용할 수 있다.

하지만..

이렇게 바뀌고 나면 제공해주고 있는 D사와 N사에서 작동안된다고 클레임 건다.

이유는 더이상 상속관계가 아니기 때문에 상속을 받아도 Connection 객체를 사용할 수 없다는 것이다.

그래서 "인터페이스의 도입"이 이루어진다.
1단계에서 메소드 추출을 이용했다.

만약 이 UserDao클래스가 인기가 많아 N사와 D사에 판매를 하는 경우
N사와 D사의 경우 각각 다른 DB을 쓰고 연결관리를 한다는 가정하에선

기존에 만들어 놓은 UserDao방식은 확장성에서 상당히 비효율적이다. 안에 메인클래스를 수정해야 함은 당연지사고 내가 고생해서 만든 UserDao클래스 극비문서를 남에게 보여줘야 한다는 문제점도 있다.

그래서 이번 단계에서는 내가 만든 UserDao클래스를 보호하면서 각기 다른 회사에 맞는 커넥션을 제공해줄수 있는 리팩토링이다.

여기에서 쓰이는 패턴은 템플릿 메소드 패턴(template method pattern:슈퍼클래스에 기본적인 로직의 흐름을 만들고 , 그 기능의 일부를 추상 메소드나 오버라이딩이 가능한 protected 메소드등으로 만든뒤 필요한 서브클래스에서 이러한 메소드를 필요에 맞게 구현해서 사용하도록 하는 방법)

그리고 서브클래스에서 구체적인 오브젝트 생성방법을 결정하게 하는 것을 팩토리 메소드 패턴(factory method pattern)이라고도 한다. 

그럼 구체적인 예로는 다음과 같다.

1.클래스를 추상클래스로 변환한다.
public abstract class UserDao {
Connection c = getConnection();
.....

public abstract Connection getConnection() throws ClassNotFoundException,SQLException;

}
2.N사와 D사는 제공되어진 추상클래스에 제공해서 getConnection() 부분만 따로 정의를 한다.

public class DUserDao extends UserDao {

@Override
public Connection getConnection() throws ClassNotFoundException,
SQLException {
//N 사 DB connection 생성코드 작성
return 만들어진 Connection;
}

}

public class NUserDao extends UserDao {

@Override
public Connection getConnection() throws ClassNotFoundException,
SQLException {
//N 사 DB connection 생성코드 작성
return 만들어진 Connection;
}

}

하지만 여기에서 큰 문제점이 있다.

자바는 다중상속이 금지되어있다.

그래서 만약 N사나 D사의 구현클래스가 다른 클래스를 이미 상속받았다면 우찌할텐가..

그래서 다음단계에서 "DAO의 확장" 한단계 더 리팩토링을 해보자.

이전 UserDao 클래스에서 add() 안의 메소드를 보면 세가지 관심사항을 발견할 수 있다.

UserDao의 관심사항
1.DB와 연결을 위한 커넥션을 어떻게 가져올까라는 관심
2.사용자 등록을 위해 DB에 보낼 SQL문장을 담을 Statement를 만들고 실행하는 것
3.작업이 끝나면 사용한 리소스를 닫아주는 일

public void add(User user) throws ClassNotFoundException,SQLException{
Connection c = getConnection();
String sql = "insert into users(id,name,password) values(?,?,?)";
PreparedStatement ps = c.prepareStatement(sql);
                .....

아래 메소드를 추가함으로써 add와 get에서 중복되는 커넥션 부분을 추출했다.
private Connection getConnection() throws ClassNotFoundException,SQLException{
Class.forName("org.gjt.mm.mysql.Driver");
return DriverManager.getConnection("jdbc:mysql://localhost/springbook","root","1234");
}

이정도는 금방 이해가 될꺼라 본다...하지만 다음단계부터 중요해짐.^^
토비의 스프링3이란 책을 보고 공부하는 중..^^;

우선 처음부터 리팩토링에 대해서 간략하게 얘기하는데 좋은 내용이다..

그래서 한번 따라해봄.^^

우선 DB 커넥션 클래스 준비

user.java 파일안

package springbook.user.domain;

public class User {
String id;
String name;
String password;
public String getId() {
return id;
}
public void setId(String id) {
this.id = id;
}
public String getName() {
return name;
}
public void setName(String name) {
this.name = name;
}
public String getPassword() {
return password;
}
public void setPassword(String password) {
this.password = password;
}
}

2. UserDao.java 파일
package springbook.user.dao;

import java.sql.Connection;
import java.sql.DriverManager;
import java.sql.PreparedStatement;
import java.sql.ResultSet;
import java.sql.SQLException;

import springbook.user.domain.User;

public class UserDao {

public UserDao(){
//초기화 ID 및 PASSWORD
}
public void add(User user) throws ClassNotFoundException,SQLException{
Class.forName("org.gjt.mm.mysql.Driver");
Connection c = DriverManager.getConnection("jdbc:mysql://localhost/springbook","root","1234");
String sql = "insert into users(id,name,password) values(?,?,?)";
PreparedStatement ps = c.prepareStatement(sql);
ps.setString(1, user.getId());
ps.setString(2,user.getName());
ps.setString(3,user.getPassword());
ps.execute();
ps.close();
c.close();
}
public User get(String id) throws ClassNotFoundException,SQLException{
Class.forName("org.gjt.mm.mysql.Driver");
Connection c = DriverManager.getConnection("jdbc:mysql://localhost/springbook","root","1234");
String sql = "select * from users where id = ?";
   PreparedStatement ps = c.prepareStatement(sql);
   ps.setString(1, id);
   ResultSet rs = ps.executeQuery();
   rs.next();
   User user = new User();
   user.setId(rs.getString("id"));
   user.setName(rs.getString("name"));
   user.setPassword(rs.getString("password"));
   
   rs.close();
   ps.close();
   c.close();
   
   return user;
   
}
public static void  main(String[] args) throws ClassNotFoundException,SQLException{
UserDao dao = new UserDao();
/*
User user = new User();
user.setId("admin");
user.setName("tommmy");
user.setPassword("1234");
dao.add(user);
*/
User user2= dao.get("admin");
System.out.println(user2.getId()+","+user2.getName()+","+user2.getPassword());
}
}

테스트를 위해 메인하나 정의한 후 테스트완료함^^

그럼 이걸 가지고 하나씩 하나씩 리팩토링해보장..^^ 다 뭐를 위해? 스프링을 위해^^;;

[서블릿기초] 5. 초간단 MVC 만들어보기 JSP기초정리 / JSP

2010/01/09 20:13

복사 http://blog.naver.com/pksaladin/30077871911

앞서 설명한 이론상의 설명으로는 뭔가 부족하다는 분들을 위해서 이제는 직접 코딩해보고 느껴보도록 하겠습니다. 일단 모델1을 작성해보고 이것을 모델2로 바꿔보는 형식으로 작성하겠습니다.

잘 따라서 해보시길 바랍니다.


먼저 모델 1 패턴으로 간단하게 텍스트 필드에 값을 받고 결과값을 출력받는 예제를 만들어보겠습니다.


 모델 1 패턴


index.html


<!DOCTYPE html PUBLIC "-//W3C//DTD HTML 4.01 Transitional//EN" "http://www.w3.org/TR/html4/loose.dtd">
<html>
<head>
<meta http-equiv="Content-Type" content="text/html; charset=EUC-KR">
<title>Insert title here</title>
</head>

<body>
<form action="result.jsp" method="post">

<table border="1">
<tr>
<td>당신의 이름은?</td>

</tr>
<tr>
<td><input type=text size="10" name="name"></input>
<input type="submit" value="확인"></input></td>
</tr>
</table>
</form>
</body>
</html>


result.jsp


<%@ page language="java" contentType="text/html; charset=EUC-KR"
    pageEncoding="EUC-KR"%>
   <%
  String name1 = (String)request.getParameter("name");//앞에서 쓴 name값을 받아서 name1에 전달합니다.
   %>

<!DOCTYPE html PUBLIC "-//W3C//DTD HTML 4.01 Transitional//EN" "http://www.w3.org/TR/html4/loose.dtd">
<html>
<head>
<meta http-equiv="Content-Type" content="text/html; charset=EUC-KR">
<title>Insert title here</title>
</head>
<body>
당신의 이름은 <%=name1 %> //name1을 출력합니다.
</body>
</html>


<결과화면>


원하는 이름을 쓰고 확인을 누르면


다음과 같이 출력됩니다.


별다른 과정없이 위에 URL을보시면 다이렉트로 가게 됩니다.

이제 이 예제를 모델2로 바꿔보겠습니다.


 MVC 모델 2 패턴


index.html


기존의 인덱스 화면의 소스에서 form action부분을 바꿔주시면됩니다.

<form action="jungtest.bo" method="post">

jungtest.bo 이부분은 매핑 으로 생성한 가상 주소를 말합니다. 이제는 좀 아시겠죠

이제 web.xml로 자동으로 가야겠죠. 매핑을 지정해주러요

WEB-INF 폴더안에 web.xml이 보이실겁니다. 이부분을 열어서


 <servlet>
    <description></description>
    <servlet-name>jungtest</servlet-name>
    <servlet-class>jung.test_result.test</servlet-class> //풀경로를 적어줍니다. 제가 정한 패키지 위치는 jung 안에 test_result 안에 test.java파일입니다. 패키지 생성법은 이클립스기준 src클릭하시고 오른쪽버튼을 클릭하시면 패키지를 클릭하시면됩니다. 다른방법으로는 직접 src폴더에 생성해주시면 됩니다.
  </servlet>


  <servlet-mapping>
    <servlet-name>jungtest</servlet-name>
    <url-pattern>/jungtest.bo</url-pattern>
  </servlet-mapping>


이부분을 추가 합니다. 매핑분석 편을 보셨다면 쉽게 이해가 되실겁니다. 결과적으로

jungtest.bo == jung.test_result.test 이거겠죠.

매핑 설정이 끝났다면 이제 매핑으로 설정된 test.java파일을 작성해보도록하겠습니다.


test.java

package jung.test_result;

import java.io.IOException;

import javax.servlet.RequestDispatcher;
import javax.servlet.ServletException;
import javax.servlet.http.HttpServlet;
import javax.servlet.http.HttpServletRequest;
import javax.servlet.http.HttpServletResponse;

public class test extends HttpServlet {
 private static final long serialVersionUID = 1L;
       
  //앞서 index.html에서지정한 method가 post로 기정했기 때문에 doPost로 가게 됩니다.

 
 protected void doPost(HttpServletRequest request, HttpServletResponse response) throws ServletException, IOException {
  // TODO Auto-generated method stub
  
  String name= request.getParameter("name");  //네임값을 넘겨 받고
  request.setAttribute("name1", name); // jsp에서 나중에 읽을 수있도록 속성값을 지정함
  RequestDispatcher view=
   request.getRequestDispatcher("result.jsp");//지정된 경로에 위치한 jsp파일에 작업을 부탁하기위해 RequestDispatcher인스턴스
  view.forward(request, response); //RequestDispatcher는 컨테이너에게 jsp를 준비하라고 요청 jsp에게 값객체를 넘김
  
 }

}


result.jsp


<%@ page language="java" contentType="text/html; charset=EUC-KR"
    pageEncoding="EUC-KR"%>
   <%
      String name1 =(String)request.getAttribute("name1"); //지정된 속성값을 받음
   %>

<!DOCTYPE html PUBLIC "-//W3C//DTD HTML 4.01 Transitional//EN" "http://www.w3.org/TR/html4/loose.dtd">
<html>
<head>
<meta http-equiv="Content-Type" content="text/html; charset=EUC-KR">
<title>Insert title here</title>
</head>
<body>
<table border="1">
<tr>
<td>당신의 이름은 <%=name1 %>입니다</td> //출력
</tr>


</table>
</body>
</html>


이제 실행을 해봅니다. 같은 결과 값이 나온다면 성공입니다.

그리고 URL을 주목해 봅니다. 기존의 모델1에서는 정확한 경로가 나왔지만 매핑을 해준결과로 저렇게 jungtest.bo로 나왔습니다. 쉽게 말해서 지정된 경로의 닉네임을 만들어준 셈이죠.


모델1의 경우 html과 jsp파일 두개로 끝이 났습니다.

모델2의 경우는 html에서 값을 넘기면 바로jsp로 가는게 아니라 매핑을 통하여 test.java쪽에 들렀다가

test.java쪽에서 지정한 페이지인 result.jsp로 가게 하도록 해놓았습니다.


직접만들어 보니까. 슬슬 감이 잡히지 않습니까?


이 포스트를..

덧글 1개 엮인글 쓰기

'모바일웹 > Tip&Tech' 카테고리의 다른 글

모바일웹 관련 rlqhs CSS  (0) 2013.05.23
모바일웹 관련 팁앤테크  (0) 2013.05.23
[펌]모바일 웹 환경 설정 하기  (0) 2012.09.18
추천 웹 사이트  (0) 2011.03.27

이 코드는 구글맵경위도좌표계(wgs84), 다음/콩나물맵(변형 tm), 네이버맵(katech 또는 tm128) 좌표계를
서로 변환해 주는 소스코드입니다.
이 코드는 aero, hyosang 님등의 블로그를 참고로 만들었으며,
오픈소스와 카피레프트의 정신에 따라 공개하니 자유롭게 사용하시기 바랍니다.

자세한 이론적인 배경은 aero 님 블로그 (http://aero.sarang.net/map/analysis.html) 을 참고해 주세요.
사실 이런 기능은 이미 야후나 다음 맵 오픈 API 등을 통하여 이미 온라인 서비스하고 있지만
안드로이드 앱 내에 포함시키는 경우에 간혹 필요할 수도 있습니다.

사용 가능한 메소드는 다음과 같습니다. 참고로, 질문/답변 란에 올려져 있는 원래 코드를 static 메소드들로 변환하였습니다.

public static GeoPoint convert(int srctype, int dsttype, GeoPoint in_pt); //srctype,dsttype 은 GEO(경위도), TM, KATEC 중 하나
public static double getDistancebyGeo(GeoPoint pt1, GeoPoint pt2); //wgs84(경위도) 좌표계에서 두 지점 간 거리
public static double getDistancebyKatec(GeoPoint pt1, GeoPoint pt2); //tm 좌표계에서 두 지점 간 거리
public static double getDistancebyTm(GeoPoint pt1, GeoPoint pt2); //katec 좌표계에서 두 지점 간 거리

다음은 테스트 코드입니다. (여기서 GeoPoint 는 구글맵 API 의 클래스가 아닌 자체 제작한 간단한 클래스입니다)

GeoPoint in_pt = new GeoPoint(127., 38.);
System.out.println("geo in : xGeo="  + in_pt.getX() + ", yGeo=" + in_pt.getY());
GeoPoint tm_pt = GeoTrans.convert(GeoTrans.GEO, GeoTrans.TM, in_pt);
System.out.println("tm : xTM=" + tm_pt.getX() + ", yTM=" + tm_pt.getY());
GeoPoint katec_pt = GeoTrans.convert(GeoTrans.TM, GeoTrans.KATEC, tm_pt);
System.out.println("katec : xKATEC=" + katec_pt.getX() + ", yKATEC=" + katec_pt.getY());
GeoPoint out_pt = GeoTrans.convert(GeoTrans.KATEC, GeoTrans.GEO, katec_pt);
System.out.println("geo out : xGeo=" + out_pt.getX() + ", yGeo=" + out_pt.getY());
GeoPoint in2_pt = new GeoPoint(128., 38.);
System.out.println("geo distance between (127,38) and (128,38) =" + GeoTrans.getDistancebyGeo(in_pt, in2_pt) + "km");

마지막으로, 코드를 개발하고 오류를 수정하도록 동기를 부여해주시고 격려해주신
SGLEE님, 자바개발자님께도 감사의 말씀을 드립니다.

덧말: 본래는 aero 님 블로그의 매쉬업 서비스를 안드로이드에서 구현하면 참 좋겠다는 생각이 들어서
osmand 와 같은 오픈소스 프로그램을 들여다보다가 이 코드를 구현하게 되었습니다.


구글 맵은 위도/경도를 바로 사용해 위치 표시가 가능하고,
네이버 맵은 카텍좌표계...TM인가... 지리학엔 문외한이라 잘 모르겠고...
암튼 둘이 좌표계가 달라서 두 지도에서 같은 위치를 표시하려면 좌표계 변환을 해야 한다.


그런데...

네이버에서도 위/경도를 지원하기 시작했더란 이야기-_-a


그래도 만들어놓은게 아까우니 포스팅은 하자...라는 심보..?


참고 포스팅의 php소스를 javascript로 변환하고 값 전달 방식만 약간씩 바꿨습니다.

함수중에 거리를 구하는 함수도 보이는데 맞는지는 모르겠습니다.. 뭘로 테스트를 해봐야 하는지도 모르겠고-_-a


js는 여기 있구요,

사용법은,

GEO <-> KATEC 변환 (Language : javascript)
  1. <script src="GeoTrans.js"></script>
  2. <script>
  3. var geo = new GeoTrans();
  4.  
  5. geo.init("katec", "geo");
  6. var pt = new Point(306151, 556443);
  7. var out_pt = geo.conv(pt);
  8.  
  9. alert("경도 : "+out_pt.x+"\n위도 : "+out_pt.y);
  10.  
  11. //역변환
  12. geo.init("geo", "katec");
  13. out_pt = geo.conv(out_pt);
  14.  
  15. alert("[KATEC 좌표]\nx : "+out_pt.x+"\ny : "+out_pt.y);
  16. </script>

이런식으로 사용하시면 되겠습니다
FAQ : 프로그래밍적으로 키보드 숨김/감춤/보기. 액티비티 시작시 키보드 숨김/감춤/보기, EditText선택시 키보드 안뜨게하기 등 소프트 키보드 동작 관련 질문에 대한 답변

1. 키보드 감추기
EditText editText = (EditText) findViewById(R.id.myEdit);
InputMethodManager imm = (InputMethodManager)getSystemService(Context.INPUT_METHOD_SERVICE);
imm.hideSoftInputFromWindow(editText.getWindowToken(), 0);

2. 키보드 보여주기
EditText editText = (EditText) findViewById(R.id.myEdit);
InputMethodManager imm = (InputMethodManager) getSystemService(Context.INPUT_METHOD_SERVICE);
imm.showSoftInput(editText, InputMethodManager.SHOW_IMPLICIT);

3. 키보드 토글 - 위 두가지 방법으로 안되는 경우 다음과 같은 코드로 동작하는 경우가 있습니다.
imm.toggleSoftInputFromWindow(editText.getApplicationWindowToken(),  InputMethodManager.SHOW_FORCED, 0); 

4. 액티비티 시작시 자동으로 키보드 보여주기
AndroidManifest.xml의 activity 태그의 속성에 android:windowSoftInputMode="stateVisible" 혹은 "stateAlwaysVisible"삽입

5. 액티비티 시작시 자동으로 키보드 보여주지 않기
AndroidManifest.xml의 activity 태그의 속성에 android:windowSoftInputMode="stateHidden" 혹은 "stateAlwaysHidden" 삽입

6. 에디트 텍스트 선택해도 키보드 안뜨게 하기
EditText xml 속성에서 inputType 을 0으로 주면 안뜹니다.

반복되는 질문을 정리하는 FAQ 작업 진행중입니다. 키보드 동작 관련해서 정리할 글입니다. 
잘못된 부분이나 추가할 부분있으면 알려주세요.

Friday, October 16, 2009

ListView and ListActivity, with Layout Animation

In the article Layout Animation, list_layout_controller is included in layout, main.xml. In the last article ListView and ListActivity, ListView is implemented as ListActivity, without XML file for layout. How can apply the LayoutAnimationController.

In this article, the same visual effect of Layout Animation will be applied on ListView and ListActivity.


- Follow the last exercise, ListView and ListActivity.

- Same as Layout Animation, create the folder /res/anim and add the files list_layout_controller.xml and scale.xml.

list_layout_controller.xml

<layoutAnimation xmlns:android="http://schemas.android.com/apk/res/android"
android:delay="50%"
android:animation="@anim/scale" />


scale.xml
<set xmlns:android="http://schemas.android.com/apk/res/android"
android:interpolator="@android:anim/accelerate_interpolator">
<scale
android:fromXScale="0.1"
android:toXScale="1"
android:fromYScale="0.1"
android:toYScale="1.0"
android:duration="2000"
android:pivotX="10%"
android:pivotY="10%"
android:startOffset="100" />
</set>


- Modify AndroidListActivity.java to add two lines of code in onCreate()
 @Override
protected void onCreate(Bundle savedInstanceState) {
// TODO Auto-generated method stub
super.onCreate(savedInstanceState);

setListAdapter(new ArrayAdapter<String>(this,
android.R.layout.simple_list_item_1, COUNTRIES));
getListView().setTextFilterEnabled(true);

LayoutAnimationController controller
= AnimationUtils.loadLayoutAnimation(
this, R.anim.list_layout_controller);
getListView().setLayoutAnimation(controller);

}

That's!

AnimationSet
extends Animaiton
java.lang.Object
android.view.animation.Animation
android.view.animation.AnimationSet

제 설명이 정확한 것인지 모르겠지만..

AnimationSet 클래스는 복수의 에니메이션(트윈을) 하나의 에니메이션으로 보이게 끔 조합시키는 클래스이다. 
Animation 추상클래스에서 생성된 다른 객체를 (예: AlphaAnimation ) values( Attributes, Constants )를 상속받는다.

생성자로는(Constructors)
AnimationSet( Context context, Attributes attrs )  <-xml 의 리소스 값들을 인플레이션하여 받음
위 생성자에서는 많이 보는 Attributes attrs 은 AttributeSet 인터페이스의 xml 리소스에 의한 전개 값 을 갔는 다는 뜻이다.

AnimationSet( boolean shareInterpolator ) <- 이것은 물론 코드상의 값을 받는다는 뜻임.
                                                             -->여기서 ShareInterpolator 단어의 Interplolator는 흠.. 머 끼어드다 정도으 뜻을 보면 좋을것 같다.ㅎㅎ


public Method들에 대해 알아보자...

void  addAnimation( Animation a ) 
-> 기능은 예를 들어 AlphaAnimation, RotateAnimaiton 클래스들로 생성된  Animation 객체를 인자로 받고 
     추가된 에니메이션은 순서대로 적용이 됩니다. 또한 Animation 클래스는 abstract 클래스임을 잊지 말자.

 
android.view.animation

public abstract class
Animation Class


예를 들어 아래와 같은 구현부가 있다면.

      AnimationSet set = new AnimationSet(true);
  2. Animation animation = new AlphaAnimation(0.0f, 1.0f);
      animation.setDuration(100);
      set.addAnimation(animation);
      animation = new TranslateAnimation(

      Animation.RELATIVE_TO_SELF, 0.0f,Animation.RELATIVE_TO_SELF, 0.0f,

            Animation.RELATIVE_TO_SELF, -1.0f,Animation.RELATIVE_TO_SELF, 0.0f

        );

animation.setDuration(100);        

api를 보면

2번째 라인에서 Animation클래스와 AlphaAnimation 는 다른 클래스이고 Animation 에 당연히 AlphaAnimation(,) 생성자가 없다. 보다 보니 Animation는 추상클래스 이네여;;; 그래서 다른 클래스의 객체 생성이 가능한 것이죠..

Animation 클래스의 다이렉트 서브클래스로는 : 
AlphaAnimationAnimationSetRotateAnimationScaleAnimationTranslateAnimation


또한  animation 패키지에 속한 에니메이션 관련 클래스들을 보면 단일 뷰(객체)에 대한 적용과 리스트뷰(listView)와 그리드뷰(GridView) 와 같이 Animaiton 객체 생성 후(다수 Animation 객체생성) AnimationSet 클래스로 인해 에니메이션 조합 후(멋진 에니이션 표현을 위함) 레이아웃 콘트롤러(GridLayoutAnimationController, LayoutAnimationController) 클래스들에게 다시 적용되어 각 리스트 뷰들이 적용이 가능하도록 되어있음..
이는 리스트들 하나하나에게 에니메이션을 적용하기 위한 방법임.. 흠.. 자세한 것은  API 를 좀더 자세히 본 후 설명하여야 겠음..
한 마디로 단일뷰와 리스트형식의 뷰에 에니메이션을 적용하기 위한 방법을 제공한다.

android.view.animation  구성

Interface

Animation.AnimationListener

An animation listener receives notifications from an animation. 

Interpolator

An interpolator defines the rate of change of an animation. 


Classes

AccelerateDecelerateInterpolator

An interpolator where the rate of change starts and ends slowly but accelerates through the middle. 

AccelerateInterpolator

An interpolator where the rate of change starts out slowly and and then accelerates. 

AlphaAnimation

An animation that controls the alpha level of an object. 

Animation

Abstraction for an Animation that can be applied to Views, Surfaces, or other objects. 

Animation.Description

Utility class to parse a string description of a size. 

AnimationSet

Represents a group of Animations that should be played together. 

AnimationUtils

Defines common utilities for working with animations. 

AnticipateInterpolator

An interpolator where the change starts backward then flings forward. 

AnticipateOvershootInterpolator

An interpolator where the change starts backward then flings forward and overshoots the target value and finally goes back to the final value. 

BounceInterpolator

An interpolator where the change bounces at the end. 

CycleInterpolator

Repeats the animation for a specified number of cycles. 

DecelerateInterpolator

An interpolator where the rate of change starts out quickly and and then decelerates. 

GridLayoutAnimationController

A layout animation controller is used to animated a grid layout's children. 

GridLayoutAnimationController.AnimationParameters

The set of parameters that has to be attached to each view contained in the view group animated by the grid layout animation controller. 

LayoutAnimationController

A layout animation controller is used to animated a layout's, or a view group's, children. 

LayoutAnimationController.AnimationParameters

The set of parameters that has to be attached to each view contained in the view group animated by the layout animation controller. 

LinearInterpolator

An interpolator where the rate of change is constant  

OvershootInterpolator

An interpolator where the change flings forward and overshoots the last value then comes back. 

RotateAnimation

An animation that controls the rotation of an object. 

ScaleAnimation

An animation that controls the scale of an object. 

Transformation

Defines the transformation to be applied at one point in time of an Animation. 

TranslateAnimation

An animation that controls the position of an object. 

출처 : http://withwani.tistory.com/160

Android의 ListView에서 HeaderView와 FooterView를 사용하는 것은 이전 포스트에서 정리를 하였다. 이번 포스트에서는 Thread를 사용하여 HeaderView와 FooterView를 실행했을 때 List item을 갱신 또는 추가 하는 부분을 해볼까 한다. 코드 구현 시 비교 대상은 Twitter Client로 이야기 목록에서의HeaderView와 FooterView을 흉내 내어 볼 것이다.


우선 Header와 Footer를 구현 할 Activity와 xml layout 파일을 구현해 보자.

접기

MoreListThreadExample.java

public class MoreListThreadExample extends Activity {
  

public static final int INC_COUNT = 15; // 추가로 보여줄 item 개수

MoreItemAdapter adtMore;

ListView lvMore;

View footer, header;

ArrayList<String> datas = new ArrayList<String>();

boolean justOnce = true, isHeader = false;

int footerId, headerId;


@Override

        public void onCreate(Bundle savedInstancestate) {

              super.onCreate(savedInstancestate);

              setContentView(R.layout.ui_listview2);


              System.out.println("Entered onCreate()");


              lvMore = (ListView)findViewById(R.id.lv_morelist);

              footer = getLayoutInflater().inflate(R.layout.ui_sub_footer, null, false);

              header = getLayoutInflater().inflate(R.layout.ui_sub_header, null, false);


              getData();

       }              


/* (non-Javadoc)

* @see android.app.Activity#onResume()

*/

@Override

protected void onResume() {

System.out.println("Entered onResume()");


              adtMore = new MoreItemAdapter(this, R.layout.ui_sub_list, datas);

              lvMore.addFooterView(footer);

              lvMore.addHeaderView(header);

              lvMore.setAdapter(adtMore);

              lvMore.setSelection(lvMore.getHeaderViewsCount());

              lvMore.setScrollbarFadingEnabled(true);


              headerId = 0;

              footerId = lvMore.getHeaderViewsCount()+datas.size();


              justOnce = false;

       super.onResume();

}

}

접기


접기

ui_listview2.xml

<?xml version="1.0" encoding="utf-8"?>

<LinearLayout xmlns:android="http://schemas.android.com/apk/res/android"

android:layout_width="fill_parent"

android:layout_height="fill_parent"

>

<ListView

        android:id="@+id/lv_morelist"

android:layout_width="fill_parent"

android:layout_height="fill_parent"

/>

</LinearLayout>

접기


접기

ui_sub_footer.xml
 

<?xml version="1.0" encoding="utf-8"?>

<LinearLayout

xmlns:android="http://schemas.android.com/apk/res/android"

android:layout_width="fill_parent"

android:layout_height="wrap_content"

android:gravity="center"

>

<ImageView

android:id="@+id/iv_list_footer_loading"

android:layout_width="wrap_content"

android:layout_height="wrap_content"

/>


<TextView

android:id="@+id/tv_list_footer"

android:layout_width="wrap_content"

android:layout_height="50dip"

android:layout_marginLeft="10dip"

android:gravity="center"

android:text="More item ..."

android:textAppearance="?android:attr/textAppearanceLarge"

/>

</LinearLayout>

접기


접기

ui_sub_header.xml
 

<?xml version="1.0" encoding="utf-8"?>

<LinearLayout

xmlns:android="http://schemas.android.com/apk/res/android"

android:layout_width="fill_parent"

android:layout_height="wrap_content"

android:gravity="center"

>

<ImageView

android:id="@+id/iv_list_header_loading"

android:layout_width="wrap_content"

android:layout_height="wrap_content"

/>


<TextView

android:id="@+id/tv_list_header"

android:layout_width="wrap_content"

android:layout_height="50dip"

android:layout_marginLeft="10dip"

android:gravity="center"

android:text="Refresh ..."

android:textAppearance="?android:attr/textAppearanceLarge"

/>

</LinearLayout>

접기

사용된 변수 중 justOnce flag는 onScroll() event에서 Header및 Footer에 한 번 이상 접근하는 것을 막기 위해 사용한 flag 변수이다.


ListView에 item을 보여줄 Adapter는 Android 내장 adapter를 사용하지 않고 ArrayAdapter를 extends 해서 새로 구현하였다. 이유는 후에 item을 추가하기 위해 adapter에 add() method를 사용해야 하는데 왜인지 ListActivity를 사용하거나 Android 내장 adapter를 사용하니 add() method를 사용할 수 없었다. 뭐… 무슨 이유가 있겠지… ^^라고 생각하며 시간 관계상 그냥 만들어서 사용해버렸다.

접기

class MoreItemAdapter extends ArrayAdapter<String> { 

Context ctx;

List<String> mDatas;

int resId;


public MoreItemAdapter(Context context, int textViewResourceId, List<String> items) {

super(context, textViewResourceId, items);

ctx = context;

mDatas = items;

resId = textViewResourceId;

}


/* (non-Javadoc)

* @see android.widget.ArrayAdapter#getView(int, android.view.View, android.view.ViewGroup)

*/

@Override

public View getView(int position, View convertView, ViewGroup parent) {

View row = convertView;

TextView holder;


if(row == null) {

        LayoutInflater inflator = (LayoutInflater)ctx.getSystemService(Context.LAYOUT_INFLATER_SERVICE);

                       row = inflator.inflate(resId, null);

                        holder = (TextView)row.findViewById(R.id.tv_list_item);

                        row.setTag(holder);

        } else {

                 holder = (TextView)row.getTag();

        }


final String str = mDatas.get(position);


if(str != null) {

holder.setText(str);

}


return row;

}

}

접기


Adapter는 간단하게 inner class로 만들었으며 생성자의 인수 값으로 Context와 Sub View의 resourceID, 그리고 String형 배열 item을 받아 들인다. String 형 배열 item은 mString으로 테스트를 위해 만들어서 사용하였다.


그 다음으로 ListView adpter와 item 집합인 datas를 갱신하고 추가하는데 사용하는 몇 가지 method와 item을 load할 때 사용할 Thread로 AsyncTask를 만들어 보도록 한다.

우선 method를 구현해 보도록 하자.

접기

getData() method : Footer를 선택하면 현재 item의 수에 추가로 item을 더하는 method. 여기서는 onCreate() method에서 한 번만 실행하게 함.

private void getData() {

System.out.println("Entered getDatas()");


/// Method 1. 추가 개수만큼 처음부터 다시 가져와서 보여주기

        int cnt = (datas.isEmpty()) ? 0 : datas.size();

        if(cnt != 0) datas.clear();

        cnt = cnt + INC_COUNT;


        for(int i=0; i<cnt; i++) {

                if(i < mStrings.length)

                        datas.add(mStrings[i]);

        }

}

접기

접기

resetList() method : 새로운 adapter를 생성 및 추가 후 ListView의 selection을 1로 설정하면서 Header를 숨기게 함.

private void resetList() {

System.out.println("Entered resetList()");


adtMore = new MoreItemAdapter(this, R.layout.ui_sub_list, datas);

lvMore.setAdapter(adtMore);

lvMore.setSelection(lvMore.getHeaderViewsCount());


footerId = lvMore.getHeaderViewsCount()+datas.size();

}

접기

접기

refreshList() method : Adapter를 갱신하고 onClick() 혹은 onScroll event를 위해 footerId를 설정함. footerId는 list item의 개수에 HeaderView의 개수를 더한 값이다. ListView의 item postion은 0부터 시작하기 때문에 header가 존재하면 header가 0이 되고 footer는 위의 계산 값이 된다.

private void refreshList() {

System.out.println("Entered refreshList()");

adtMore.notifyDataSetChanged();


footerId = lvMore.getHeaderViewsCount()+datas.size();

}

접기

접기

LongProgress AsyncTask : Header와 Footer로 onClick 또는 onScroll event로 접근했을 때 ListView의 item을 추가 혹은 갱신할 때 사용하는 Thread. 주석 중에 Method1은 ProgressDialog를 사용하는 방법이고 Method2는 AnimationDrawable를 header 및 footer에 추가하는 방법이다. Twitter는 Method2를 사용하고 있기 때문에 그 방법을 채택하기로 한다.

class LongProgress extends AsyncTask<Void, Void, Void> {

ProgressDialog dialog = new ProgressDialog(MoreListThreadExample.this);


int cnt, start, end;

String view;

ArrayList<String> temp;


public LongProgress(String viewName) {

super();

view = viewName;

}


/* (non-Javadoc)

* @see android.os.AsyncTask#onPreExecute()

*/

@Override

protected void onPreExecute() {

/// Method 1. ProgressDialog 사용

//                        dialog.setMessage("Loading data...");

//                        dialog.show();


/// Method 2. View에 Spin animation 사용

if(view == "header") {

System.out.println("Header spin animation start.");

headerSpinAnim.start();

} else if(view == "footer") {

System.out.println("Footer spin animation start.");

footerSpinAnim.start();

}


temp = new ArrayList<String>();

super.onPreExecute();

}


@Override

protected Void doInBackground(Void... params) {


synchronized (datas) {

/// Method 2. 추가 개수만큼 adapter에 붙여 넣기.

cnt = (datas.isEmpty()) ? 0 : datas.size();

System.out.println("previous datas count = "+datas.size());


if (view == "header") { /// Header 쪽으로 스크롤링 했을 때... 아이템 및 리스트 재설정

        start = 0;

        end = cnt;

} else if(view == "footer") { /// Footer 쪽으로 스크롤링 했을 때... 아이템 추가 및 리스트 갱신

        start = cnt;

end = cnt + INC_COUNT;

}

System.out.println("Start = "+start+", end = "+end);


for(int i=start; i<end; i++) {

        try {

Thread.sleep(50);

} catch (InterruptedException e) {

e.printStackTrace();

}

                temp.add(mStrings[i]);

}

}

return null;

}


/* (non-Javadoc)

* @see android.os.AsyncTask#onPostExecute(java.lang.Object)

*/

@Override

protected void onPostExecute(Void result) {

System.out.println("Enterd onPostExecute()! result = "+result+", temp size = "+temp.size());


if (view == "header") { /// Header 쪽으로 스크롤링 했을 때... 아이템 및 리스트 재설정

System.out.println("Viewing Header...Called resetList()");

datas = null;

datas = temp;

        resetList();

} else if(view == "footer") { /// Footer 쪽으로 스크롤링 했을 때... 아이템 추가 및 리스트 갱신

        System.out.println("Viewing Footer...Called refreshList()");

        if(!temp.isEmpty()) {

                for(int i=0; i<temp.size(); i++) {

        adtMore.add(temp.get(i));

//                                 datas.add(temp.get(i)); /// adapter 에 추가하면 자동적으로 늘어남. 즉, 중복 추가라서 삭제함.

}

        }

refreshList();

}


System.out.println("result datas count = "+datas.size()+", adtMore size = "+adtMore.getCount());


/// Method 1. ProgressDialog 사용

//                        dialog.dismiss();


/// Method 2. View에 Spin animation 사용

if(view == "header") {

System.out.println("Header spin animation stop.");

headerSpinAnim.stop();

} else if(view == "footer") {

System.out.println("Footer spin animation stop.");

footerSpinAnim.stop();

}


justOnce = false;

super.onPostExecute(result);

}

}

접기

접기

loadData() method : Header와 Footer에 접근하여 event가 발생했을 때 AsyncTask를 실행하여 item을 추가 및 갱신 시킬 때 사용하는 method.

private void loadData(String who) {

System.out.println("Entered loadData(), who = "+who);

new LongProgress(who).execute();

}

접기

접기

OnItemClickListener : 만약 Header와 Footer를 onClick() event를 이용해서 동작시킬 때 사용. 여기서는 사용하지 않는다.

OnItemClickListener mClickListener = new OnItemClickListener() {

@Override

public void onItemClick(AdapterView<?> parent, View view, int position, long id) {

System.out.println("position = "+position+", datas.size() = "+datas.size());


if(position == footerId) {

if(!justOnce) {

System.out.println("Last position!!!!!!!!!!!!!!!!!!!!!!!!!!!!!!!!!!!!!!!!!!");

justOnce = true;

loadData("footer");

}

} else if(position == headerId) {

if(!justOnce) {

System.out.println("First position!!!!!!!!!!!!!!!!!!!!!!!!!!!!!!!!!!!!!!!!!!");

justOnce = true;

loadData("header");

}

}

}

};

접기

접기

OnScrollListener : ListView에서 onScroll() event를 통해 Header와 Footer를 동작시키기 위해 필요한 listener.

OnScrollListener mOnScrollListener = new OnScrollListener() {


@Override

public void onScrollStateChanged(AbsListView view, int scrollState) {

// TODO Auto-generated method stub

}


@Override

public void onScroll(AbsListView view, int firstVisibleItem, int visibleItemCount, int totalItemCount) {

//                        System.out.println("first : "+firstVisibleItem+" items : "+visibleItemCount+" last : "+totalItemCount);

if((firstVisibleItem+visibleItemCount) == totalItemCount){ /// footer

if(!justOnce) {

System.out.println("Last position!!!!!!!!!!!!!!!!!!!!!!!!!!!!!!!!!!!!!!!!!!");

justOnce = true;

loadData("footer");

}

} else if((firstVisibleItem == 0)) { /// header

if(!justOnce) {

System.out.println("First position!!!!!!!!!!!!!!!!!!!!!!!!!!!!!!!!!!!!!!!!!!");

justOnce = true;

isHeader = true;

//                                        loadData("header"); // Touch event에서 손을 떼었을 때 이벤트 발생하게끔 onTouch로 넘김

}

} else {

//                                justOnce = false;

isHeader = false;

}


}

};

접기

접기

OnTouchListener : Twitter를 흉내내기 위해 Header에서 onScroll() event에서 Thread를 발생시키지 않고 onScroll() event 체크 후 onTouch() event에서 ACTION_UP 시에(Touch 후 손을 떼었을 때) 발생시키기 위해 추가한 listener.

OnTouchListener mOnTouchListener = new OnTouchListener() {


@Override

public boolean onTouch(View v, MotionEvent event) {

if(event.getAction() == MotionEvent.ACTION_UP) {

if(isHeader) {

System.out.println("onTouch() entered! event : "+event);

loadData("header");

isHeader = false;

}


}


return false;

}

};

접기


자, 준비가 거의 끝났기 때문에 추가로 해줘야 할 일 몇 개만 하면 실행이 가능하다. 새로 생성한 method를 onResume() method에 적용하고 spin animation을 사용하기 위해 animation xml 파일을 만들고 onCreate() method에 적용하자.

접기

@Override

protected void onResume() {

       System.out.println("Entered onResume()");


       adtMore = new MoreItemAdapter(this, R.layout.ui_sub_list, datas);

       lvMore.addFooterView(footer);

       lvMore.addHeaderView(header);

       lvMore.setAdapter(adtMore);

       lvMore.setSelection(lvMore.getHeaderViewsCount());

       lvMore.setScrollbarFadingEnabled(true);

       // lvMore.setOnItemClickListener(mClickListener); // Concept에 따라 사용 안함.

       lvMore.setOnScrollListener(mOnScrollListener);

       lvMore.setOnTouchListener(mOnTouchListener);


       headerId = 0;

       footerId = lvMore.getHeaderViewsCount()+datas.size();


       justOnce = false;

       super.onResume();

}

접기

접기

@Override

public void onCreate(Bundle savedInstancestate) {

       super.onCreate(savedInstancestate);

       setContentView(R.layout.ui_listview2);


       System.out.println("Entered onCreate()");


       lvMore = (ListView)findViewById(R.id.lv_morelist);

       footer = getLayoutInflater().inflate(R.layout.ui_sub_footer, null, false);

       /// Spin animation 관련 ImageView 구현

       loadFooter = (ImageView)footer.findViewById(R.id.iv_list_footer_loading);

       loadFooter.setBackgroundResource(R.anim.anim_spiner);

       footerSpinAnim = (AnimationDrawable)loadFooter.getBackground();

       header = getLayoutInflater().inflate(R.layout.ui_sub_header, null, false);

       /// Spin animation 관련 ImageView 구현

       loadHeader = (ImageView)header.findViewById(R.id.iv_list_header_loading);

       loadHeader.setBackgroundResource(R.anim.anim_spiner);

       headerSpinAnim = (AnimationDrawable)loadHeader.getBackground();


       getData();

}

접기

접기

anim_spiner.xml : drawable에 존재하는 image는 Android에서 사용하는 ProgressDialog spin image 혹은 popup sync image를 사용하면 된다.
 

<?xml version="1.0" encoding="utf-8"?>

<animation-list xmlns:android="http://schemas.android.com/apk/res/android"

android:oneshot="false">

<item android:drawable="@drawable/img_intro_loading_a"

android:duration="150">

</item>

<item android:drawable="@drawable/img_intro_loading_b"

android:duration="150">

</item>

<item android:drawable="@drawable/img_intro_loading_c"

android:duration="150">

</item>

<item android:drawable="@drawable/img_intro_loading_d"

android:duration="150">

</item>

<item android:drawable="@drawable/img_intro_loading_e"

android:duration="150">

</item>

<item android:drawable="@drawable/img_intro_loading_f"

android:duration="150">

</item>

<item android:drawable="@drawable/img_intro_loading_g"

android:duration="150">

</item>

<item android:drawable="@drawable/img_intro_loading_h"

android:duration="150">

</item>

<item android:drawable="@drawable/img_intro_loading_i"

android:duration="150">

</item>

<item android:drawable="@drawable/img_intro_loading_j"

android:duration="150">

</item>

<item android:drawable="@drawable/img_intro_loading_k"

android:duration="150">

</item>

<item android:drawable="@drawable/img_intro_loading_l"

android:duration="150">

</item>

</animation-list>

접기


자~ 모든 구현이 끝났다. Twitter의 이야기 메뉴의 ListView를 보이는 것만 보고 따라하기 한 것이므로 구조적인 문제는 좀 더 다듬어야 하겠지만 기본적은 구현 부는 정리가 되었으므로 나머지는 이걸 어떻게 효율적으로 변형하여 사용하느냐~ 가 될 것이다. 오늘 포스트와 같이 구현하면 다음과 같은 실행 화면을 볼 수 있다. 쓰고 보니 글이 참 길어진 것 같다. 1,2 편으로 나눌까? 했지만 필자가 그런 것을 싫어하므로 그냥 한 화면에서 볼 수 있게 적었다. 불편했다면 양해 바란다.

 초기 실행 시 화면

 Scroll up 한 후 Touch up 했을 때 화면

 Scroll down 했을 때 화면

세상에는 날고 기는 사람들이 참 많은 것 같다..


안드로이드 리스트 async(비동기) 구성 안드로이드

2010/09/01 23:33

복사 http://blog.naver.com/wono77/140113961263

출처: 

안드로이드 리스트 async(비동기) 구성


문서 히스토리:

2010년 9월 1일 글 최초 작성(비공개)

2010년 10월 1일 공개전환


원문:

http://android-developers.blogspot.com/2010/07/multithreading-for-performance.html?utm_source=feedburner&utm_medium=feed&utm_campaign=Feed:+blogspot/hsDu+(Android+Developers+Blog


안드로이드와 같은 모바일 프로그램이 웹의 자원을 가져올때,

여러 화면에 걸쳐 출력되는 리스트나 그리드뷰에 용량이 좀 되는 이미지들이 많이 존재한다면

전체 리소스를 가져오기 위해 대기시간이 엄청나게 길어지게 된다.


이 문제를 해결하기 위해 안드로이드 2.2에서는 아래와 같은 방법으로

자원을 대기하지 않고 한 화면단위로 async(비동기)하게 가져올 수 있다.


아래 예제에서 라디오 버튼을 제거한 async 리스트를 만드려면 시작부분을 아래처럼 고치면 된다.

첨부 파일을 참조할 것.


public class Async  extends ListActivity{
    /** Called when the activity is first created. */
 
  @Override
     protected void onCreate(Bundle savedInstanceState) {
         super.onCreate(savedInstanceState);
        
         setContentView(R.layout.imagelist);

         ImageDownloader.Mode mode = ImageDownloader.Mode.CORRECT;
         setListAdapter(new ImageAdapter());
         ((ImageAdapter) getListAdapter()).getImageDownloader().setMode(mode);
     }
}


예제에 대한 프로젝트 파일 첨부함. by wono77


도움이 되셨다면 댓글을 남겨주시는 당신은 센스쟁이~^^*


아래에 원문 글을 소개합니다.

----------------------------------------------------------------------------------------

Multithreading For Performance

[This post is by Gilles Debunne, an engineer in the Android group who loves to get multitasked. ? Tim Bray]

A good practice in creating responsive applications is to make sure your main UI thread does the minimum amount of work. Any potentially long task that may hang your application should be handled in a different thread. Typical examples of such tasks are network operations, which involve unpredictable delays. Users will tolerate some pauses, especially if you provide feedback that something is in progress, but a frozen application gives them no clue.

In this article, we will create a simple image downloader that illustrates this pattern. We will populate a ListView with thumbnail images downloaded from the internet. Creating an asynchronous task that downloads in the background will keep our application fast.

An Image downloader

Downloading an image from the web is fairly simple, using the HTTP-related classes provided by the framework. Here is a possible implementation:

static Bitmap downloadBitmap(String url) {
   
final AndroidHttpClient client = AndroidHttpClient.newInstance("Android");
   
final HttpGet getRequest = new HttpGet(url);

   
try {
       
HttpResponse response = client.execute(getRequest);
       
final int statusCode = response.getStatusLine().getStatusCode();
       
if (statusCode != HttpStatus.SC_OK) {
           
Log.w("ImageDownloader", "Error " + statusCode + " while retrieving bitmap from " + url);
           
return null;
       
}
       
       
final HttpEntity entity = response.getEntity();
       
if (entity != null) {
           
InputStream inputStream = null;
           
try {
                inputStream
= entity.getContent();
               
final Bitmap bitmap = BitmapFactory.decodeStream(inputStream);
               
return bitmap;
           
} finally {
               
if (inputStream != null) {
                    inputStream
.close();  
               
}
                entity
.consumeContent();
           
}
       
}
   
} catch (Exception e) {
       
// Could provide a more explicit error message for IOException or IllegalStateException
        getRequest
.abort();
       
Log.w("ImageDownloader", "Error while retrieving bitmap from " + url, e.toString());
   
} finally {
       
if (client != null) {
            client
.close();
       
}
   
}
   
return null;
}

A client and an HTTP request are created. If the request succeeds, the response entity stream containing the image is decoded to create the resulting Bitmap. Your applications' manifest must ask for the INTERNET to make this possible.

Note: a bug in the previous versions of BitmapFactory.decodeStream may prevent this code from working over a slow connection. Decode a new FlushedInputStream(inputStream) instead to fix the problem. Here is the implementation of this helper class:

static class FlushedInputStream extends FilterInputStream {
   
public FlushedInputStream(InputStream inputStream) {
       
super(inputStream);
   
}

   
@Override
   
public long skip(long n) throws IOException {
       
long totalBytesSkipped = 0L;
       
while (totalBytesSkipped < n) {
           
long bytesSkipped = in.skip(n - totalBytesSkipped);
           
if (bytesSkipped == 0L) {
                 
int byte = read();
                 
if (byte < 0) {
                     
break;  // we reached EOF
                 
} else {
                      bytesSkipped
= 1; // we read one byte
                 
}
           
}
            totalBytesSkipped
+= bytesSkipped;
       
}
       
return totalBytesSkipped;
   
}
}

This ensures that skip() actually skips the provided number of bytes, unless we reach the end of file.

If you were to directly use this method in your ListAdapter's getView method, the resulting scrolling would be unpleasantly jaggy. Each display of a new view has to wait for an image download, which prevents smooth scrolling.

Indeed, this is such a bad idea that the AndroidHttpClient does not allow itself to be started from the main thread. The above code will display "This thread forbids HTTP requests" error messages instead. Use the DefaultHttpClient instead if you really want to shoot yourself in the foot.

Introducing asynchronous tasks

The AsyncTask class provides one of the simplest ways to fire off a new task from the UI thread. Let's create an ImageDownloader class which will be in charge of creating these tasks. It will provide a download method which will assign an image downloaded from its URL to an ImageView:

public class ImageDownloader {

   
public void download(String url, ImageView imageView) {
           
BitmapDownloaderTask task = new BitmapDownloaderTask(imageView);
            task
.execute(url);
       
}
   
}

   
/* class BitmapDownloaderTask, see below */
}

The BitmapDownloaderTask is the AsyncTask which will actually download the image. It is started using execute, which returns immediately hence making this method really fast which is the whole purpose since it will be called from the UI thread. Here is the implementation of this class:

class BitmapDownloaderTask extends AsyncTask<String, Void, Bitmap> {
   
private String url;
   
private final WeakReference<ImageView> imageViewReference;

   
public BitmapDownloaderTask(ImageView imageView) {
        imageViewReference
= new WeakReference<ImageView>(imageView);
   
}

   
@Override
   
// Actual download method, run in the task thread
   
protected Bitmap doInBackground(String... params) {
         
// params comes from the execute() call: params[0] is the url.
         
return downloadBitmap(params[0]);
   
}

   
@Override
   
// Once the image is downloaded, associates it to the imageView
   
protected void onPostExecute(Bitmap bitmap) {
       
if (isCancelled()) {
            bitmap
= null;
       
}

       
if (imageViewReference != null) {
           
ImageView imageView = imageViewReference.get();
           
if (imageView != null) {
                imageView
.setImageBitmap(bitmap);
           
}
       
}
   
}
}

The doInBackground method is the one which is actually run in its own process by the task. It simply uses the downloadBitmap method we implemented at the beginning of this article.

onPostExecute is run in the calling UI thread when the task is finished. It takes the resulting Bitmap as a parameter, which is simply associated with the imageView that was provided to download and was stored in the BitmapDownloaderTask. Note that this ImageView is stored as a WeakReference, so that a download in progress does not prevent a killed activity's ImageView from being garbage collected. This explains why we have to check that both the weak reference and the imageView are not null (i.e. were not collected) before using them in onPostExecute.

This simplified example illustrates the use on an AsyncTask, and if you try it, you'll see that these few lines of code actually dramatically improved the performance of the ListView which now scrolls smoothly. Read Painless threading for more details on AsyncTasks.

However, a ListView-specific behavior reveals a problem with our current implementation. Indeed, for memory efficiency reasons, ListView recycles the views that are displayed when the user scrolls. If one flings the list, a given ImageView object will be used many times. Each time it is displayed the ImageView correctly triggers an image download task, which will eventually change its image. So where is the problem? As with most parallel applications, the key issue is in the ordering. In our case, there's no guarantee that the download tasks will finish in the order in which they were started. The result is that the image finally displayed in the list may come from a previous item, which simply happened to have taken longer to download. This is not an issue if the images you download are bound once and for all to given ImageViews, but let's fix it for the common case where they are used in a list.

Handling concurrency

To solve this issue, we should remember the order of the downloads, so that the last started one is the one that will effectively be displayed. It is indeed sufficient for each ImageView to remember its last download. We will add this extra information in the ImageView using a dedicated Drawable subclass, which will be temporarily bind to the ImageView while the download is in progress. Here is the code of our DownloadedDrawable class:

static class DownloadedDrawable extends ColorDrawable {
   
private final WeakReference<BitmapDownloaderTask> bitmapDownloaderTaskReference;

   
public DownloadedDrawable(BitmapDownloaderTask bitmapDownloaderTask) {
       
super(Color.BLACK);
        bitmapDownloaderTaskReference
=
           
new WeakReference<BitmapDownloaderTask>(bitmapDownloaderTask);
   
}

   
public BitmapDownloaderTask getBitmapDownloaderTask() {
       
return bitmapDownloaderTaskReference.get();
   
}
}

This implementation is backed by a ColorDrawable, which will result in the ImageView displaying a black background while its download is in progress. One could use a “download in progress” image instead, which would provide feedback to the user. Once again, note the use of a WeakReference to limit object dependencies.

Let's change our code to take this new class into account. First, the download method will now create an instance of this class and associate it with the imageView:

public void download(String url, ImageView imageView) {
     
if (cancelPotentialDownload(url, imageView)) {
         
BitmapDownloaderTask task = new BitmapDownloaderTask(imageView);
         
DownloadedDrawable downloadedDrawable = new DownloadedDrawable(task);
         imageView
.setImageDrawable(downloadedDrawable);
         task
.execute(url, cookie);
     
}
}

The cancelPotentialDownload method will stop the possible download in progress on this imageView since a new one is about to start. Note that this is not sufficient to guarantee that the newest download is always displayed, since the task may be finished, waiting in its onPostExecute method, which may still may be executed after the one of this new download.

private static boolean cancelPotentialDownload(String url, ImageView imageView) {
   
BitmapDownloaderTask bitmapDownloaderTask = getBitmapDownloaderTask(imageView);

   
if (bitmapDownloaderTask != null) {
       
String bitmapUrl = bitmapDownloaderTask.url;
       
if ((bitmapUrl == null) || (!bitmapUrl.equals(url))) {
            bitmapDownloaderTask
.cancel(true);
       
} else {
           
// The same URL is already being downloaded.
           
return false;
       
}
   
}
   
return true;
}

cancelPotentialDownload uses the cancel method of the AsyncTask class to stop the download in progress. It returns true most of the time, so that the download can be started in download. The only reason we don't want this to happen is when a download is already in progress on the same URL in which case we let it continue. Note that with this implementation, if an ImageView is garbage collected, its associated download is not stopped. A RecyclerListener might be used for that.

This method uses a helper getBitmapDownloaderTask function, which is pretty straigthforward:

private static BitmapDownloaderTask getBitmapDownloaderTask(ImageView imageView) {
   
if (imageView != null) {
       
Drawable drawable = imageView.getDrawable();
       
if (drawable instanceof DownloadedDrawable) {
           
DownloadedDrawable downloadedDrawable = (DownloadedDrawable)drawable;
           
return downloadedDrawable.getBitmapDownloaderTask();
       
}
   
}
   
return null;
}

Finally, onPostExecute has to be modified so that it will bind the Bitmap only if this ImageView is still associated with this download process:

if (imageViewReference != null) {
   
ImageView imageView = imageViewReference.get();
   
BitmapDownloaderTask bitmapDownloaderTask = getBitmapDownloaderTask(imageView);
   
// Change bitmap only if this process is still associated with it
   
if (this == bitmapDownloaderTask) {
        imageView
.setImageBitmap(bitmap);
   
}
}

With these modifications, our ImageDownloader class provides the basic services we expect from it. Feel free to use it or the asynchronous pattern it illustrates in your applications to ensure their responsiveness.

Demo

The source code of this article is available online on Google Code. You can switch between and compare the three different implementations that are described in this article (no asynchronous task, no bitmap to task association and the final correct version). Note that the cache size has been limited to 10 images to better demonstrate the issues.

Future work

This code was simplified to focus on its parallel aspects and many useful features are missing from our implementation. The ImageDownloader class would first clearly benefit from a cache, especially if it is used in conjuction with a ListView, which will probably display the same image many times as the user scrolls back and forth. This can easily be implemented using a Least Recently Used cache backed by a LinkedHashMap of URL to Bitmap SoftReferences. More involved cache mechanism could also rely on a local disk storage of the image. Thumbnails creation and image resizing could also be added if needed.

Download errors and time-outs are correctly handled by our implementation, which will return a null Bitmap in these case. One may want to display an error image instead.

Our HTTP request is pretty simple. One may want to add parameters or cookies to the request as required by certain web sites.

The AsyncTask class used in this article is a really convenient and easy way to defer some work from the UI thread. You may want to use the Handler class to have a finer control on what you do, such as controlling the total number of download threads which are running in parallel in this case.

출처 : http://mainia.tistory.com/555

(1) 여러 개의 멀티선택 옵션으로 표현해 주기


다중선택을 위한 다이얼로그 창을 띄운다. 리스트에는 제목과 radio button

이 있다. AlertDialog.Builder 클래스로 구현하며 리스트중 특정행을 클릭했을 때

이벤트는 setSingleChoiceItems 에 등록한다. Ok 버튼클릭 이벤트는

setPositiveButton , Cancel 버튼클릭 이벤트는 setNegativeButton 에 등록하고

기능을 구현하면 된다.


01 private void DialogSelectOption() {
02     final String items[] = { "item1", "item2", "item3" };
03     AlertDialog.Builder ab = new AlertDialog.Builder(DialogSample.this);
04     ab.setTitle("Title");
05     ab.setSingleChoiceItems(items, 0,
06         new DialogInterface.OnClickListener() {
07         public void onClick(DialogInterface dialog, int whichButton) {
08             // 각 리스트를 선택했을때 
09         }
10         }).setPositiveButton("Ok",
11         new DialogInterface.OnClickListener() {
12         public void onClick(DialogInterface dialog, int whichButton) {
13             // OK 버튼 클릭시 , 여기서 선택한 값을 메인 Activity 로 넘기면 된다.
14         }
15         }).setNegativeButton("Cancel",
16         new DialogInterface.OnClickListener() {
17         public void onClick(DialogInterface dialog, int whichButton) {
18             // Cancel 버튼 클릭시
19         }
20         });
21     ab.show();
22 }


(2) html 로 구현한 text 넣기


다이얼로그 창을 띄울 때 공지나 경고성 창이라면 내용이 들어갈것이다. 이 내용을

HTML 태그를 적용해 넣을 수가 있다. 색깔은 제대로 바뀌는 것 같은데 <strong>, <b>

등 글자에 대한 bold 처리가 한거나 안한거나 똑같이 보여서 제대로 표현되는지는

좀더 테스트 해봐야할것같다.

01 private void DialogHtmlView(){
02 AlertDialog.Builder ab=new AlertDialog.Builder(DialogSample.this);
03     ab.setMessage(Html.fromHtml("<STRONG><FONT color=#ff0000> " +
04         "Html 표현여부 " +"</FONT></STRONG><BR>
05   
06   
07 HTML 이 제대로 표현되는지 본다."));
08         ab.setPositiveButton("ok", null);
09         ab.show();
10 }


(3) 프로그레시브(Progress) 다이얼로그 구현


안드로이드에서 프로그레시브바를 구현할수 있다. 이것을 구현하기 위한 클래스는

ProgressDialog 를 사용해야 한다. 다이얼로그 창의 중지는 ProgressDialog

dismiss 를 쓰면된다.

1 private void DialogProgress(){
2        ProgressDialog dialog = ProgressDialog.show(DialogSample.this, "",
3                         "잠시만 기다려 주세요 ...", true);
4       // 창을 내린다.
5       // dialog.dismiss();
6 }
aaa


(4) Radio 버튼을 포함한 다중선택 다이얼로그 창


1번 예제와 비슷하게 Radio 버튼이 추가되어있는 다중선택 다이얼로그 창이다.

차이가 있다면 창 타이틀에 setIcon 을 써서 아이콘을 집어넣은것과

선택한 행 번호를 알아와 Toast 로 화면에 문자열을 표시해주는 내용이다.

창을 닫고 싶다면 onclick 함수에 넘어온 DialogInterface 객체로 cancel 함수를

호출해 닫으면 된다.

01 private void DialogRadio(){
02 final CharSequence[] PhoneModels = {"iPhone", "Nokia", "Android"};
03         AlertDialog.Builder alt_bld = new AlertDialog.Builder(this);
04         alt_bld.setIcon(R.drawable.icon);
05         alt_bld.setTitle("Select a Phone Model");
06         alt_bld.setSingleChoiceItems(PhoneModels, -1, new DialogInterface.OnClickListener() {
07             public void onClick(DialogInterface dialog, int item) {
08                 Toast.makeText(getApplicationContext(), "Phone Model = "+PhoneModels[item], Toast.LENGTH_SHORT).show();
09                 // dialog.cancel();
10             }
11         });
12         AlertDialog alert = alt_bld.create();
13         alert.show();
14 }


(5) 선택에 따른 로직구현을 위한 다이얼로그 창 구현


예를 들어 Yes/No 중 하나를 선택함으로서 특정 기능을 구현해주고자 할 때

쓰일만한 예제이다. 샘플에서는 Yes/No 일때를 구분하여 코드를 구현할수

있도록 나누어져 있다. 우리가 흔히 보는 대표적인 다이얼로그 창일것이다.

01 private void DialogSimple(){
02     AlertDialog.Builder alt_bld = new AlertDialog.Builder(this);
03     alt_bld.setMessage("Do you want to close this window ?").setCancelable(
04         false).setPositiveButton("Yes",
05         new DialogInterface.OnClickListener() {
06         public void onClick(DialogInterface dialog, int id) {
07             // Action for 'Yes' Button
08         }
09         }).setNegativeButton("No",
10         new DialogInterface.OnClickListener() {
11         public void onClick(DialogInterface dialog, int id) {
12             // Action for 'NO' Button
13             dialog.cancel();
14         }
15         });
16     AlertDialog alert = alt_bld.create();
17     // Title for AlertDialog
18     alert.setTitle("Title");
19     // Icon for AlertDialog
20     alert.setIcon(R.drawable.icon);
21     alert.show();
22 }
aaaa


(6) Time Picker 시간선택 컨트롤을 다이얼로그에 구현


Time Picker 컨트롤을 다이얼로그 창에 구현한 예제이다. 그리고 다이얼로그에

구현되어있는 Time Picker 에서 선택한 값을 부모 화면에서 받아 그 값을 Toast

로 보여준다
01 private void DialogTimePicker(){
02     TimePickerDialog.OnTimeSetListener mTimeSetListener = 
03     new TimePickerDialog.OnTimeSetListener() {
04         public void onTimeSet(TimePicker view, int hourOfDay, int minute) {
05             Toast.makeText(DialogSample.this,
06             "Time is=" + hourOfDay + ":" + minute, Toast.LENGTH_SHORT)
07             .show();
08         }
09     };
10     TimePickerDialog alert = new TimePickerDialog(this
11 mTimeSetListener, 0, 0, false);
12     alert.show();
13 }


(7) Date Picker 날짜선택 컨트롤을 다이얼로그에 구현


Date Picker 컨트롤을 다이얼로그 창에 구현한 예제이다. 그리고 다이얼로그에

구현되어있는 Date Picker 에서 선택한 값을 부모 화면에서 받아 그 값을 Toast

로 보여준다. 창을 띄우기 전에 현재 날짜정보를 넘겨주고 Date Picker 에서는

그것을 받아 표시해 준다.

01 private void DialogDatePicker(){
02     Calendar c = Calendar.getInstance();
03     int cyear = c.get(Calendar.YEAR);
04     int cmonth = c.get(Calendar.MONTH);
05     int cday = c.get(Calendar.DAY_OF_MONTH);
06       
07     DatePickerDialog.OnDateSetListener mDateSetListener = 
08     new DatePickerDialog.OnDateSetListener() {
09     // onDateSet method
10     public void onDateSet(DatePicker view, int year, int monthOfYear, int dayOfMonth) {
11          String date_selected = String.valueOf(monthOfYear+1)+
12                 " /"+String.valueOf(dayOfMonth)+" /"+String.valueOf(year);
13          Toast.makeText(DialogSample.this
14         "Selected Date is ="+date_selected, Toast.LENGTH_SHORT).show();
15     }
16      };
17      DatePickerDialog alert = new DatePickerDialog(this,  mDateSetListener,  
18      cyear, cmonth, cday);
19      alert.show();
20 }
aaaa


(8) 전체 소스


001 import java.util.ArrayList;
002 import java.util.Calendar;
003 import java.util.HashMap;
004 import java.util.List;
005 import java.util.Map;
006   
007 import android.app.AlertDialog;
008 import android.app.DatePickerDialog;
009 import android.app.ListActivity;
010 import android.app.ProgressDialog;
011 import android.app.TimePickerDialog;
012 import android.content.DialogInterface;
013 import android.os.Bundle;
014 import android.text.Html;
015 import android.util.Log;
016 import android.view.View;
017 import android.widget.DatePicker;
018 import android.widget.ListView;
019 import android.widget.SimpleAdapter;
020 import android.widget.TimePicker;
021 import android.widget.Toast;
022   
023 import com.sample.R;
024   
025 public class DialogSample extends ListActivity {
026   
027     private String[] mMenuText;
028     private String[] mMenuSummary;
029   
030     private String keyName = "name";
031     private String keyDesc = "desc";
032     private String TAG;
033       
034     /** Called when the activity is first created. */
035     @Override
036     public void onCreate(Bundle savedInstanceState) {
037         super.onCreate(savedInstanceState);
038         TAG = getClass().getName();
039   
040         int length = 7;
041         mMenuText = new String[length];
042         mMenuSummary = new String[length];
043   
044         mMenuText[0] = "다중선택 새창";
045         mMenuSummary[0] = "다중선택을 할수 있는 Alert 예제구현이다.";
046         mMenuText[1] = "HTML 적용 새창";
047         mMenuSummary[1] = "Text 에 HTML 을 적용하는 Alert 예제구현이다.";
048         mMenuText[2] = "프로그레시브바 새창";
049         mMenuSummary[2] = "진행중을 나타내는 프로그레시브바 Alert 예제구현다.";
050         mMenuText[3] = "Radio 버튼 새창";
051         mMenuSummary[3] = "Radio 버튼이 들어간 새창 이며 선택하면 창이 닫힌다. ";
052         mMenuText[4] = "Simple Dialog";
053         mMenuSummary[4] = "선택에 따른 로직구현을 위한 다이얼로그 창 구현";
054         mMenuText[5] = "Time Picker";
055         mMenuSummary[5] = "Time Picker 시간선택 컨트롤을 다이얼로그에 구현";
056         mMenuText[6] = "Date Picker";
057         mMenuSummary[6] = "Date Picker 날짜선택 컨트롤을 다이얼로그에 구현";
058   
059         setListAdapter(new SimpleAdapter(this, getListValues(),
060                 android.R.layout.simple_list_item_2, new String[] { keyName,
061                         keyDesc }, new int[] { android.R.id.text1,
062                         android.R.id.text2 }));
063     }
064   
065     private List<MAP><STRING, String="">> getListValues() {
066         List<MAP><STRING, String="">> values = new ArrayList<MAP><STRING, String="">>();
067         int length = mMenuText.length;
068         for (int i = 0; i < length; i++) {
069             Map<STRING, String=""> v = new HashMap<STRING, String="">();
070             v.put(keyName, mMenuText[i]);
071             v.put(keyDesc, mMenuSummary[i]);
072             values.add(v);
073         }
074         return values;
075     }
076   
077     @Override
078     protected void onListItemClick(ListView l, View v, int position, long id) {
079         super.onListItemClick(l, v, position, id);
080         Log.d(TAG, "id : " + id + ", position : " + position);
081         switch (position) {
082         case 0:
083             // 다중선택 옵션창 
084             this.DialogSelectOption();
085             break;
086         case 1:
087             // HTML 구현 
088             this.DialogHtmlView();
089             break;
090         case 2:
091             // 프로그레시브바 구현
092             this.DialogProgress();
093             break;
094         case 3:
095             //  Radio 버튼이 추가된 다중선택 창
096             this.DialogRadio();
097             break;
098         case 4:
099             // 가장 일반적인 Yes/NO기능구현 Dialog
100             this.DialogSimple();
101             break;
102         case 5:
103             this.DialogTimePicker();
104             break;
105         case 6:
106             // 날짜 선택 Dialog 구현 
107             this.DialogDatePicker();
108             break;
109         default:
110             break;
111         }
112     }
113   
114     private void DialogSelectOption() {
115         final String items[] = { "item1", "item2", "item3" };
116         AlertDialog.Builder ab = new AlertDialog.Builder(DialogSample.this);
117         ab.setTitle("Title");
118         ab.setSingleChoiceItems(items, 0,
119             new DialogInterface.OnClickListener() {
120                 public void onClick(DialogInterface dialog, int whichButton) {
121                     // 각 리스트를 선택했을때 
122                 }
123             }).setPositiveButton("Ok",
124             new DialogInterface.OnClickListener() {
125                 public void onClick(DialogInterface dialog, int whichButton) {
126                     // OK 버튼 클릭시 , 여기서 선택한 값을 메인 Activity 로 넘기면 된다.
127                 }
128             }).setNegativeButton("Cancel",
129             new DialogInterface.OnClickListener() {
130                 public void onClick(DialogInterface dialog, int whichButton) {
131                     // Cancel 버튼 클릭시
132                 }
133             });
134         ab.show();
135     }
136       
137     private void DialogHtmlView(){
138         AlertDialog.Builder ab=new AlertDialog.Builder(DialogSample.this);
139         ab.setMessage(Html.fromHtml("<STRONG><FONT color=#ff0000> " +
140                 "Html 표현여부 " +"</FONT></STRONG><BR>
141   
142   
143   
144 HTML 이 제대로 표현되는지 본다."));
145             ab.setPositiveButton("ok", null);
146             ab.show();
147     }
148       
149     private void DialogProgress(){
150         ProgressDialog dialog = ProgressDialog.show(DialogSample.this, "",
151                                 "잠시만 기다려 주세요 ...", true);
152                 
153         // 창을 내린다.
154         // dialog.dismiss();
155     }
156       
157     private void DialogRadio(){
158         final CharSequence[] PhoneModels = {"iPhone", "Nokia", "Android"};
159         AlertDialog.Builder alt_bld = new AlertDialog.Builder(this);
160         alt_bld.setIcon(R.drawable.icon);
161         alt_bld.setTitle("Select a Phone Model");
162         alt_bld.setSingleChoiceItems(PhoneModels, -1, new DialogInterface.OnClickListener() {
163             public void onClick(DialogInterface dialog, int item) {
164                 Toast.makeText(getApplicationContext(), "Phone Model = "+PhoneModels[item], Toast.LENGTH_SHORT).show();
165                 dialog.cancel();
166             }
167         });
168         AlertDialog alert = alt_bld.create();
169         alert.show();
170     }
171       
172     private void DialogSimple(){
173         AlertDialog.Builder alt_bld = new AlertDialog.Builder(this);
174         alt_bld.setMessage("Do you want to close this window ?").setCancelable(
175                 false).setPositiveButton("Yes",
176                 new DialogInterface.OnClickListener() {
177                     public void onClick(DialogInterface dialog, int id) {
178                         // Action for 'Yes' Button
179                     }
180                 }).setNegativeButton("No",
181                 new DialogInterface.OnClickListener() {
182                     public void onClick(DialogInterface dialog, int id) {
183                         // Action for 'NO' Button
184                         dialog.cancel();
185                     }
186                 });
187         AlertDialog alert = alt_bld.create();
188         // Title for AlertDialog
189         alert.setTitle("Title");
190         // Icon for AlertDialog
191         alert.setIcon(R.drawable.icon);
192         alert.show();
193     }
194       
195     private void DialogTimePicker(){
196         TimePickerDialog.OnTimeSetListener mTimeSetListener = 
197             new TimePickerDialog.OnTimeSetListener() {
198                 public void onTimeSet(TimePicker view, int hourOfDay, int minute) {
199                     Toast.makeText(DialogSample.this,
200                         "Time is=" + hourOfDay + ":" + minute, Toast.LENGTH_SHORT)
201                         .show();
202                 }
203         };
204         TimePickerDialog alert = new TimePickerDialog(this, mTimeSetListener, 0, 0, false);
205         alert.show();
206     }
207       
208     private void DialogDatePicker(){
209         Calendar c = Calendar.getInstance();
210         int cyear = c.get(Calendar.YEAR);
211         int cmonth = c.get(Calendar.MONTH);
212         int cday = c.get(Calendar.DAY_OF_MONTH);
213           
214         DatePickerDialog.OnDateSetListener mDateSetListener = 
215             new DatePickerDialog.OnDateSetListener() {
216                 // onDateSet method
217                 public void onDateSet(DatePicker view, int year, int monthOfYear, int dayOfMonth) {
218                     String date_selected = String.valueOf(monthOfYear+1)+
219                         " /"+String.valueOf(dayOfMonth)+" /"+String.valueOf(year);
220                     Toast.makeText(DialogSample.this
221                             "Selected Date is ="+date_selected, Toast.LENGTH_SHORT).show();
222                 }
223         };
224         DatePickerDialog alert = new DatePickerDialog(this,  mDateSetListener,  cyear, cmonth, cday);
225         alert.show();
226     }
227   
228


[Tip]Android에서의 RSS Reader 구현 개발 팁 / 모바일 웹

첨부파일 :


2009/03/24 21:30

 http://blog.naver.com/kippee/130044828392

네이버 블로그(RSS 2.0)를 가져올 수 있는 간단한 RSS Reader를 안드로이드 에서 구현하였다.

실제 사용하기 보단 (구글폰도 없지만) Study 개념으로 작성한 것이기 때문에

네이버 블로그만 가져올 수 있고 (물론, java 소스를 고치면 다른 것도 가능하다)

링크되어 있는 이미지 처리도 안된다


여기에는 몇가지 기술을 적용하였는데

  • 입력창에서 Blog ID를 입력하면 List를 볼수 있는 화면 (특정 Activity 호출)으로 전환
  • 간단한 팝업창
  • 블로그들을 Fetch하는데 지루하지 않도록 Progress Dialog를 보여주는 방법
  • ListView에서 클릭하면 별도의 Dialog Box가 보여주는 방법
  • 특정 부분을 클릭하면 안드로이드  제공 블라우저을 호출하는 것

호출한 XML문서를 Parsing 하는 방법 등이다.


1. 입력창에서 Blog ID를 입력하면 List를 볼수 있는 화면 (특정 Activity 호출)으로 전환

위의 그림처럼 확인 버튼을 누르면 다른 화면으로 전환하게 되는 데 버튼에 리슨너를 등록하고

   //* 확인 버튼에 리슨너 등록

  mbtStartGetRSS.setOnClickListener(mGoListner);

리슨너를 아래와 같이 Define 해주면 된다

여기서 Intent를 생성하고 실행된 Activity Class와 함께 보내줄 데이타를 지정해준다.


 private DialogInterface.OnClickListener mGoOKListener = new DialogInterface.OnClickListener()
 {     

  public void onClick(DialogInterface dialog, int which) {
   String mBlogId;
   

   mBlogId = metBlogId.getText().toString();
   // TODO Auto-generated method stub
   // getRSSItem();
   Intent mI = new Intent();
   mI.setClass(RSSMain.this,BlogList.class);
   mI.putExtra("Blogger",metBlogId.getText().toString());
   startActivity(mI);
   finish();
  }

  
 };

2. 간단한 팝업창

일반적으로 팝업창은 Alertailog의 Builder Class를 이용하여 할 수도 있지만

Toast를 이용하여 간단하게 작성할 수도 있다.

  private OnClickListener mGoListner = new OnClickListener()
 {      

  @Override
  public void onClick(View arg0) {
   // TODO Auto-generated method stub
   if (metBlogId.getText().toString().length() == 0){ 
    Toast.makeText(RSSMain.this,"BlogID를 입력하세요",Toast.LENGTH_SHORT )
    .show();
   }
   else
    showDialog(POPUP_DIALOG);
  }  
 };


3. 블로그들을 Fetch하는데 지루하지 않도록 Progress Dialog를 보여주는 방법

이 부분을 구현하는 데 가장 많이 시간이 소요 되었다.

착안점은 먼저 Progress Bar를 먼저 보여 주고 BackGroud로 Blog를 Fetch 해야 되는 데

이부분은 별도의 thread로 처리해야 된다.

일단 Progress Bar를 표시하는 방법은


onCreateDialog 에 다른 Dialog와 함께 Progress Dialog를 정의한다.

  protected Dialog onCreateDialog(int id) {
  // TODO Auto-generated method stub
  switch (id) {
  case ITEM_DIALOG:
   LayoutInflater li = LayoutInflater.from(this);
   View ItemDetailsView = li.inflate(R.layout.item_details, null);

   AlertDialog.Builder mItemDialog = new AlertDialog.Builder(this);
   mItemDialog.setTitle("블로그 정보");
   mItemDialog.setPositiveButton("확인", null);
   mItemDialog.setNegativeButton("취소", null);
   mItemDialog.setView(ItemDetailsView);
   return mItemDialog.create();
  case PROGRESS_DIALOG:
   mProgressDialog = new ProgressDialog(this);
   mProgressDialog.setMessage("Fetching Blogs ....");
   mProgressDialog.setIndeterminate(true);
   mProgressDialog.setCancelable(true);
   mProgressDialog.setProgressStyle(ProgressDialog.STYLE_SPINNER);
   return mProgressDialog;


  }
  return null;
 }

보여주는 시점에서 ShowDialog(PROGRESS_DIALOG) 를 호출하면 된다.


위에서 언급한 것 처럼 실제로 Progress Dialog가 보여주는 동안에 별도의 Thread를 생성하여 Blog를 가져와야 되는 데 코드는 아래와 같다

 new Thread() {
   public void run() {
    try{
     // Do some Fake-Work
     if ((mDoc = readFeeder(mFeeder)) != null)
      parseBlog(mDoc);
     mProgressDialog.dismiss();
     mProgressHandler.post(mUpdateResults);


    } catch (Exception e) { 
     Log.e("RSS", "Exception : Unknown Exception ");
    }
    // Dismiss the Dialog
    //mProgressDialog.dismiss();
   }
  }.start();

여기서 중요한 것은 Backgroud로 실행된 결과는 결코 화면으로 표시되는 것이 아니라 (화면에 표시하면 에러가 발생한다) 별도의 메소드로 처리해야 되는 데 일단 핸들러로 Message Queue에 Runnable을 post 해야 한다.  mProgressHandler.post(mUpdateResults);   

그리고 실제 Runnable에서 다시 표시할 수 있는 코드을 작성해야 된다.

  private void updateResultsInUi()
 {
  mtvBlogTitle.setText(mBlogURL);
  mtvBlogLink.setText(" http://www.naver.com");
  mtvBlogDesc.setText(mBlog.getMDesc());
  mtvBlogGenerator.setText(mBlog.getMGenerator());
  SimpleDateFormat sdf = new SimpleDateFormat("yyyy/MM/dd HH:mm:ss");
  mtvBlogPubdate.setText(sdf.format(mBlog.getMPubdate()));
  
  aaI.notifyDataSetChanged();
  Toast.makeText(getApplicationContext(),mBlogs+
    "개의 Blog들이 있습니다.",
    Toast.LENGTH_LONG).show();
  Log.e("RSS", "updateResultsInUi Started ");  
 } 
여기서 notifyDataSetChanged는 ListView add 된 내용을 다시 보여주는 method 이다
Android Load Image From URL Example ANDROID / 프로젝트

2010/09/05 18:59

복사 http://loadtodream.blog.me/30093256249

In android we can show image from URL (web).
Here we are going to see about how to load the image from web in simple way.
Example for Android Load Image From Web :-
Add the below code to AndroidManifest.xml for Internet Permission.


<uses-permission android:name="android.permission.INTERNET"></uses-permission>


Edit your main.xml file

<?xml version="1.0" encoding="utf-8"?>
<LinearLayout android:id="@+id/LinearLayout01"
android:layout_width="fill_parent"
android:layout_height="fill_parent"
xmlns:android="http://schemas.android.com/apk/res/android">
<ImageView android:id="@+id/ImageView01"
android:layout_height="wrap_content" android:layout_width="wrap_content"/>
</LinearLayout>

Edit your java file

import java.io.InputStream;
import java.net.URL;
import android.app.Activity;
import android.graphics.drawable.Drawable;
import android.os.Bundle;
import android.widget.ImageView;

public class ImageFromUrlExample extends Activity {
    /** Called when the activity is first created. */
    @Override
    public void onCreate(Bundle savedInstanceState) {
        super.onCreate(savedInstanceState);
        setContentView(R.layout.main);

        ImageView imgView =(ImageView)findViewById(R.id.ImageView01);
        Drawable drawable = LoadImageFromWebOperations("http://www.androidpeople.com/wp-content/uploads/2010/03/android.png");
        imgView.setImageDrawable(drawable);

    }

   private Drawable LoadImageFromWebOperations(String url)
   {
  try
  {
   InputStream is = (InputStream) new URL(url).getContent();
   Drawable d = Drawable.createFromStream(is, "src name");
   return d;
  }catch (Exception e) {
   System.out.println("Exc="+e);
   return null;
  }
 }
}

output will looks like


http://www.androidpeople.com/category/image/


출처 : http://dingpong.net/tt/215
 프로그램을 만들다보면 '안녕하세요. 반갑습니다.' 왼쪽과 같이 부분적으로 색상을 변경해야 되는 경우가 발생할 수 있습니다. 또는 부분적으로만 Bold처리 등을 할 수도 있습니다. 이러한 경우 아래와 같은 코드를 사용할 수 있습니다.

final SpannableStringBuilder sp = new SpannableStringBuilder("안녕하세요.");
sp.setSpan(new ForegroundColorSpan(Color.RED), 1, 3, Spannable.SPAN_EXCLUSIVE_EXCLUSIVE);
textView.append(sp);

 안드로이드펍에 어떤 글에서는 String에 Html태그가 적용이 된다고 되어 있는데, <b><u>와 같은 태그만 적용이 되었고 색상에 대해서는 잘 안되었습니다. (가능한 방법은 [이쪽] 자료를 참고해 보시길 바랍니다). 그래서 검색해서 이 방법을 찾아서 사용하였습니다.

 위 코드를 분석하면 "안녕하세요." 라는 텍스트의 1~3위치에 있는 텍스트를 RED 색상으로 변경해서 textView에 넣는 코드입니다. 여러 가지로 색상을 바꿔야하면sp를 Clear한 다음에 append로 텍스트를 넣어서 재활용 할 수 있습니다.

- 참고 자료
http://developer.android.com/reference ··· der.html
http://anddev.tistory.com/49
http://www.mailinglistarchive.com/andr ··· 030.html
http://www.androidpub.com/android_dev_info/51697

크리에이티브 커먼즈 라이센스
Creative Commons License

'Android > Tip&Tech' 카테고리의 다른 글

[펌]listview에 progress 적용참고 팁  (0) 2010.12.10
[펌]웹상의 이미지를 ImageView로 로딩하기  (0) 2010.12.10
아이콘 추천 사이트  (0) 2010.12.09
Tservice agent파일  (0) 2010.12.09
[펌]커스텀 뷰 확장하기  (0) 2010.12.08

네이버에서 SVN 서버도 제공한다고 한다. 사용 방법을 정리해 보려했으나 아래에 정리가 더 잘 되있다.

참고 페이지 : http://blog.ithcity.com/55

여기에 이클립스에 svn 설치 방법이 없어서 추가한다.

1. http://subversion.tigris.org 접속

2. IDE 환경에서 eclipse 선택

3. donwlaod and install 선택

4. eclipse update site (http://subclipse.tigris.org/update_1.6.x)복사

5. eclipse를 켠 후 Help - Install New Software 추가 및 모두 추가하고 next


6. SVN repository exploring 선택

7. SVN repositories 창 생성 확인

창 우측 클릭후 new->repository location 선택

이 후 부터 위의 블로그 내용 참고

'자바 > 자바팁' 카테고리의 다른 글

[자바]소켓(CLient측) 연결 확인  (0) 2011.10.20
properties to hashmap  (0) 2011.04.11
네이버 svn 설치방법  (0) 2010.12.08
[펌]자바 IO 대충 정리..(필요할때 쓰자)  (0) 2010.12.03
색상표  (0) 2010.12.02
에물 하나 바뀔때마다 귀찮은 파일 하나를 계속 설치를 해야함

'자바 > 자바팁' 카테고리의 다른 글

properties to hashmap  (0) 2011.04.11
네이버 svn 설치방법 참고  (0) 2010.12.09
[펌]자바 IO 대충 정리..(필요할때 쓰자)  (0) 2010.12.03
색상표  (0) 2010.12.02
[펌]압축 관련 스트림 팁  (0) 2010.12.01

안드로이드 Custom View를 이용하여 Custom Android Button 만들기 어플 개발 / 안드로이드

2010/04/22 12:33

복사 http://blog.naver.com/mygirl2/40105201905

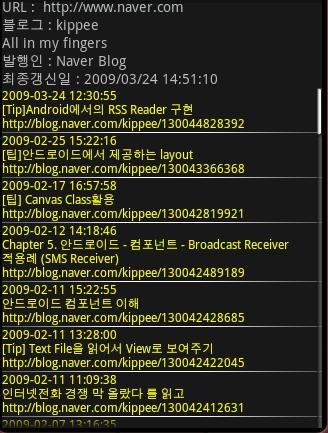
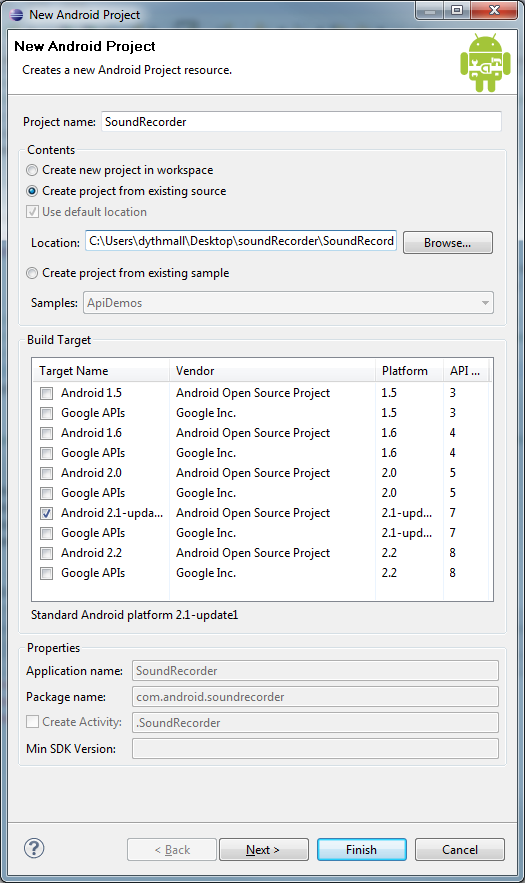
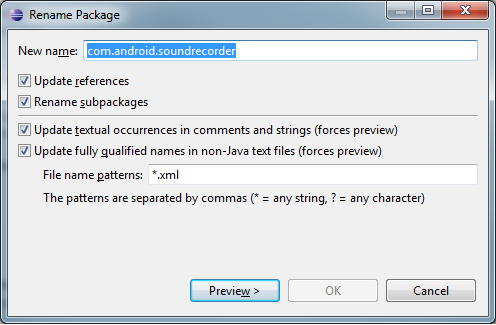
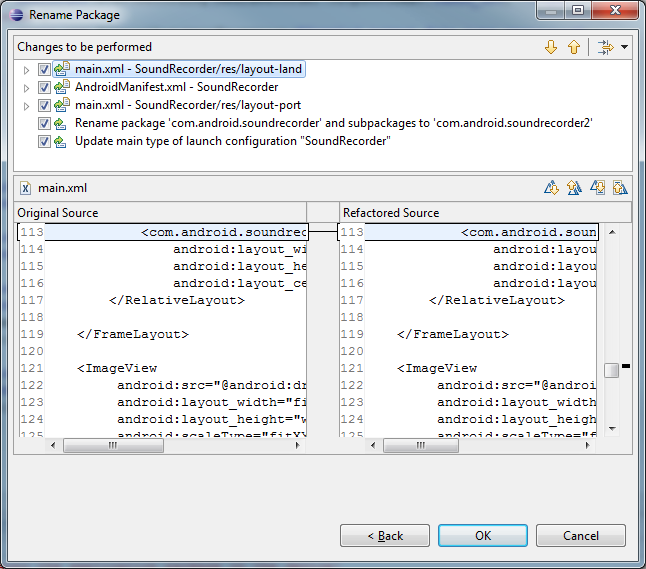
출처 : http://androidcore.com/index.php?option=com_content&view=article&id=235&Itemid=106


Making a custom Android button using a custom view


Creating a custom view is as simple as inheriting from the View class and overriding the methods that need to be overridden. In this example, a custom button is implemented in this way. The button shall feature a labelled image (i.e. an image with text underneath).


사용자 정의 뷰(View)를 이용하여 사용자 정의 버튼(안드로이드용) 만들어 보기


사용자 정의 뷰(View)를 생성하는 것은 뷰 클래스를 상속하는 것만큼 쉽다. 그리고 오버라이드(Override) 해야 할 메소드를 오버라이드하는 것 만큼...

의역하면, 뷰 클래스를 상속하고 오버라이드 해줘야 할 부분만 오버라이드 해주면 되니까 사용자 정의 뷰를 만드는 것이 굉장히 쉽다는 얘기이다.

예를 들면, 사용자 정의 버튼은 이런 방식으로 구현이 되는데... 다음의 예제에서는 사용자 정의 버튼이 라벨이 표시되는 이미지와 밑에 텍스트가 추가되는 특징을 갖게 된다. 그럼 예제를 보자...


1   public class CustomImageButton extends View {
2       private final static int WIDTH_PADDING = 8;
3       private final static int HEIGHT_PADDING = 10;
4       private final String label;
5       private final int imageResId;
6       private final Bitmap image;
7       private final InternalListener listenerAdapter = new InternalListener();
8
 

The constructor can take in the parameters to set the button image and label.


생성자는 버튼 이미지와 라벨을 설정하기 위해 파라미터를 받을 수 있다.


9       /**
10       * Constructor.
11       *

// 생성자


12       * @param context
13       *        Activity context in which the button view is being placed for.


// 버튼 뷰가 배치되는 액티비티 문맥(context)


14       *
15       * @param resImage
16       *        Image to put on the button. This image should have been placed
17       *        in the drawable resources directory.

// 버튼에 이미지를 추가하기. 이 이미지는 drawable 리소스 디렉토리에 배치(보관, 저장?)되어야 한다.


18       *
19       * @param label
20       *        The text label to display for the custom button.
21       */


// 사용자 정의 버튼에서 표시될 텍스트 라벨


22      public CustomImageButton(Context context, int resImage, String label)
23       {
24           super(context);
25           this.label = label;
26           this.imageResId = resImage;
27           this.image = BitmapFactory.decodeResource(context.getResources(),
28                  imageResId);
29 
30           setFocusable(true);
31           setBackgroundColor(Color.WHITE);
32
33           setOnClickListener(listenerAdapter);
34           setClickable(true);
35       }
36
 

With the constructor defined, there are a number of methods in the View class that needs to be overridden to this view behave like a button. Firstly, the onFocusChanged gets triggered when the focus moves onto or off the view. In the case of our custom button, we want the button to be “highlighted” when ever the focus is on the button.


생성자가 정의 되고 나서 뷰 클래스는 몇가지 메소드들이 있다는 것도 고려해야 한다. 그것은 뷰 클래스에서 버튼과 같은 뷰가 가져야 할 것을 오버라이드해줘야 한다는 것이다. (위에 서두에 언급했던 내용...)


첫번째로 onFocusChanged 메소드는 발동을 언제하냐면, 포커스가 On되거나 Off될때이다. 뷰에서 대한 포커스 말이다.

여기에서 언급되는 사용자 정의 버튼의 경우, 버튼이 하이라이트(highlighted)되는 기능이 필요한데, 포커스가 버튼에 맞춰졌을때(Focus On 되었을때) 말이다.


49          {
50              this.setBackgroundColor(Color.WHITE);
51          }
52      }
53     
 

The method responsible for rendering the contents of the view to the screen is the draw method. In this case, it handles placing the image and text label on to the custom view.


setBackgroundColor() 메소드는 뷰의 내용들을 표현하는 메소드인데, 스크린에 표현하게 된다. 이 메소드는 draw 메소드 계열이다.

여기서 소개된 이 메소드는 이미지와 텍스트 라벨을 사용자 정의 뷰에 배치하는 것을 조정(컨트롤)한다.


54      /**
55       * Method called on to render the view.
56       */
57      protected void onDraw(Canvas canvas)
58      {
59          Paint textPaint = new Paint();
60          textPaint.setColor(Color.BLACK);
61          canvas.drawBitmap(image, WIDTH_PADDING / 2, HEIGHT_PADDING / 2, null);
62          canvas.drawText(label, WIDTH_PADDING / 2, (HEIGHT_PADDING / 2) +
63                  image.getHeight() + 8, textPaint);
64      }
65     
 

For the elements to be displayed correctly on the screen, Android needs to know the how big the custom view is. This is done through overriding the onMeasure method. The measurement specification parameters represent dimension restrictions that are imposed by the parent view.


요소들(elements)들이 화면에 제대로 표현되기 위해서 안드로이드는 사용자 정의 뷰의 크기가 얼마나 되는지에 대한 정보를 필요로 한다.

아래의 경우 onMeasure 메소드를 오버라이딩한 것이다. measurement(측정) 상세 내용(스펙) 파라미터는 부모 뷰(View)로 부터 결정된(강요된? 강제로 결정된?) 치수 제한을 나타낸다.


 66        @Override
 67        protected void onMeasure(int widthMeasureSpec, int heightMeasureSpec)
 68        {
 69         setMeasuredDimension(measureWidth(widthMeasureSpec),
 70                 measureHeight(heightMeasureSpec));
 71        }
 72   
 

The call to setMeasuredDimension in the onMeasure method is important. The documentation states that the call is necessary to avoid a IllegalStateException.


onMeasure 메소드 내에서 setMeasuredDimension() 메소드를 호출하는 것은 중요하다. 그 이유는 illegalStateException이 발생하는 것을 피하기 위해서이다. 이 메소드의 호출이 말이다. (문서에 표시된 내용 - 어떤 문서?)


 73     private int measureWidth(int measureSpec)
 74     {
 75         int preferred = image.getWidth() * 2;
 76         return getMeasurement(measureSpec, preferred);
 77     }
 78   
 79     private int measureHeight(int measureSpec)
 80     {
 81         int preferred = image.getHeight() * 2;
 82         return getMeasurement(measureSpec, preferred);
 83     }
 84   
 

To calculate the width and height measurements, I’ve chosen to keep the logic simple by using a simple formula to calculate the dimensions. This simple formula computes the dimensions based on the dimensions of the image. The measureSpec parameter specifies what restrictions are imposed by the parent layout.


가로폭과 세로높이 측정값을 계산하기 위해서, 이 글을 쓴 사람은 치수를 계산 하기 위한(할 수 있는) 간단한 공식을 이용했고 그렇게 한 이유는 프로그램 로직을 간결하게 유지하기 위한 방법이라고 생각했기 때문이다.

이 간단한 공식은 이미지의 치수에 기초(기반)을 둔 치수를 산출한다.(compute 뜻 까먹었었는데, 긴가민가했는데 찍었는데 맞췄다. ㅇㅇ)

measureSpec 파라미터는 부모 레이아웃으로 강요된 제한들을 명시한다.


 85     private int getMeasurement(int measureSpec, int preferred)
 86     {
 87         int specSize = MeasureSpec.getSize(measureSpec);
 88         int measurement = 0;
 89       
 90         switch(MeasureSpec.getMode(measureSpec))
 91         {
 92             case MeasureSpec.EXACTLY:
 93                 // This means the width of this view has been given.
 

// 이것은 주어진 뷰(View)의 가로폭을 의미한다.


 94                 measurement = specSize;
 95                 break;
 96             case MeasureSpec.AT_MOST:
 97                 // Take the minimum of the preferred size and what
 98                 // we were told to be. 


// 원하는 크기(size)의 최소값을 얻어라

// 뭔가 되기 위해서? 되어햐 할 것들에 대해 듣는 것.. (코드를 봐야 이해할 것 같다. 일단 나중에..)


 99                 measurement = Math.min(preferred, specSize);
100                 break;
101             default:
102                 measurement = preferred;
103                 break;
104         }
105   
106         return measurement;
107     }
108
 

To make the customised button useful, it needs to trigger some kind of action when it is clicked (i.e. a listener). The view class already defines methods for setting the listener, but a more specialised listener could be better suited to the custom button. For example, the specialised listener could pass back information on the instance of the custom button.


사용자 정의 버튼을 유용하게 만들기 위해서는 사용자 버튼에 몇가지 종류의 액션(Action)을 발동 시키는 것이 필요한데, 예를들어 리스너(listener)등으로 클릭했을 때 말이다.

뷰(View) 클래스의 경우 이미 리스너 설정에 필요한 메소드들을 정의되어 있다.

하지만 좀 더 특별하고 뛰어나다고 할까? 이러한 리스너는 사용자 정의 버튼에 좀 더 최적화 될 수 있다.

예를 들면, 이 특별한 리스너는 정보를 돌려줄 수 있는데, 사용자 정의 버튼의 객체(instance)에 말이다.


109     /**
110      * Sets the listener object that is triggered when the view is clicked.


// 리스너 객체를 설정하라. 뷰가 클릭되었을때 발동되는 리스너 객체 말이다.


111      *
112      * @param newListener
113      *        The instance of the listener to trigger.


// 발동되는 리스너 객체..


114      */
115     public void setOnClickListener(ClickListener newListener)
116     {
117         listenerAdapter.setListener(newListener);
118     }
119   
 

If the custom listener passes information about this instance of the custom button, it may as well have accessors so listener implementation can get useful information about this custom button.


사용자 정의 리스너가 사용자 정의 버튼 객체에 대한 정보를 제공한다면, 사용자 정의 리스너는 접근자를 가질지도 모른다. 리스너 구현하는 것이 사용자 정의 버튼에 대한 유용한 정보를 제공 할 수 있도록 말이다.

(의역하면, 사용자 정의 리스너가 사용자 정의 버튼 객체에 대해 뭔가를 제공한다면 전달하거나... 그러면 구현하는 리스너가 사용자 정의 버튼에 대해 유용한 정보를 가질 수 있도록 접근자를 가질지도 모른다는 의미가 될 것 같다. 코드를 안 보고 번역하니 헤깔린다.)


120     /**
121      * Returns the label of the button.


// 라벨 버튼을 반환하기


122      */
123     public String getLabel()
124     {
125         return label;
126     }
127   
128     /**
129      * Returns the resource id of the image.
130      */


// 이미지의 리소스 아이디(id)를 반환하기


131     public int getImageResId()
132     {
133         return imageResId;
134     }
135   
 

Finally, for our custom button class that is using a custom listener, the custom listener class needs to be defined.


마지막으로 사용자 정의 리스너를 사용하고 있는 여기에 소개된 사용자 정의 버튼에 대해 사용자 정의 리스너 클래스가 정의되어야 한다는 것을 말해두고 싶다.


136     /**
137      * Internal click listener class. Translates a view’s click listener to
138      * one that is more appropriate for the custom image button class.


/* 내부의 클릭 리스너 클래스(이것이 익명 클래스라고 불리기도 하는건가? 안 찾아봐서 잘 모르겠다.)

뷰(View)의 클래스를 전환(변환)해야 하는데, 사용자 정의 버튼 클래스에 좀 더 적합한 것으로 말이다.

(위에 설명된 translate라는 단어는 번역이라기 보다는 전환(변환)이 맞을 것 같다.) */


139      *
140      * @author Kah
141      */
142     private class InternalListener implements View.OnClickListener
143     {
144         private ClickListener listener = null;
145   
146         /**
147          * Changes the listener to the given listener.


리스너를 주어진 리스너로 변경해라


148          *
149          * @param newListener
150          *        The listener to change to.


바꿀 리스너


151          */
152         public void setListener(ClickListener newListener)
153         {
154             listener = newListener;
155         }
156       
157         @Override
158         public void onClick(View v)
159         {
160             if (listener != null)
161             {
162                 listener.onClick(CustomImageButton.this);
163             }
164         }
165     }
166    }
167  

테스트위해 간단하게 짠겁니다..^^

소스 :
(불펌 방지 암호필요:댓글 달아주시면 암호 보내드립니다.^^)

왕초보가 왕초보님께 드리는 팁입니다.

단계
1.어떤 A라는 Activity를 실행시켰습니다.(화면에 계속 보여주고 있는 상태)
2.그리고 A가 서비스를 실행시켰습니다.
3.그리고 바인딩시켰습니다..서비스 퍼블릭된 자원을 맘껏 쓰고 있습니다...
4.그런데 막상 다시 서비스가 지금 보여주고 있는 화면에 값을 넘겨주고 싶을때가 있더군요.
5.그럴때 이용하는 방법입니다.

1.A Activity를 실행해서 버튼 클릭하면 PendingIntent를 보냅니다.그냥 Intent를 보내도 무방함(물론 서비스도 실행된상태임)
01.PendingIntent pIntent = 
02.     PendingIntent.getService(getBaseContext(), 0, 
03.       new Intent(ExamService.ACTION_FILTER), PendingIntent.FLAG_ONE_SHOT);
04.    try {
05.     pIntent.send();
06.    } catch (Exception e) {
07.     // TODO: handle exception
08.     e.printStackTrace();
09.    }
10.  
11.//브로드 리시버 등록
12.        this.registerReceiver(receiver, new IntentFilter(ExamService.ACTION_FILTER));

2.서비스 내에선 데이타 담아서 방송해줍니다.
1.super.onStart(intent, startId);
2.    
3.  //PendingIntent에 Intent 첨부해서 보내므로 바로 인자로 넣어주면 실행됨
4.  intent.putExtra("msg", "안드로이드가 맛있다눈!!^^");
5.    
6.  this.sendBroadcast(intent);
7.    
8.  this.onDestroy();

3.그럼 다시 A라는 Activity에서 방송을 받아서 맴버 메소드를 실행시킵니다.

01.private BroadcastReceiver receiver = 
02.     new BroadcastReceiver(){
03.   @Override
04.   public void onReceive(Context context, Intent intent) {
05.    // TODO Auto-generated method stub
06.    process.append("SERVICE BROADCATING THIS!!\n");
07.    String msg = intent.getStringExtra("msg");
08.    if(msg!=null)
09.     doProcess(msg);
10.    process.append("IT'S DONE!!\n");
11.   }     
12.    };


이런식으로 서비스에서 보여주고 있는 Activity에 데이타를 담아서 메소드를 실행시킵니다.

물론 aidl를 이용하면 더 효율적이라는 데..아무리 봐도 잘 이해가 안가네요..(제수준에선)^^

아무튼 저랑 같이 고민하고 있는 분들을 위해서 적어봤습니다.

풀소스는 제 블로그( http://javaexpert.tistory.com )에서 받을수 있습니다.

오늘도 수고하세요^^
출처 : http://underclub.tistory.com/333

안드로이드의 커스텀 컴포넌트에 관한 글입니다.


커스텀 확장 뷰 생성하기

안드로이드의 기초 레이아웃인 뷰와 뷰그룹에서는 컴포넌트화 된 모델을 제공해 줍니다. UI 를 디자인하는데 필요한 미리 정의된 뷰와 뷰 그룹의 하위 클래스 ( 위젯과 레이아웃 ) 를 가지고 있습니다.

이런것들 중에서 새로운 것을 만들기 위해 자신만의 뷰 클래스를 만들수도 있고, 기존의 위젯-레이아웃을 조금만 수정하고 싶다면 상속받은 뒤 메소드를 오버라이드 하는 방식을 사용합니다.

순서
1. 사용할 클래스에서 기존의 뷰 또는 뷰 하위클래스를 상속 받습니다.

2. 슈퍼클래스의 메소드를 오버라이드 합니다. ( 오버라이드할 슈퍼클래스의 메소드들은 on....() 으로 시작됩니다. )

3. 새로운 클래스를 기존의 뷰클래스를 대신하여 사용합니다.
[ 상속받은 클래스는 액티비티 내부에서 이너클래스(Inner Class) 로 정의할 수 있는데요, 이것은 그 액티비티 내부에서만 쓰일 수 있으므로, 어플리케이션 내에서 더 넓게 사용할 수 있는 public 뷰를 만드는것이 더 유리합니다 ]


완전한 커스텀 컴포넌트

완전한 커스텀 컴포넌트란, 만들고자 하는 어떠한 디자인으로도 컴포넌트를 만들 수 있다는 것을 의미합니다. 예를들어, " A " 라는 디자인을 하고싶은데, 이것이 내장된 컴포넌트를 어떻게 조합하더라도 만들 수 없는 경우가 있을 수도 있습니다.

즉, 원하는 방식으로 보여지고 동작하는 컴포넌트를 만들 수 있다는 얘기인데, 구글에서는 상상력과 스크린의 크기, 사용가능한 프로세스 파워만이 제약조건이 될 수 있다고 말하고 있네요 ㅎㅎ 재미있군요 ㅎ

커스텀 컴포넌트의 생성하는 순서
1. 뷰 ( View ) 클래스를 상속합니다.

2. XML 내에 속성과 파라미터를 가지는 생성자를 만들수 있고, 그것을 사용할 수 있습니다.

3. 이벤트 리스너, 속성, 접근자 및 수정자 등을 추가하여 동작을 결정합니다.

4. onMeasure() 메소드와 onDraw() 메소드를 오버라이드하여 구현을 해야합니다. 이때 둘다 디폴트 동작구조는 onDraw() 는 아무런 일도 하지않고, onMeasure() 는 100X100 의 크기로 설정되기 때문에 알맞게 수정해야 합니다.

5. 추가적으로 필요한 메소드들을 추가합니다.


onDraw() 와 onMeasure() 구현하기

onDraw() 는 캔버스(Canvas) 를 파라미터로 전달하며, 그 캔버스위에 원하는 것. 즉, 2D 그래픽이나 기타 다른것들을 구현합니다
이것은 3D 그래픽에는 적용되지 않는데, 3D 그래픽을 쓰려면 서피스뷰(SurfaceView) 를 상속해야 하며, 별도의 스레드에서 그리기를 해야되기 때문입니다.


onMeasure() 는 정확한 값을 가지고 오버라이드 해야되는데요, 부모(parent) 의 요구조건과 측정된 너비와 높이를 가지고 setMeasuredDimension() 메소드를 호출해야만 합니다. 만약 이 메소드를 호출하지 않으면 측정 시점에서 예외가 발생합니다.


onMeasure() 메소드 구현 순서
1. onMeasure() 메소드에 너비와 높이를 파라미터로 전달합니다. ( widthMeasureSpec, heightMeasureSpec 은 정수형 값 입니다. )

2. onMeasure() 메소드에서 요구하는 너비와 높이를 계산합니다. 즉, 요구하는 값이 부모의 값보다 크다면 부모는 잘라내기, 스크롤, 예외발생, 재시도( onMeasure() 다시호출) 등을 선택할 것입니다.

3. 계산되어진 너비와 높이를 가지고 setMeasuredDimension(int width, int height) 를 호출합니다. 위에서 언급했지만 호출하지 않으면 예외가 발생합니다.


▶ 그 밖의 뷰에서 프레임워크가 호출하는 다른 메소드들..
⊙ 생성자 : 소스코드에서 뷰가 생성될 때 호출되는 형태와, 레이아웃 파일에서 뷰가 전개(inflate) 될 때 호출되는 형태 두가지가 있습니다. 두번째 형태는 레이아웃에 정의된 속성을 분석한 후 적용합니다.

onFinishInflate()뷰와 그 하위 자식들이 XML 에서 전개 된 후 호출됩니다.

onMeasure(int, int) : 뷰와 그 자식들에 대한 크기를 결정하기 위해 호출됩니다.

onLayout(boolean, int, int, int, int) : 뷰가 그 자식들에게 크기와 위치를 할당할 때 호출됩니다.

onSizeChanged(int, int, int, int) : 뷰의 크기가 바뀔 때 호출됩니다.

onDraw(Canvas) : 뷰가 컨텐츠를 그릴 때 호출되지요

onKeyDown(int, KeyEvent) : 새로운 키 이벤트 발생시 호출됩니다.

onKeyUp(int, KeyEvent) : 키 업 이벤트 발생시에 호출됩니다.

onTrackballEvent(MotionEvent) : 트랙볼 모션 이벤트 발생시에 호출됩니다.

onTouchEvnet(MotionEvent) : 터치스크린의 모션 이벤트 발생시에 호출됩니다.

onFocusChanged(boolean, int, Rect) : 뷰가 포커스를 가지거나 잃을 때 호출됩니다.

onWindowFocusChanged(boolean) : 뷰를 포함한 윈도우가 포커스를 가지거나 잃을 때 호출됩니다.

onAttachedToWindow() : 뷰가 윈도우에 포함될 때 호출됩니다.

onDetachedFromWindow() : 뷰가 윈도우에서 분리될 때 호출됩니다.

onWindowVisibillityChanged(int) : 뷰를 포함한 윈도우가 보여지는 상태가 변할 때 호출됩니다.


커스텀 뷰 예제

커스텀 뷰 예제는 안드로이드에서 제공하는 샘플들 중에서 API Demos 의 CustomView 예제가 있는데, 이 예제의 컴스텀 뷰는 LabelView 클래스에서 정의되어 있습니다.


LabelView 샘플은 커스텀 컴포넌트를 이해하기에 아주 적합합니다.
/*
* Copyright (C) 2007 The Android Open Source Project
*
* Licensed under the Apache License, Version 2.0 (the "License");
* you may not use this file except in compliance with the License.
* You may obtain a copy of the License at
*
* http://www.apache.org/licenses/LICENSE-2.0
*
* Unless required by applicable law or agreed to in writing, software
* distributed under the License is distributed on an "AS IS" BASIS,
* WITHOUT WARRANTIES OR CONDITIONS OF ANY KIND, either express or implied.
* See the License for the specific language governing permissions and
* limitations under the License.
*/

package com.example.android.apis.view;

// Need the following import to get access to the app resources, since this
// class is in a sub-package.
import android.content.Context;
import android.content.res.TypedArray;
import android.graphics.Canvas;
import android.graphics.Paint;
import android.util.AttributeSet;
import android.view.View;

import com.example.android.apis.R;


/**
* Example of how to write a custom subclass of View. LabelView
* is used to draw simple text views. Note that it does not handle
* styled text or right-to-left writing systems.
*
*/
public class LabelView extends View {
    private Paint mTextPaint;
    private String mText;
    private int mAscent;
    
    /**
* Constructor. This version is only needed if you will be instantiating
* the object manually (not from a layout XML file).
* @param context
*/
    public LabelView(Context context) {
        super(context);
        initLabelView();
    }

    /**
* Construct object, initializing with any attributes we understand from a
* layout file. These attributes are defined in
* SDK/assets/res/any/classes.xml.
*
* @see android.view.View#View(android.content.Context, android.util.AttributeSet)
*/
    public LabelView(Context context, AttributeSet attrs) {
        super(context, attrs);
        initLabelView();

        TypedArray a = context.obtainStyledAttributes(attrs,
                R.styleable.LabelView);

        CharSequence s = a.getString(R.styleable.LabelView_text);
        if (s != null) {
            setText(s.toString());
        }

        // Retrieve the color(s) to be used for this view and apply them.
        // Note, if you only care about supporting a single color, that you
        // can instead call a.getColor() and pass that to setTextColor().
        setTextColor(a.getColor(R.styleable.LabelView_textColor, 0xFF000000));

        int textSize = a.getDimensionPixelOffset(R.styleable.LabelView_textSize, 0);
        if (textSize > 0) {
            setTextSize(textSize);
        }

        a.recycle();
    }

    private final void initLabelView() {
        mTextPaint = new Paint();
        mTextPaint.setAntiAlias(true);
        mTextPaint.setTextSize(16);
        mTextPaint.setColor(0xFF000000);
        setPadding(3, 3, 3, 3);
    }

    /**
* Sets the text to display in this label
* @param text The text to display. This will be drawn as one line.
*/
    public void setText(String text) {
        mText = text;
        requestLayout();
        invalidate();
    }

    /**
* Sets the text size for this label
* @param size Font size
*/
    public void setTextSize(int size) {
        mTextPaint.setTextSize(size);
        requestLayout();
        invalidate();
    }

    /**
* Sets the text color for this label.
* @param color ARGB value for the text
*/
    public void setTextColor(int color) {
        mTextPaint.setColor(color);
        invalidate();
    }

    /**
* @see android.view.View#measure(int, int)
*/
    @Override
    protected void onMeasure(int widthMeasureSpec, int heightMeasureSpec) {
        setMeasuredDimension(measureWidth(widthMeasureSpec),
                measureHeight(heightMeasureSpec));
    }

    /**
* Determines the width of this view
* @param measureSpec A measureSpec packed into an int
* @return The width of the view, honoring constraints from measureSpec
*/
    private int measureWidth(int measureSpec) {
        int result = 0;
        int specMode = MeasureSpec.getMode(measureSpec);
        int specSize = MeasureSpec.getSize(measureSpec);

        if (specMode == MeasureSpec.EXACTLY) {
            // We were told how big to be
            result = specSize;
        } else {
            // Measure the text
            result = (int) mTextPaint.measureText(mText) + getPaddingLeft()
                    + getPaddingRight();
            if (specMode == MeasureSpec.AT_MOST) {
                // Respect AT_MOST value if that was what is called for by measureSpec
                result = Math.min(result, specSize);
            }
        }

        return result;
    }

    /**
* Determines the height of this view
* @param measureSpec A measureSpec packed into an int
* @return The height of the view, honoring constraints from measureSpec
*/
    private int measureHeight(int measureSpec) {
        int result = 0;
        int specMode = MeasureSpec.getMode(measureSpec);
        int specSize = MeasureSpec.getSize(measureSpec);

        mAscent = (int) mTextPaint.ascent();
        if (specMode == MeasureSpec.EXACTLY) {
            // We were told how big to be
            result = specSize;
        } else {
            // Measure the text (beware: ascent is a negative number)
            result = (int) (-mAscent + mTextPaint.descent()) + getPaddingTop()
                    + getPaddingBottom();
            if (specMode == MeasureSpec.AT_MOST) {
                // Respect AT_MOST value if that was what is called for by measureSpec
                result = Math.min(result, specSize);
            }
        }
        return result;
    }

    /**
* Render the text
*
* @see android.view.View#onDraw(android.graphics.Canvas)
*/
    @Override
    protected void onDraw(Canvas canvas) {
        super.onDraw(canvas);
        canvas.drawText(mText, getPaddingLeft(), getPaddingTop() - mAscent, mTextPaint);
    }
}


뜯어보자면...

1. 완전한 커스텀 컴포넌트를 위해 뷰 클래스를 상속 받았습니다.

2. 생성자는 inflation 파라미터를 가지고 있습니다 ( XML 에서 정의됨 )
또한 LabelView 를 위해 정의된 속성들을 가지고 있지요.

3. 라벨에 표시할 public 메소드를 사용하고 있습니다
( setText(), setTextColor() 등 )

4. 그리기를 수행할 때 필요한 크기를 설정하기 위하여 onMeasure() 메소드가 있습니다.
이 예제의 실제 작업처리는 private measureWidth() 메소드에서 수행하도록 되어 있네요

5. 캔버스에 라벨을 그리기 위해 onDraw() 메소드를 오버라이드 했습니다. 추가로 custom_view_1.xml 에 보면 android: 네임스페이스 와 app: 네임스페이스가 있는데요, app: 네임스페이스는 LabelView 가 작업하는 커스텀 파라미터이며, R 클래스의 styleable 내부클래스에서 정의됩니다.


합성 ( Compound ) 컴포넌트

완전한 커스텀 컴포넌트를 만들기 보다는, 기존의 컨트롤들을 조합하여 구성하는 컴포넌트를 만들려면 합성 컴포넌트를 사용하면 됩니다.

이것은 하나로 취급될 수 있는 아이템들을 그룹안에서 합쳐놓는 방식이며, 안드로이드에는 이런것을 위해 제공되는 두 개의 뷰가 존재합니다.
바로 SpinnerAutoCompleteTextView 가 그것이지요.

합성 컴포넌트 만들기
1. 일반적인 시작점은 레이아웃이 됩니다. 따라서 하나의 레이아웃을 확장하는 클래스를 만들고, 컴포넌트가 구조화 될 수 있도록 다른 레이아웃을 포함합니다. 컴포넌트에 포함된 레이아웃은 XML 에서 선언하거나 소스코드에서 추가할 수 있습니다.

2. 새로운 클래스의 생성자에서 슈퍼클래스의 생성자를 먼저 호출해 줍니다. 그 다음에 새로운 컴포넌트 안에서 다른 뷰를 구성합니다. 이것 또한 XML 로 선언할 수 있으며, 속성과 파라미터를 만들어 사용할 수도 있습니다.

3. 알맞은 이벤트 리스너를 구현해 줍니다.

4. 레이아웃을 상속하는 경우에는 onDraw() 나 onMeasure() 메소드를 오버라이드 하지 않아도 됩니다. 왜냐하면 레이아웃은 디폴트 동작 구조가 있기 때문입니다. 만약 필요하다면 오버라이드 해도 무방합니다.

5. onKeyDown() 메소드 같은 다른 on....() 메소드를 오버라이드 할 수 있습니다.


▶ 커스텀 컴포넌트를 레이아웃으로 사용하면서의 장점은 무엇일까요?
1. XML 로 레이아웃을 만들 수 있고, 소스코드에서 동적으로 만들어서 추가할 수도 있습니다.

2. onDraw() 와 onMeasure() 메소드를 오버라이드 하지 않아도 됩니다.

3. 복잡한 뷰를 생성할 수도 있고, 그것들이 하나의 컴포넌트처럼 재사용 할 수도 있습니다.

합성 컴포넌트 예제

합성 컴포넌트도 마찬가지로 안드로이드 샘플의 API Demos 의 Views/Lists 안에 있는 Example4 와 Example6 클래스가 해당되는 예제입니다.

이것들은 SpeechView 기능을 합니다. SpeechView 란 말 그대로 연설문 보여주기 같은 기능입니다.

자바 클래스는 List4.java 와 List6.java 클래스이고, 이 클래스는 합성 컴포넌트 생성을 위해 LinearLayout 을 상속했네요~


커스텀 컴포넌트에 관한 글이었습니다.
꽤 긴글이 되어 버렸네요...;;

다음 포스팅엔 커스텀 컴포넌트에 이어지는 글인 이미 존재하는 뷰를 수정해서 커스텀 뷰를 만드는 것을 살펴보죠


[안드로이드] 오픈소스 받아서 실행해 보기 (리코더) Android

2010/11/15 11:42

복사 http://blog.naver.com/dythmall/30097179951

주의) SVN을 좀 아셔야 이 내용이 이해가 될 수 있습니다


안드로이드의 전체 소스는 공개가 되어 있습니다.

누구나 다운 받아서 보고 쓸 수 있지요.

이번에는 안드로이드 오픈소스를 받아서 빌드하고 실행해 보는 방법을 알아보겟습니다.


안드로이드 오픈소스라고 하면 부트로더, 리눅스 커널, 안드로이드 런타임, 등등 여러 가지의 Software Stack이 같이 있는데요

개발자들이 쉽게 보고 따라할 수 있는 Apps (안드로이드에 제공되는 기본엡)를 다운받아서 빌드해 보겟습니다.

예제는 SoundRecorder를 쓰겟습니다 (이게 젤 쉽고 간단합니다 ㅎㅎ)


윈도우 사용자라면 git을 직접 쓰기엔 좀 많은 작업이 필요 함으로 gitweb을로 snapshot을 받아오겟습니다

http://android.git.kernel.org/


이 경로로 가면 안드로이드 오픈소스의 천체 트리가 보입니다.

우리가 원하는건 그중 

platform/packages/apps/SoundRecorder.git

이것!


우선 처음에는 좀 헷 갈릴 수도 있습니다

보아야 할 곳은 shorLog 정도를 보면 되겟습니다.

이곳이 중요한 release들을 모아놓은 곳 입니다.

이중에도 더 중요한 release는 녹색 바탕으로 label을 부쳐 놓았습니다.


 오른쪽에 보이는 commit은 commit햇을때의 정보와 자세 로그를 볼 수 있습니다.

commitdiff는 말 그대로 commit된 파일들의 diff

tree는 그 revision때의 소스 트리 구조

snapshot - (이 부분이 저희에게 중요한 부분입니다) commit당시의 소스를 받아볼 수 있습니다.


그럼 eclair (안드로이드 2.1) 소스를 받아 봅니다.


snapshot을 누르면 tar.gz로 압축된 파일이 받아 집니다.

이것 (빵집이나 7zip으로 풀 수 있습니다) 압축을 풀면 SoundRecorder라는 폴더가 생성 됩니다.

이제 Eclipse project를 이 소스를 이용해서 만듭니다.

[File]->[new]->[Android Project]


New Android Project 다이얼로그에서 위와 같이 세팅을 해야 합니다.

ProjectName은 그대로 두시고

create Project from existing source를 선택 합니다.

그리고 soundrecorder가 있는 폴더를 선택 하면 모든 내용이 자동으로 입력 됩니다.

여기서 안드로이드 build target은 직접 선택 해야 합니다. (2.1로 선택해 주세요)

Finish를 누르면 SoundRecorder 프로젝트가 생성 됩니다.


우선은 빨간 x가 뜹니다..

찾아가 보면 SoundRecorder.java의 다음과 같은 라인에서 에러가 납니다.


mRecorder.startRecording(MediaRecorder.OutputFormat.AMR_NB, ".amr");


AMR_NB가 바뀌었나 봅니다.


mRecorder.startRecording(MediaRecorder.OutputFormat.RAW_AMR, ".amr");


이것으로 바꾸어 주면 에러가 사라집니다.

오 벌써 되는건가? 하고 build 버튼을 누르면 다음과 같은 메시지가 뜰겁니다.


 Re-installation failed due to different application signatures.

 You must perform a full uninstall of the application. WARNING: This will remove the application data!

 Please execute 'adb uninstall com.android.soundrecorder' in a shell.

 Launch canceled!


이미 같은 프로그램이 존재한답니다 (그쵸... 안드로이드 기본 어플이니 있겟죠 ㅎㅎㅎ)

근데 제 signing key가 구글의 key랑 달라서 지금 있는 어플을 없애고 하랍니다....

이건 불가능 합니다.  그럼 어덯게 할까요?


간단합니다 안드로이드는 2개의 앱이 같은 앱인가 아닌가를 package 이름을 보고 압니다. 

그래서  꼭꼭 내 어플을 만들때는 나만의 URL을 이용해서 만들라고 주의를 줍니다 (안그러면 이런 일이 많이 일어나겟죠)

그럼 package 이름을 바꾸죠 refactoring을 합니다. 저는 com.android.soundrecorder2 라고 바꾸었습니다.

http://blog.naver.com/dythmall/30096460128 - refactoring 하는 방법은 여기에 설명이 되어 있습니다.


xml부분도 고쳐야 하는데 그 부분은 다음과 같은 옵션을 주면 바꿀 수 있습니다.


OK를 누르면 package이름이 바뀌게 됩니다.

그런데 또 x가 나옵니다. 이번에는 


import com.android.soundrecorder.R;


이 부분인데요, 이곳은 수동으로 고칠 수 밖에 없습니다.

에러가 없어지면 이제 다시 빌드해서 실행해 봅니다.

근데 이번에는 인스톨은 되는데 실행이 안됩니다. ㅡ.ㅡ


AndroidManifest.xml을 열어봅니다. 

가만히 살펴보면 자주 보이던 intent filter가 보이지 않습니다.


이 필터를 넣고 다시 시도합니다!


앗! 이제야 되는 군요.


성공입니다.


사실 이 예제는 쉬운 축에 속합니다. 겔러리나 음악 프로그램은 조금더 신경써야하는 부분들이 있더군요


[펌] Android 개발 팁 50선 Android

2010/05/10 10:15

복사 http://blog.naver.com/kopidat/40106280563

 
개발중에 메모해둔 팁/힌트입니다.
한참을 헤매다가 때로는 3일에 1개 만들기도 하고, 하루에 1개 겨우 구현하기도 했던 
검색력 향상(?)를 꾀한 개발.
50개가 되었기에 포스팅을 걸어둡니다.
또 50개 모으면 2탄을;
(요약 부분이 있는데 잘려서 입력되네..)

번호

제목

출처

요약

1

이미지와 텍스트가 같이 들어간 버튼 만들기

http://www.androidpub.com/15765

<Button
android:layout_width="fill_parent"
android:layout_width="wrap_content"
android:drawableLeft="@drawable/ic_settings"
android:drawablePadding="4dp"
android:text="Settings"
/>
 
Button button = new Button(mContext);
button.setText("Close");
Drawable close = Drawable.createFromPath("/data/icon/image.png");
close.setBounds(0, 0, close.getIntrinsicWidth(), close.getIntrinsicHeight());

button.setCompoundDrawables(close, null, null, null);

2

버튼 색깔 바꾸기

http://stackoverflow.com/questions/1521640/standard-android-button-with-a-different-color


<?xml version="1.0" encoding="utf-8"?>    
<selector xmlns:android="http://schemas.android.com/apk/res/android">
    <item android:state_pressed="true" android:drawable="@drawable/red_button_pressed" />
    <item android:state_focused="true" android:drawable="@drawable/red_button_focus" />
    <item android:drawable="@drawable/red_button_rest" />
</selector>

3

전체화면 사용하기 (Status bar, Title bar 숨기기)

http://www.androidpub.com/4710


android:theme="@android:style/Theme.NoTitleBar.Fullscreen"

android:theme="@android:style/Theme.NoTitleBar"

getWindow().setFlags(WindowManager.LayoutParams.FLAG_FULLSCREEN,

 WindowManager.LayoutParams.FLAG_FULLSCREEN);


4

ImageButton의 투명 효과 사용하기

http://joywoni.egloos.com/2847047


android:background="#a0000000" 를 설정하면 배경이 투명해지므로 버튼 모양을 안봐도 된다.

5

Android 정리문서

http://sgap.springnote.com/pages/5076381


SurfaceView와 SurfaceHolder.Callback, thread

6

네이티브 안드로이드 개발 관련 블로그

http://hybridego.net/


7

안드로이드 개발 각종 예제 소스

http://www.androidpeople.com/2010/01/


8

메뉴별 이미지 처리

http://stackoverflow.com/questions/2065430/fixed-android-detecting-focus-pressed-color


<?xml version="1.0" encoding="utf-8"?>
<selector xmlns:android="http://schemas.android.com/apk/res/android">
    <item android:state_pressed="true"
        android:drawable="@android:drawable/btn_default" ></item>
    <item android:state_focused="true"
        android:drawable="@android:drawable/btn_default" ></item>
    <item android:drawable="@drawable/btn_default_red" ></item>
</selector>

9

객체 Style 처리

http://www.anddev.org/viewtopic.php?p=37330


10

Button Highlight

http://www.androidpeople.com/category/android-tutorial/


11

SurfaceView

http://vissel.tistory.com/92


12

android:configChanges

http://www.androidpub.com/52338


android:configChanges="orientation"

onConfigurationChanged()

13

전원관리

http://samse.tistory.com/entry/AlarmManager-PowerManager


PowerManager pm = (PowerManager) getSystemService(Context.POWER_SERVICE);

 PowerManager.WakeLock wl = pm.newWakeLock(PowerManager.SCREEN_DIM_WAKE_LOCK, "My Tag");

 wl.acquire();

   ..screen will stay on during this section..

 wl.release();

14

하드웨어 콘트롤 관련 PDF 문서

http://mikechen.com/classes/2009-11-27%20NTU%20Mobile%20Phone%20Programming%20-%20Mike%20Chen%20-%2010%20-%20Security,%20Camera,%20Audio%20and%20Video.pdf


15

unique device ID

고유값 가져오기

http://developer.android.com/reference/android/telephony/TelephonyManager.html#getDeviceId%28%29


TelephonyManager mTelephonyMgr = (TelephonyManager)getSystemService(Context.TELEPHONY_SERVICE);

String imei = mTelephonyMgr.getDeviceId();

16

안드로이드 네이티브 라이브러리Ⅰ

http://www.imaso.co.kr/?doc=bbs/gnuboard.php&bo_table=article&wr_id=34284


[다른블로그] http://infodev.tistory.com/322

17

Introduction android

http://yotteum.tistory.com/entry/Introduction-Android


안드로이드 소개

바인딩 설명

18

안드로이드 - 버튼 OnClickListener 인터페이스 구현

http://woosa7.tistory.com/entry/%EC%95%88%EB%93%9C%EB%A1%9C%EC%9D%B4%EB%93%9C-%EB%B2%84%ED%8A%BC-OnClickListener-%EC%9D%B8%ED%84%B0%ED%8E%98%EC%9D%B4%EC%8A%A4-%EA%B5%AC%ED%98%84

http://www.cyworld.com/kkjw1801/3222534


19

Android - Change Tab Background

http://escomic.net/218


TabWidget에서 추가되는 Tab의 Background변경하기

Tab마다 View를 얻어와서 직접 BackgroundDrawable을 지정하고

아래 막대부분은 reflection을 이용하여 꽁수로 바꿔치기 한다


tab_indicator.xml, tab_bar_left.xml, tab_bar_right.xml 내용은 <selector>로 정의

20

KH5200 드라이버 설치

http://kil.imradriss.co.cc:8000/tc/30


21

DrawableTop 이미지 변경하기

http://www.androidpub.com/10154


보기 1 ================================================
Drawable img = context.getResources().getDrawable(R.drawable.filename);
Drawable img2 = img ;

보기 2 ================================================
Drawable img = context.getResources().getDrawable(R.drawable.filename);
Drawable img2 = context.getResources().getDrawable(R.drawable.filename);

보 기
 3 ================================================
Drawable img = context.getResources().getDrawable(R.drawable.filename);
Drawable img2 = context.getResources().getDrawable(R.drawable.filename2);
================================================

22

Layout 사이즈 동적변경

http://www.androidpub.com/40481

http://gall.dcinside.com/list.php?id=accident2&no=1195485

LinearLayout ll = (LinearLayout)findViewById(R.id.write_LinearLayout);

LinearLayout.LayoutParams params = new LinearLayout.LayoutParams(LinearLayout.LayoutParams.FILL_PARENT,

400);  // 400 이라는 높이를 지정

ll.setLayoutParams(params);

23

Android UI 개발기: XML 안쓰고 UI 코딩하기

http://xrath.com/2009/11/android-ui-%EA%B0%9C%EB%B0%9C%EA%B8%B0-xml-%EC%95%88%EC%93%B0%EA%B3%A0-ui-%EC%BD%94%EB%94%A9%ED%95%98%EA%B8%B0/


24

전화상태 변화감지 리스너

PhoneStateListener 예제

http://www.kandroid.org/board/board.php?board=AndroidTechQnA&page=124&command=body&no=432


MyPhoneStateListener phoneListener=new MyPhoneStateListener();

TelephonyManager telephonyManager  =(TelephonyManager)getSystemService(TELEPHONY_SERVICE);

telephonyManager.listen(phoneListener,PhoneStateListener.LISTEN_CALL_STATE);


public class MyPhoneStateListener extends PhoneStateListener {...}

25

안드로이드 하드웨어관련 자료(통화,폰상태,네트워크,카메라,센서)

http://gtko.springnote.com/pages/5396297

http://developer.android.com/reference/android/content/Intent.html

http://developer.android.com/reference/android/net/ConnectivityManager.html

android.net.conn.CONNECTIVITY_CHANGE


26

sms 수신해서 요약내용 보여주기

http://www.anddev.org/recognize-react_on_incoming_sms-t295.html

http://flytop.tistory.com/62

android.provider.Telephony.SMS_RECEIVED


// SMS 수신 감지 등록

IntentFilter smsRcvFilter = new IntentFilter(CSmsReceiver .ACTION);

smsReceiver =  new CSmsReceiver();

registerReceiver(smsReceiver, smsRcvFilter);


//if(smsReceiver != null) {

//    unregisterReceiver(smsReceiver);

//}


<!-- SMS Broadcast Receiver 등록 -->

<receiver android:name=".common.CSmsReceiver">

<intent-filter>

<action android:name="android.provider.Telephony.SMS_RECEIVED" />

</intent-filter>

</receiver>

27

BroadcastReceiver XML설정하기

http://www.androidpub.com/186727

<receiver android:name="리시버클래스" android:enabled="true">
<intent-filter><action android:name="android.net.conn.CONNECTIVITY_CHANGE" /></intent-filter>
</receiver>

28

각종 Management 클래스

http://www.imaso.co.kr/?doc=bbs/gnuboard.php&bo_table=article&page=10&wr_id=34565

29

Dialog 구조 분석

(아이콘,텍스트 위치등)

http://sgap.springnote.com/pages/5235569


30

SMS 수신시 Toast 메시지 출력

http://www.androidpub.com/138352


Intent sendIntent = new Intent(Intent.ACTION_SEND); sendIntent.addCategory("android.intent.category.DEFAULT");      

sendIntent.putExtra("address", PhoneNumberUtils.formatNumber(phoneNumber));

sendIntent.putExtra("exit_on_sent", true);

sendIntent.putExtra("subject", "TEST MMS");

sendIntent.putExtra("sms_body", "MMS 테스트입니다.");

context.startActivity(sendIntent);

31

Broadcast Receiver :네트워크상태 체크

http://www.anddev.org/viewtopic.php?p=32088


OnReceive 메소드 내에서..

ConnectivityManager connec=  (ConnectivityManager)getSystemService(Context.CONNECTIVITY_SERVICE);

if(connec.getNetworkInfo(0).getState()==NetworkInfo.State.CONNECTED||connec.getNetworkInfo(1).getState()==NetworkInfo.State.CONNECTING ) {

text.setText("hey your online!!!");

//Do something in here when we are connected

}

elseif(connec.getNetworkInfo(0).getState()== NetworkInfo.State.DISCONNECTED||connec.getNetworkInfo(1).getState() == NetworkInfo.State.DISCONNECTED ) {

text.setText("Look your not online");

}

32

안드로이드 API기능 설명

http://www.jopenbusiness.com/mediawiki/index.php/Android


33

Actions for BroadcastReceiver

http://www.dearsoft.org/tag/broadcastreceiver/


34

Layout.out.xml 생성되는 문제

http://www.androidpub.com/101585

main.out.xml 파일은 삭제해 주세효~
그건 xml 을 펼쳐둔 상태에서 Run 을 하면 만들어 지는데, 그럼 제대로 실행이 되지 않아효~

35

Multi Touch

http://www.mentby.com/naya/multitouch-support-in-android-20.html

http://gist.github.com/324166

2.0 부터 지원

36

ScrollView 스크롤 하단으로 내리기

http://www.anddev.org/viewtopic.php?p=36823

sv.post(new Runnable() {

             public void run() {

                           sv.fullScroll(ScrollView.FOCUS_DOWN);

             }

});

37

Timer 만들기

http://developer.android.com/intl/de/resources/articles/timed-ui-updates.html

http://www.developer.com/java/ent/print.php/3589961

http://www.androidpub.com/4374

http://blog.inculab.net/25


38

Logcat 동작안하는 에러 발생시 처리

(Could not create the view: For input string: "")

http://www.mail-archive.com/android-developers@googlegroups.com/msg60683.html

hide details Aug 18
 
I have had the same problem.
 
The logcat view crashes after I inserted a filter containing a ":" in
the filtername.
I solved the problem by changing the settings in the file
".metadata/.plugins/org.eclipse.core.runtime/.settings/
com.android.ide.eclipse.ddms.prefs" placed in the workspace of
eclipse.
com.android.ide.eclipse.ddms.logcat.filters= was the key of the fault
setting.


39

SSL 인증서 등록하기

http://www.java2go.net/blog/197?TSSESSION=1202a1a23fa67bae15ce3ab15a5a0cea

http://www.virgo81.net/70

http://crazybob.org/2010/02/android-trusting-ssl-certificates.html

http://www.bouncycastle.org/latest_releases.html

keytool -import -keystore cacerts -file C:\cert\TrialRootCA.cer -alias afcert

40

Signing By Private Key

http://www.devx.com/wireless/Article/39972/1954


41

영상 녹화하기

http://www.anddev.org/viewtopic.php?p=24723#24723


42

SurfaceView 의 이해

http://androidhuman.tistory.com/entry/카메라를-이용하자-SurfaceView에-대한-이해


43

안드로이드 JAVA 소스

http://anddev.tistory.com/77

http://anddev.tistory.com/50

http://anddev.tistory.com/42

{SDK_LOCATION}/platforms/1.5/sources

44

SSL 인증서 우회하기

http://www.experts-exchange.com/Programming/Languages/Java/Q_23063074.html

http://7bee.j2ee.us/blog/2008/03/28/1206704820000.html


45

JAVA SSL 관련 공식문서

http://java.sun.com/javase/6/docs/technotes/guides/security/jsse/JSSERefGuide.html

http://java.sun.com/javase/6/docs/technotes/guides/security/jsse/JSSERefGuide.html#CreateKeystore

http://java.sun.com/javase/6/docs/technotes/guides/security/jsse/JSSERefGuide.html#CodeExamples

http://java.sun.com/javase/6/docs/technotes/guides/security/jsse/samples/sockets/client/SSLSocketClient.java


46

SSL 인증서 증명에러 해결하기

http://blog.naver.com/PostView.nhn?blogId=fidelis98&logNo=140103425406&redirect=Dlog&widgetTypeCall=true

http://code.google.com/p/android/issues/detail?id=1946

http://developer.android.com/intl/de/reference/javax/net/ssl/TrustManager.html

http://mail-archives.apache.org/mod_mbox/hc-httpclient-users/200906.mbox/

http://www.exampledepot.com/egs/javax.net.ssl/GetCert.html?l=rel

http://www.android-portal.com/2007/12/20/secure-server-socket-with-tlsssl-on-android-fails/

http://www.exampledepot.com/egs/javax.net.ssl/TrustAll.html?

http://blog.keduall.co.kr/lsb76/entry/자바-SSL-접속-오류

해결방법: http://www.exampledepot.com/egs/javax.net.ssl/TrustAll.html


// Create a trust manager that does not validate certificate chains

TrustManager[] trustAllCerts = new TrustManager[]{

   new X509TrustManager() {

        public java.security.cert.X509Certificate[] getAcceptedIssuers() {

             return null;

        }

        public void checkClientTrusted( java.security.cert.X509Certificate[] certs, String authType) {

        }

        public void checkServerTrusted( java.security.cert.X509Certificate[] certs, String authType) {

        }

    }

};

47

안드로이드 Service 에서 Activity 를 실행하는 방법 

http://blog.naver.com/huewu/110084868855


Intent i = new Intent(this, ServiceTest.class);

PendingIntent p = PendingIntent.getActivity(this, 0, i, 0);

try {

           p.send();

} catch (CanceledException e) {

           e.printStackTrace();

}


48

안드로이드 이미지(사진) 불러오기

http://shinluckyarchive.tistory.com/469

http://developer.android.com/reference/android/graphics/BitmapFactory.Options.html


import android.graphics.Bitmap;
import android.graphics.BitmapFactory;
...
BitmapFactory.Options options = new BitmapFactory.Options();
options.inSampleSize = 8;  
Bitmap src = BitmapFactory.decodeFile(fileListSDCard[i], options);
Bitmap resized = Bitmap.createScaledBitmap(src, 100, 100, true);


49

SSL 인증키 무조건 우회하기

http://groups.google.com/group/android-developers/browse_thread/thread/62d856cdcfa9f16e

public class _FakeX509TrustManager implements X509TrustManager { 
        private static TrustManager[] trustManagers; 
        private static final X509Certificate[] _AcceptedIssuers = new 
X509Certificate[] {};
 
        @Override 
        public void checkClientTrusted(X509Certificate[] chain, String 
authType) throws CertificateException {
 
        } 
        @Override 
        public void checkServerTrusted(X509Certificate[] chain, String 
authType) throws CertificateException {
 
        } 
        public boolean isClientTrusted(X509Certificate[] chain) { 
                return true; 
        } 
        public boolean isServerTrusted(X509Certificate[] chain) { 
                return true; 
        } 
        @Override 
        public X509Certificate[] getAcceptedIssuers() { 
                return _AcceptedIssuers; 
        } 
        public static void allowAllSSL() { 
                HttpsURLConnection.setDefaultHostnameVerifier(new HostnameVerifier() 
             {
 
                        @Override 
                        public boolean verify(String hostname, SSLSession session) { 
                                return true; 
                        } 
                }); 
                SSLContext context = null; 
                if (trustManagers == null) { 
                        trustManagers = new TrustManager[] { new _FakeX509TrustManager() }; 
                } 
                try { 
                        context = SSLContext.getInstance("TLS"); 
                        context.init(null, trustManagers, new SecureRandom()); 
                } catch (NoSuchAlgorithmException e) { 
                        e.printStackTrace(); 
                } catch (KeyManagementException e) { 
                        e.printStackTrace(); 
                } 
                 
HttpsURLConnection.setDefaultSSLSocketFactory(context.getSocketFactory()); 
        } 
}

50

효과음 관련 자료(Creating Sound Effects in Android)

http://www.androidpub.com/257540#4

public void playSound(int index) {
               float streamCurrent = mAudioManager.getStreamVolume(AudioManager.STREAM_MUSIC);  
               float streamMax = mAudioManager.getStreamMaxVolume(AudioManager.STREAM_MUSIC);      
               float streamVolume = streamCurrent / streamMax;   
               mSoundPool.play(mSoundPoolMap.get(index), streamVolume, streamVolume, 1, 0, 1f); 
}


+ Recent posts