
오늘도 공부
[펌][Android] 안드로이드 인디케이터 설정 - NotificationManager 본문
|
2010/08/02 13:34 [출처] |
안드로이드에서 NotificationManager를 통해 인디케이터 바를 설정하거나 출력(notify)할 수 있다.
흔히들 인디케이터 바를 status 바라도 말하기도 한다.
우선 간단하게 getSystemService() 메소드를 통해 NotificationManager을 받아올수 있다.
이후 flags 값을 셋팅하고, setLatestEventInfo를 통해 noti 선택 시 실행될 Activity를 설정해 주면된다.
 private void showNotify() {

    NotificationManager nm = (NotificationManager)getSystemService(NOTIFICATION_SERVICE);

    int _ID = 0xffff0001;


    Notification notification = null;

    notification = new Notification(R.drawable.icon, "start notify", System.currentTimeMillis());

    notification.flags = Notification.FLAG_ONGOING_EVENT;


    PendingIntent contentIntent = PendingIntent.getActivity(this, 0, new Intent(this, ServiceSample.class), 0);

    notification.setLatestEventInfo(this, "Test Notify", "hello notification", contentIntent);

    nm.notify(_ID, notification);

 }
위 메소드 showNotify() 를 호출 하게 되면 아래와 같이 인디케이터 영역이 초기화되면서 등록한 아이콘과 메세지가 출력된후
![]()
사용자가 지우기 이전까지 인디케이터 영역에 존재하게 된다.

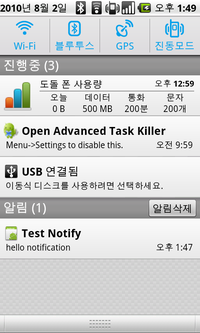
위와 같이 호출 시 다음과 같이 인디케이터 영역에 아이콘을 출력하고 notify 할 수 있다.
왼쪽 이미지 인디케이터 영역에 안드로이드 아이콘이 출력된 것을 확인할 수 있다.
이 이미지는 Notification 객체 생성 시 지정해 줄수 있다. 여기서는 R.drawable.icon 과 같이 기본 아이콘을 사용 하였다.
new Notification(R.drawable.icon, "start notify", System.currentTimeMillis());
오른쪽 이미지는 인디케이터 바를 아래로 드레그한 화면이다. 알림에 해당 noti가 등록된 것을 볼 수 있다.
여기서는 아래와 같이 등록을 하고 클릭 시 연결(link)될 인텐트, class 를 PandingIntent 로 생성 후 setLatestEventInfo() 메소드를 사용하여 연결했다.
PendingIntent contentIntent = PendingIntent.getActivity(this, 0, new Intent(this, ServiceSample.class), 0);
notification.setLatestEventInfo(this, "Test Notify", "hello notification", contentIntent);
알림 영역이 아닌 진행중 영역에 notify 를 등록 하고 싶다면 flag 를 아래와 같이 설정해 주면 된다.
notification.flags = Notification.FLAG_ONGOING_EVENT;
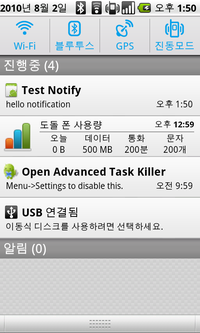
이전 이미지와 다르게 알림영역이 아닌 진행중 영역으로 등록 되어 있는 것을 볼 수 있다.
'Android > Tip&Tech' 카테고리의 다른 글
| [펌] Android 개발 팁 50선 Android (0) | 2010.12.07 |
|---|---|
| [펌]안드로이드 aidl 시작하기 (0) | 2010.12.07 |
| 미디어플레이어 백그라운드 작업 참고문 (0) | 2010.12.04 |
| MediaPlayer 순환표 (0) | 2010.12.03 |
| [안드로이드]롤오버 이미지 만들기 (0) | 2010.12.03 |