'Android > 추천사이트모음' 카테고리의 다른 글
| Mp3 Tag 가져오기 (0) | 2010.12.09 |
|---|---|
| [펌]안드로이드 Custom View를 이용하여 Custom Android Button 만들기 (0) | 2010.12.08 |
| 안드로이드 추천 팁 있는 사이트 (0) | 2010.12.03 |
| [안드로이드]서비스와 알람 설명 괜찮은 곳 (0) | 2010.11.25 |
| 구글의 인터넷주소 축약서비스 (0) | 2010.11.25 |
| Mp3 Tag 가져오기 (0) | 2010.12.09 |
|---|---|
| [펌]안드로이드 Custom View를 이용하여 Custom Android Button 만들기 (0) | 2010.12.08 |
| 안드로이드 추천 팁 있는 사이트 (0) | 2010.12.03 |
| [안드로이드]서비스와 알람 설명 괜찮은 곳 (0) | 2010.11.25 |
| 구글의 인터넷주소 축약서비스 (0) | 2010.11.25 |
[펌]http://kaludin.egloos.com/2653125
AIDL이란?
http://developer.android.com/guide/developing/tools/aidl.html
http://www.androidpub.com/8013
http://www.androidpub.com/6167
http://codelab.textcube.com/457
http://www.flowdas.com/blog/archives/2337.html
스텁은 원격 객체에 대한 메소드 호출을 실제 구현된 원격 객체가 있는 서버로 전송하는 일을 담당하는 대리자 역할을 하는 객체이다. 클라이언트 객체가 가지게 되는 원격 객체에 대한 참조는 실제로는 지역의 스텁에 대한 참조이다. 스텁 파일은 서버 쪽과 클라이언트 쪽 모두에 필요하다. Naming 클래스나 Registry 인터페이스의 lookup() 메소드를 사용하여 RMI 등록부에 등록된 원격 객체에 대한 참조를 얻을 때 이 메소드가 반환하는 객체는 실제 원격 서버 객체가 아니라 원격 서버에 대한 스텁 객체가 된다.
필요성을 느낄때 : Activity에서 Service를 바인딩 한후 Activity에서 서비스 메소드는 간단히 호출되지만..
Service에서 Activity 메소드를 호출하는 건 힘들다는 걸 느꼈다..
그래서 공부한게 이 방법인 것 같다.^^;
출처 :
http://blog.naver.com/dlgusrb5061?Redirect=Log&logNo=120101130132
아래의 설명은 안드로이드 프로그래밍을 기본적으로 한다고 생각하고 쓴다
1. 기본적으로 안드로이드 프로젝트를 생성한다.
2. 액티비티 에서 생성할 서비스 클래스를 만든다
3. .aidl 파일을 만든다
package com.service; // 패키지 이름 따라서..
interface state{ // state 라는 인터페이스를 만든다 파일명도 state.aidl
int getState(); // 값을 주기 위한 함수
int setState(int k); // 값을 입력하기 위한 함수
}
4. 위의 인터페이스를 이용하여 서비스에 bind를 생성한다. Stub를 이용하여 만들수 있다.
// state.Stub 클래스
private final state.Stub binder = new state.Stub() {
@Override
public int getState() throws RemoteException {
return 0;
}
@Override
public int setState(int k) throws RemoteException {
return 0;
}
};
synchronized private int getStatePageImpl() {
return 0;
}
5. 서비스 클래스 에서 onBind함수의 return을 위의 binder로 해 준다
@Override
public IBinder onBind(Intent intent) {
return binder;
}
6. 액티비티 클래스 에서 ServiceConnection 을 이용하여 서비스가 시작될 때와 종료될 때 상황을 구현한다
import android.content.ServiceConnection;
private ServiceConnection serviceConn = new ServiceConnection() {
public void onServiceConnected(ComponentName className, IBinder binder) {
service = state.Stub.asInterface(binder);
}
public void onServiceDisconnected(ComponentName className) {
}
};
7. 서비스 시작과 종료를 구현한다
<시작>
serviceintent = new Intent(this, mainService.class);
bindService(serviceintent, serviceConn, BIND_AUTO_CREATE);
<종료>
unbindService(serviceConn);
==========================자세한 설명
AIDL를 사용하여 원격 언터페이스를 사용하거나 설계(디자인)하기 - 번역 2008년 2월 20일 김문섭 (Easygn Institute) 그 코드를 구획화 하는 작업은 골치아픈 작업이고, 그래서 우리는 당신을 위해 AIDL 도구를 제공하게 되었습니다. AIDL (안드로이드 인터페이스 정의 언어)는 하나의 안드로이드 장치 위에서 잠김프로세스 통신규약(IPC)에 의해 * AIDL를 사용하여 IPC를 구현합니다. 1. 내 .aidl 파일을 작성하기 2. 내가 만든 .aidl 파일을 추가하기 3. 내 인터페이스 메소드를 구현하기 4. 내 인터페이스를 클라이언트에 통보하기 AIDL 은 하나 이상의 메소드를 함께 사용하는 인터페이스를 당신이 선언한 수 있도록 간단한 문법을 쓰며, List - List 내부의 모든 엘리먼트는 반드시 하나의 이 아래에 있는 리스트 내부의 한 속성이어야 합니다. Map - 맵 객체 안의 모든 엘리먼트들은 반드시 리스트 안에있는 하나 이상의 속성들 이어야 하며, CharSeq- TextView 나 다른 위젯 오브젝트들로 CharSequence 속성들을 사용하기에 매우 유용합니다. 다른 AIDL 생성된 인터페이스는 언제나 레퍼런스로 통과됩니다. import 를 명시하는 방법은 아래와 같습니다. 여기 기본 AIDL 문법이 있습니다 - [ 문서 내의 소스코드 참조] ● 인터페이스 구현 AIDL는 당신과 함께 비슷한 이름을 가진 당신의 .aidl file 를 위해 인터페이스 파일을 생성합니다 생성된 인터페이스를 포함하여 한 추상화 내부 클래스 명명 조각에 모든 당신이 선언한 .aidl 파일 그 메소드를을 선언합니다. 당신의 인터페이스를 구현할 때, YourInterface.Stub 를 확장(상속), 그리고 메소드를 구현 (.aidl 파일과 stub 구현 메소드를 여기 간단한 IRemoteService 호출에 대한 인터페이스 구현 예제가 있으며, 단일 메소드로 분리되고 // No need to import IRemoteService if it's in the same project. ● 인터페이스 구현에는 몇 가지 규칙이 있습니다. * 당신의 호출 전송에 대하여 미리 예외검사를 하지 않습니다. 이제 당신은 인터페이스 구현법을 알게 되었고 클라이언트에 공개할 차례 입니다. 당신의 서비스에 발표 한단 뜻이기도 합니다. 여기 IRemoteService 인터페이스를 클라이언트 공개하는 일부 코드가 있습니다. (문서 소스코드 참조) 만약 당신이 만든 클래스가 한 프로세스 가 다른 AIDL 인터페이스를 경유하여 보내게 되는 일을 수행한다면, 그일도 가능합니다. 여기에 5개 파티의 Parcelable 프로토콜을 지원하는 클래스 생성법이 있습니다. 1. Parcelable 인터페이스로 당신의 클래스를 구현하세요. AIDL 는 이 메소드와 필드를 당신의 오브젝트들의 구획화와 비구획화 된 곳에 생성할 것입니다. 여기에 Rect 클래스를 Parcelable 프로토콜을 통해 구현한 예제가 있습니다. (문서 코드 참조) // Declare Rect so AIDL can find it and knows that it implements 여기엔 당신의 원격 인터페이스를 호출할 수 있도록 클래스를 호출하는 단계 입니다. 1. 당신이 정의해둔 .aidl 파일을 인터페이스 속성 변수로 선언합니다. 2. ServiceConnection 을 구현합니다. 3. ApplicationContext.bindService() 를 호출합니다. 서비스연결 완성된 것의 인수를 넘깁니다. 4. 당신의 완성된 ServiceConnection.onServiceConnected() 것으로 IBinder 인스턴스 값을 받을 수 있습니다. 5. 메소드를 당신이 정의한 인터페이스로 호출합니다. 당신은 언제나 예외 점검에 잡힐 수 있습니다. DeadObjectException, 6. 연결을 해제합니다. ApplicationContext.unbindService() 를 인터페이스의 인스턴스와 함께 호출합니다. * 오브젝트는 맞은편의 프로세스의 갯수를 참조합니다.
그 동안 각각의 어플리케이션은 자신이 해당되는 프로세스에서 실행되며, 다른 프로세스가 실행시되는
응용프로그램 인터페이스나 프로세스 사이에 개체를 전달해야 할 경우에 당신은 서비스를 쓰기가 가능합니다.
기본 적으로 안드로이드 플랫폼 상에서 한 프로세스는 메모리상에서, 다른 프로세스에 대한 정상적인 액세스가 불가능합니다.
한마디로, 그들은 오브젝트 안에서 운영체제 시스템이 이해할 수 있도록 세분화된 개체를 필요로 합니다,
그리고 오브젝트 간의 구획화 작업을 당신이 하도록 합니다.
두 프로세스들 사이에 대화가 가능하도록 하기위한 목적으로 생성되어진 코드를 사용할 수 있게하는 IDL 언어 입니다.
만약 당신이 한 프로세스(예: Acitivity객체) 안의 코드가
또 다른 프로세스(예: Service 객체) 안의 한 오브젝트 위의것을 필요로 하게 된다면
당신은 AIDL 을 사용하여 구획화 파라미터들의 코드를 생성하게 될 것입니다.
그 AIDL IPC 메커니즘은 COM or Corba 와 유사한 인터페이스를 기반으로 하고 있습니다.
그러나 보다 가볍고 빠르게 만들어졌습니다.
이것은 한 프록시 클래스와 클라이언트 클라이언트 사이에 값을 넘길 수 있도록 구현하는데 사용되어 집니다.
이 페이지는 다음의 주요 단원으로 나눠졌습니다:
* .aidl 포맷의 IPC Class 를 호출해 봅니다.
◎ AIDL 를 통해 IPC 구현하기
AIDL를 사용하여 IPC 서비스를 구현하는 순서는 다음과 같습니다.
- 이 파일은 미리 정의된 메소드와 필드를 클라이언트에 사용할 수 있도록
인터페이스(내인터페이스.aidl)를 정의합니다.
- (당신에 의해 이클립스 플러그인이 관리하도록 합니다) 컴파일러로 안드로이드에 인클루드 하고
AIDL를 호출하고, tool/ 안에 넣습니다.
- AIDL 컴파일러는 당신의 AIDL 인터페이스로부터 자바프로그래밍 언어로 구현된 것을 생성합니다.
이 인터페이스는 한 인터페이스(그리고 IPC 호출를 위해 필수적인 약간의 메소드가 추가된)를 상속한
하나의 추상화 클래스로 명명된 조각을 가집니다.
- 만약 당신이 서비스에 기재한다면, 한 당신이 구현된 인터페이스 클래스의 인스턴스를
Service 로 확장 오버라이드된 Service.onBind(Intent) 에게 반환할 것입니다.
● .aidl 파일 작성하기
패러미터나 반환값을 가질 수 있습니다. 그 패러미터들과 반환값은 다양한 타입이 될 수 있으며,
심지어는 AIDL로 생성된 인터페이스도 될 수 있습니다.
그러나 이 점을 중요하게 참고해야 합니다. 생성되지 않은 모든 타입,
심지어 만약 같은 패키지에 정의된 당신의 인터페이스를 포함해서 당신은 반드시 import 해야 합니다.
여기에 AIDL 가 자체 지원할 수 있는 데이터 타입이 있습니다.
* 원시형태의 자바 프로그래밍 언어타입(int, boolean 기타) - import 명시가 필요하지 않습니다.)
* 다음에 해당되는 클래스(import 명시가 필요치 않습니다.)
String
다른 AIDL로 생성된 인터페이스와 세부 가능화된 것들을 인클루드 합니다. 리스트는 제네릭 클래스 (예: List<String>)를
사용하는 방법을 써도 됩니다. 다른 측면의 현실적이고 구체적인 클래스라면, 비록 메소드는 리스트 인터페이스를 사용하여
생성된 것일지라도, 항상 ArrayList 를 통해 받을 수 있도록 하는 것입니다,
다른 AIDL로 생성된 인터페이스와 세부 가능화된 것들을 인클루드 합니다.
제너릭 맵 (예: Map(String, Integer)은 지원하지 않습니다. 다른 측면의 현실적이고 구체적인 클래스라면,
비록 메소드는 맵 인터페이스를 사용해 생성된 것일지라도 항상 해쉬맵을 통해 받는 것입니다.
uence
사용자 정의를 구현 클래스는 세분화가능한 프로토콜을 하거나 값 별로 전달합니다. import를 명시하는 방법은 아래와 같습니다.
만약 당신이 이클립스 플러그인을 사용한다면 AIDL은 빌드 프로세스(프로젝트 빌드를 위해 미리 AIDL을 실행시킬 필요가 없습니다)
파트에 자동으로 실행되도록 합니다.
만약 이 플러그인을 쓰게되면 당신은 AIDL을 먼저 실행하게 될 것입니다.
조각은 또한 약간의 헬퍼 메소드, 그 중에 가장 많은 asInterface(), 어느 곳에 가져온 IBinder ( application.Context.bindService()가
성공했을 때의 클라이언트 onServiceConnected() 구현체 ), 그리고 IPC메소드를 호출하는데 사용된 인터페이스의 인스턴스의 리턴 값
들로 선언되어 있습니다. Calling an IPC 섹션을 참고하면 좀더 캐스트하는 것에 대한 더 많은 사항을 알 수 있습니다.
안드로이드 빌드프로세스 가 .Java 파일을 프로세스하기 전에 먼저 만들도록 할 수 있습니다. )
getPid 를 사용한 익명의 인스턴스의 경우입니다. (참고할 것):
private final IRemoteService.Stub mBinder = new IRemoteService.Stub(){
public int getPid(){
return Process.myPid();
}
}
* IPC는 동시에 호출 됩니다. 만약 당신이 IPC 서비스가 보다 많은 작은 밀리초 단위로 처리해나갈 필요가 있다고 느끼면
알고 있다면, 당신은 되도록 Acitivity/View 쓰레드를 호출하지 말아야 하는데, 그 이유는 CPU가 특정 어플리케이션(안드로이드는 "Application not Responding" 다이얼로그를 표시할 수도 있습니다)에 매달려 정체될 될 수도 있기 입니다.
다른 쓰레드로 나눠서 처리하는 방법을 시도해 봅니다.
* 메소드들은 이렇게만 지원됩니다 " 당신은 static 필드 형태로 AIDL 인터페이스를 선언할 수 없습니다.
● 인터페이스를 클라이언트에 공개하기
Service를 상속받고 Service.onBind(Intent) 를 구현하도록 받아서 구현된 인터페이스 클래스 의 인스턴스를 반환합니다.
● 패러미터 값을 Parcelables(꾸러미객체) 를 이용해서 인수값으로 넘겨주기
주의 :
Parcelables 는 현재 당신이 이클립스 플러그인을 사용할시에 작동하지 않습니다.
강제로 시도할 경우 다음과 같은 에러들을 보게 될 것입니다. :
.aidl files that only declare parcelables don't need to go in the makefile
aidl can only generate code for interface, not parcelables
이것으로 한계가 있음을 알게 되었습니다. Parcelable은 역시 build.xml 파일들 이나 당신이 가진
사용자정의 빌드 시스템만을 사용할 수 있습니다.
작업공간은 당신은 위해 aidl tool 로 손안의 모든 인터페이스를 구현하고 추가할 수 있도록
당신의 이클립스 프로젝트 상에서 실행되어 집니다.
왜 이클립스가 aidl 파일 컴파일 시도가 불가능한지를 5장을 통해 알아보세요.
당신은 당신의 클래스가 다른 측면의 IPC 에게도 유효하다면. 그 코드를 안전하게 보호해야 합니다.
일반적으로 그것은 당신이 시작과 동시에 서비스와 의사소통을 할 수 있음을 의미합니다.
2. public void writeToParcel(Parcel out) : 오브젝트와 꾸러미에 쓰기의 현재 상태를 보존할 수 있도록 다음과 같이 구현하세요.
3. public void readToParcel(Parcel in) : 오브젝트로부터 꾸러미 값을 읽을 수 있도록 다음과 같이 구현합니다.
4. CREATOR를 호출할 static 필드를 추가합니다. 당신의 클래스에 이것은 Parcelable.Create 인터페이스로 구현할 수 있습니다.
5. 마지막이지만 남은 것이 있습니다. aidl 파일을 AIDL 도구가 찾을 수 있도록 parcelable 클래스에 추가하되,
하지만 당신의 빌드에 추가하지 마세요. 이것은 C 헤더파일을 쓰는 것과 비슷합니다.
당신은 aidl을 컴파일할 수 없습니다. parcelable 로 하여금 마치 헤더파일을 기본적으로 컴파일할수 없는 것 처럼 말입니다.
Rect.aidl 예제가 있습니다.
package android.graphics;
// the parcelable protocol.
parcelable Rect;
구획화하는 예쁘고 간단한 Rect 클래스 입니다. 다른 메소드에서 당신이 꾸러미에 쓴 값이
꾸러미 위에서 어떤 식으로 보여지는지를 살펴보세요.
주의 : 다른 프로세스로 부터 데이터를 받는 것에 보안이 되어있음을 잊지마세요.
예로, Rect는 꾸러미로 부터 4개의 값을 읽지만 이것은 동의 하에 안전하게 올려졌습니다.
하지만 이것은 위로 당신에게 안전하게 동의가능한 범위내의 무엇이든지 호출해서 시도하도록 만들어져 있습니다.
구획화로부터 안전하게 보호하는 방법을 알기 위해 안드로이드에서 보안, 권한에 관한 문서를 자주 참고하세요.
● IPC 메쏘드를 호출하기
YourInterfaceName.Stub.asInterface((IBinder)Service) 를 호출해서 Yourinterface 속성으로 변환후 넘깁니다.
어느것은 연결이 끊어질 수도 있습니다 : 이것은 오직 원격메소드를 통해 예외처리 검사를 해야 합니다.
약간의 IPC 서비스 호출에 대해 덧붙이자면.
* 당신은 익명의 오브젝트에 메소드 arguments를 보낼 수 있습니다.
여기에 AIDL 로 만들어진 서비스를 호출하는 약간의 코드 예제가 있습니다. ApiDemos project로부터 원격 Activity 샘플을 참조하세요
[출처] 안드로이드 서비스 + AIDL + Activity |작성자 좋은사람
| [안드로이드] 오픈소스 받아서 실행해 보기 (리코더) Android (0) | 2010.12.07 |
|---|---|
| [펌] Android 개발 팁 50선 Android (0) | 2010.12.07 |
| [펌][Android] 안드로이드 인디케이터 설정 - NotificationManager (0) | 2010.12.06 |
| 미디어플레이어 백그라운드 작업 참고문 (0) | 2010.12.04 |
| MediaPlayer 순환표 (0) | 2010.12.03 |
|
2010/08/02 13:34 [출처] |
안드로이드에서 NotificationManager를 통해 인디케이터 바를 설정하거나 출력(notify)할 수 있다.
흔히들 인디케이터 바를 status 바라도 말하기도 한다.
우선 간단하게 getSystemService() 메소드를 통해 NotificationManager을 받아올수 있다.
이후 flags 값을 셋팅하고, setLatestEventInfo를 통해 noti 선택 시 실행될 Activity를 설정해 주면된다.
 private void showNotify() {

    NotificationManager nm = (NotificationManager)getSystemService(NOTIFICATION_SERVICE);

    int _ID = 0xffff0001;


    Notification notification = null;

    notification = new Notification(R.drawable.icon, "start notify", System.currentTimeMillis());

    notification.flags = Notification.FLAG_ONGOING_EVENT;


    PendingIntent contentIntent = PendingIntent.getActivity(this, 0, new Intent(this, ServiceSample.class), 0);

    notification.setLatestEventInfo(this, "Test Notify", "hello notification", contentIntent);

    nm.notify(_ID, notification);

 }
위 메소드 showNotify() 를 호출 하게 되면 아래와 같이 인디케이터 영역이 초기화되면서 등록한 아이콘과 메세지가 출력된후
![]()
사용자가 지우기 이전까지 인디케이터 영역에 존재하게 된다.

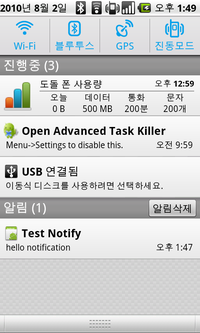
위와 같이 호출 시 다음과 같이 인디케이터 영역에 아이콘을 출력하고 notify 할 수 있다.
왼쪽 이미지 인디케이터 영역에 안드로이드 아이콘이 출력된 것을 확인할 수 있다.
이 이미지는 Notification 객체 생성 시 지정해 줄수 있다. 여기서는 R.drawable.icon 과 같이 기본 아이콘을 사용 하였다.
new Notification(R.drawable.icon, "start notify", System.currentTimeMillis());
오른쪽 이미지는 인디케이터 바를 아래로 드레그한 화면이다. 알림에 해당 noti가 등록된 것을 볼 수 있다.
여기서는 아래와 같이 등록을 하고 클릭 시 연결(link)될 인텐트, class 를 PandingIntent 로 생성 후 setLatestEventInfo() 메소드를 사용하여 연결했다.
PendingIntent contentIntent = PendingIntent.getActivity(this, 0, new Intent(this, ServiceSample.class), 0);
notification.setLatestEventInfo(this, "Test Notify", "hello notification", contentIntent);
알림 영역이 아닌 진행중 영역에 notify 를 등록 하고 싶다면 flag 를 아래와 같이 설정해 주면 된다.
notification.flags = Notification.FLAG_ONGOING_EVENT;
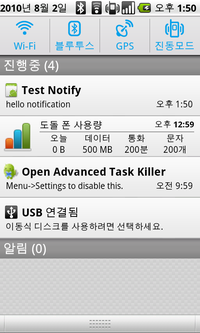
이전 이미지와 다르게 알림영역이 아닌 진행중 영역으로 등록 되어 있는 것을 볼 수 있다.
| [펌] Android 개발 팁 50선 Android (0) | 2010.12.07 |
|---|---|
| [펌]안드로이드 aidl 시작하기 (0) | 2010.12.07 |
| 미디어플레이어 백그라운드 작업 참고문 (0) | 2010.12.04 |
| MediaPlayer 순환표 (0) | 2010.12.03 |
| [안드로이드]롤오버 이미지 만들기 (0) | 2010.12.03 |
<Service >
예) 미디어 플레이어 : 꼭 Service로 만들어야 하는건 아니다. Activity로도 만들수있음.
장시간으로 하면서 user Interface가 거의 없는 것을 Service로 만드는 게 좋다.
* intent filter 존재 : intent로 시작됨.
Intent i = new Intent(명시적 or 암시적)
startService(i); // 한 life cycle 돌게됨.
- 객체는 singleton이라서 다른곳에서 startService()를 다시 호출해도 onCreate()는 되지않고 onStart()만 다시불린다.
stopService(i);
bindService(i); // 내 액티비티에서 저 서비스 연결해서 뭔가 뽑아내고자 할때
unbindService(i);
* Life Cycle
onCreate()
| |
onStart() onBind()
...
thread
(장시간 이용할시)
...
onStop() unBind()
| |
onDestroy()
onCreate() -> onStart() -> onStop() -> onDestroy();
Binding할때 : onCreate() ->onBind() -> unBind() -> onDestroy();
onBind()
{
return new My();
}
class My extends Binder {
service getService();
return 0;
}
ServiceConnection타입의 객체 (interface) 를 inner class로 만듬.
- onServiceConnected(Binder b);, onServiceDisConnected() 두개 overriding해야됨.
Connection완료된 다음에 Binding정보 넘겨주는 게 맞음.
b.getService() 이런식으로..
BindService할때 매개변수로 ServiceConnection을 매개변수로 넘겨줌.
쓰레드를 얼마나 깔끔하게 짜느냐도 관건..
* Background Thread (<-> Main Thread(UI Thread))
오래걸리는 작업이 있을 시 Background thread로 돌린다.
왜냐하면 5초이상 반응해주지 못하면 에러이기때문.
Binder-post()
[실습]
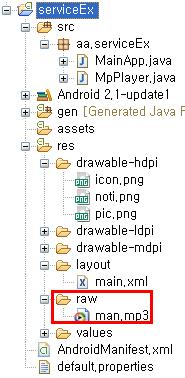
프로젝트 새로 생성 후,
res폴더밑에 폴더 raw하나 만들어서 kara.mp3, start.png, stop.png파일을 넣는다.
[AndroidManifest.xml]
Service 하나 추가한다.
<?xml version="1.0" encoding="utf-8"?>
<manifest xmlns:android="http://schemas.android.com/apk/res/android"
package="chap8.Service"
android:versionCode="1"
android:versionName="1.0">
<application android:icon="@drawable/icon" android:label="@string/app_name">
<activity android:name=".Main"
android:label="@string/app_name">
<intent-filter>
<action android:name="android.intent.action.MAIN" />
<category android:name="android.intent.category.LAUNCHER" />
</intent-filter>
</activity>
<service android:name="PlayService"></service>
</application>
<uses-sdk android:minSdkVersion="7" />
</manifest>
[main.xml]
<?xml version="1.0" encoding="utf-8"?>
<LinearLayout xmlns:android="http://schemas.android.com/apk/res/android"
android:orientation="vertical" android:layout_width="fill_parent"
android:layout_height="fill_parent">
<LinearLayout xmlns:android="http://schemas.android.com/apk/res/android"
android:orientation="horizontal" android:layout_width="fill_parent"
android:layout_height="wrap_content">
<ImageButton android:id="@+id/ImageButton01"
android:layout_width="wrap_content" android:layout_height="wrap_content"
android:src="@raw/start"></ImageButton>
<ImageButton android:id="@+id/ImageButton02"
android:layout_width="wrap_content" android:layout_height="wrap_content"
android:src="@raw/stop"></ImageButton>
</LinearLayout>
<ProgressBar
android:id="@+id/ProgressBar01"
android:layout_width="fill_parent" android:layout_height="wrap_content"
style="?android:attr/progressBarStyleHorizontal"></ProgressBar>
</LinearLayout>
[PlayService.java]
package chap8.Service;
import android.app.Service;
import android.content.Intent;
import android.media.MediaPlayer;
import android.os.Binder;
import android.os.IBinder;
public class PlayService extends Service implements Runnable {
MediaPlayer player;
boolean flag = true;
private int duration;
private int currentPosition;
// getter, setter함수
public boolean isFlag() {
return flag;
}
public void setFlag(boolean flag) {
this.flag = flag;
}
public int getDuration() {
return duration;
}
public void setDuration(int duration) {
this.duration = duration;
}
public int getCurrentPosition() {
return currentPosition;
}
public void setCurrentPosition(int currentPosition) {
this.currentPosition = currentPosition;
}
// thread 에 의해 실행되는 코드...
// Bind되는 순간부터 run이 실행되면서 매 초마다 현재 Position를 설정한다.
public void run() {
// run을 빠져나가면 thread는 끝난다.
// 장시간 해야되는건 주로 loop를 만들어 놓는다.
while(flag) // 음원이 끝나면 나가라.
{
setCurrentPosition(player.getCurrentPosition());
try {
// sleep은 항상 try~cath와 같이 쓰여야 한다.
Thread.sleep(1000); // milisecond unit
} catch (Exception e) {
// TODO: handle exception
}
}
}
@Override
public IBinder onBind(Intent arg) {
// TODO Auto-generated method stub
player = MediaPlayer.create(this, R.raw.kara);
setDuration(player.getDuration());
player.start();
// MediaPlayer의 음원 플레이 시간을 얻어내서 service의 데이터를
// 업데이트 시키는 작업을 하는 thread
//(null: 특별히 group값이 필요없음.
// this: thread 돌릴 source, player는 이름
Thread t = new Thread(null, this, "player");
t.start(); // bind되는 순간 PlayService의 run()이 시작됨.
return new MyBinder(); // bind될 객체 리턴해야됨.
}
@Override
public void onDestroy() {
// TODO Auto-generated method stub
super.onDestroy();
player.stop(); // service 멈추기
flag = false; // thread가 멈출 수 있게 flag값 설정
}
@Override
public void onStart(Intent intent, int startId) {
// TODO Auto-generated method stub
super.onStart(intent, startId);
// player = MediaPlayer.create(this, R.raw.kara);
// player.start();
// SD카드의 여러 음악프로그램중 어떤걸 play할 것인지?
// 음악이 끝났다는 신호를 받을 수 있다. 그러면 다음곡 실행시키기.
}
// Activity bind시 Activity에 전달시킬 객체
public class MyBinder extends Binder {
PlayService getService() {
return PlayService.this;
}
}
}
[Main.java]
package chap8.Service;
import android.app.Activity;
import android.content.ComponentName;
import android.content.Context;
import android.content.Intent;
import android.content.ServiceConnection;
import android.os.Bundle;
import android.os.Handler;
import android.os.IBinder;
import android.view.View;
import android.view.View.OnClickListener;
import android.widget.ImageButton;
import android.widget.ProgressBar;
public class Main extends Activity implements OnClickListener, Runnable{
/** Called when the activity is first created. */
private ImageButton bt1;
private ImageButton bt2;
private ProgressBar bar;
// service랑 bind해서 service 객체를 얻어 service 의 데이터에 접근하기 위해
private PlayService pService;
// UI Thread에 UI 변경작업을 지시하기 위해 선언
private Handler handler = new Handler();
// user event와 상관없이 장시간 동안 service에 접근해서 데이터 획득하는 역할
private Thread background;
@Override
// 1. Main이 실행되면서 onCreate()함수가 가장 먼저 실행된다.
public void onCreate(Bundle savedInstanceState) {
super.onCreate(savedInstanceState);
setContentView(R.layout.main);
bt1 = (ImageButton)findViewById(R.id.ImageButton01);
bt2 = (ImageButton)findViewById(R.id.ImageButton02);
bt1.setOnClickListener(this);
bt2.setOnClickListener(this);
bar = (ProgressBar)findViewById(R.id.ProgressBar01);
//bar.setOnClickListener(this);
}
public void onClick(View v) {
// TODO Auto-generated method stub
if(v == bt1)
{
Intent intent = new Intent(this, PlayService.class); // 명시적
//startService(intent);
// 2. 재생버튼을 누르면 OnClick이 실행되고,
// 여기서 service를 bind시킨다.
// Service에서는 onCreate(), onBind()까지 실행되게된다.
bindService(intent, connection, Context.BIND_AUTO_CREATE);
background = new Thread(null, this, "test");
} else if(v == bt2) {
Intent intent = new Intent(this, PlayService.class);
//stopService(intent);
// stop버튼을 누르면 binding이 끊긴다.
unbindService(connection);
} else if(v == bar) {
//handler.post(updateBar);
// UserEvent받아들일 수 있는 거는 SeekBar로만 할 수 있다.
// ProgressBar는 시스템에 의해서만 동작된다.
}
}
// bind 상태에 따라 자동 호출되는 메서드를 가지는 객체 선언
private ServiceConnection connection =
new ServiceConnection() {
public void onServiceDisconnected(ComponentName name) {
// TODO Auto-generated method stub
pService = null;
}
public void onServiceConnected(ComponentName name, IBinder service) {
// TODO Auto-generated method stub
// IBinder타입을 PlayService.MyBinder타입으로 type-casting하고
// getService로 서비스 가져온다.
//3. Binding이 완료되면 Service 정보를 가져오고
pService = ((PlayService.MyBinder)service).getService();
//4. background로 thread를 실행시킨다.
background.start(); // 이때부터 run()이 실행된다.
}
};
// UI Thread 에게 넘겨줄 작업
// Inner class - Runnable이 inteface이므로..
private Runnable updateBar = new Runnable() {
public void run() {
// UI thread는 간단하게 짠다. loop문같은거 넣지않는다.
// 6. bar가 새롭게 그려진다.
bar.setProgress(pService.getCurrentPosition());
}
};
// background thread가 작업할 내용을 가지는 메서드
// 5. background thread는 돌면서 1초마다
// UI updateBar thread한테 progress를 표시하라고 post한다.
public void run() {
// 전체 음원의 시간값으로 bar의 Max를 설정한다.
bar.setMax(pService.getDuration());
while(pService.isFlag())
{
try {
Thread.sleep(1000);
// 오늘의 key point!!
// 1초마다 main thread한테 update progress bar하라고 날린다.
handler.post(updateBar);
} catch (Exception e) {
// TODO: handle exception
}
}
}
}
| [펌]안드로이드 aidl 시작하기 (0) | 2010.12.07 |
|---|---|
| [펌][Android] 안드로이드 인디케이터 설정 - NotificationManager (0) | 2010.12.06 |
| MediaPlayer 순환표 (0) | 2010.12.03 |
| [안드로이드]롤오버 이미지 만들기 (0) | 2010.12.03 |
| [펌]Mediaplayer Service - 백그라운드 음악 실행 (0) | 2010.12.03 |
MediaPlayer class can be used to control playback of audio/video files and streams. An example on how to use the methods in this class can be found in VideoView. Please see Audio and Video for additional help using MediaPlayer.
Topics covered here are:
Playback control of audio/video files and streams is managed as a state machine. The following diagram shows the life cycle and the states of a MediaPlayer object driven by the supported playback control operations. The ovals represent the states a MediaPlayer object may reside in. The arcs represent the playback control operations that drive the object state transition. There are two types of arcs. The arcs with a single arrow head represent synchronous method calls, while those with a double arrow head represent asynchronous method calls.

From this state diagram, one can see that a MediaPlayer object has the following states
| [펌][Android] 안드로이드 인디케이터 설정 - NotificationManager (0) | 2010.12.06 |
|---|---|
| 미디어플레이어 백그라운드 작업 참고문 (0) | 2010.12.04 |
| [안드로이드]롤오버 이미지 만들기 (0) | 2010.12.03 |
| [펌]Mediaplayer Service - 백그라운드 음악 실행 (0) | 2010.12.03 |
| [펌]mediaplayer로 mp3돌리는 팁 (0) | 2010.12.03 |


| 미디어플레이어 백그라운드 작업 참고문 (0) | 2010.12.04 |
|---|---|
| MediaPlayer 순환표 (0) | 2010.12.03 |
| [펌]Mediaplayer Service - 백그라운드 음악 실행 (0) | 2010.12.03 |
| [펌]mediaplayer로 mp3돌리는 팁 (0) | 2010.12.03 |
| [펌]안드로이드 개발 팁 및 소스 링크 (0) | 2010.12.02 |
|
2010/11/20 11:31
출처: |
Service
사용자와 상호작용 없이 내부적으로 실행되는 프로세스
- UI없이 오랫동안 살아있으면서 실행되는 코드들
- media player activity는 Context.startService()를 이용하여 백그라운드로 음악이 계속 재생되는 서비스 구동
- 서비스에 접근할 때, 서비스에 의해 나타난 인터페이스를 통해 서비스와 통신할 수 있다.
이미지 버튼과 음악 재생에 사용할 파일을 미리 준비해 둔다
미디어 파일은 /res/raw 폴더 생성
xml 버튼에 onClick 이벤트 달기
android:id="@+id/btnStop"
android:layout_width="fill_parent"
android:layout_height="wrap_content"
android:layout_marginTop="10dp"
android:onClick="btnProcess" />
main.xml
http://schemas.android.com/apk/res/android"
android:orientation="vertical"
android:layout_width="fill_parent"
android:layout_height="fill_parent"
>
android:layout_width="fill_parent"
android:layout_height="wrap_content"
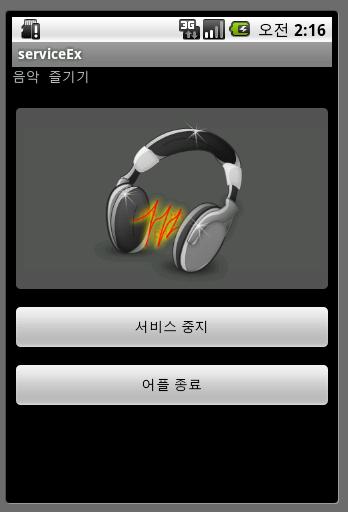
android:text="음악 즐기기" />
android:id="@+id/btnStart"
android:layout_width="fill_parent"
android:layout_height="wrap_content"
android:src="@drawable/pic"
android:layout_marginTop="20dp"
android:onClick="btnProcess" />
android:id="@+id/btnStop"
android:layout_width="fill_parent"
android:layout_height="wrap_content"
android:text="서비스 중지"
android:layout_marginTop="10dp"
android:onClick="btnProcess" />
android:id="@+id/btnExit"
android:layout_width="fill_parent"
android:layout_height="wrap_content"
android:text="어플 종료"
android:layout_marginTop="10dp"
android:onClick="btnProcess" />
Manifest.xml
MainApp.java
package aa.serviceEx;
import android.app.*;
import android.content.*;
import android.os.*;
import android.view.*;
import android.widget.*;
public class MainApp extends Activity {
/** Called when the activity is first created. */
@Override
public void onCreate(Bundle savedInstanceState) {
super.onCreate(savedInstanceState);
setContentView(R.layout.main);
}
public void btnProcess(View v) {
Toast.makeText(this, "success", 2000).show();
}
}

버튼 테스트를 위해 토스트를 달았다.
세가지 버튼을 누르게 되면 모두 같은 프로세스를 호출하기 때문에
같은 success 메시지가 나온다.
음악 재생 코드 추가
MainApp.java
package aa.serviceEx;
import android.app.*;
import android.content.*;
import android.os.*;
import android.view.*;
import android.view.View.*;
import android.widget.*;
public class MainApp extends Activity implements OnClickListener {
/** Called when the activity is first created. */
ImageButton btnStart;
@Override
public void onCreate(Bundle savedInstanceState) {
super.onCreate(savedInstanceState);
setContentView(R.layout.main);
btnStart = (ImageButton)findViewById(R.id.btnStart);
Button btnStop = (Button)findViewById(R.id.btnStop);
Button btnExit = (Button)findViewById(R.id.btnExit);
btnStart.setOnClickListener(this);
btnStop.setOnClickListener(this);
btnExit.setOnClickListener(this);
}
@Override
public void onClick(View v) {
if(v.getId() == R.id.btnStart) {
startService(new Intent("aa.bb.cc.mbc"));
btnStart.setEnabled(false);
}
else if(v.getId() == R.id.btnStop) {
stopService(new Intent("aa.bb.cc.mbc"));
btnStart.setEnabled(true);
}
else if(v.getId() == R.id.btnExit) {
stopService(new Intent("aa.bb.cc.mbc"));
btnStart.setEnabled(true);
finish();
}
}
}
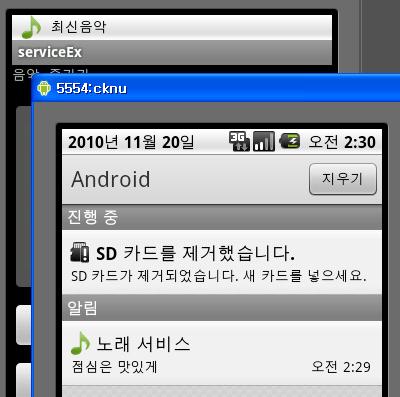
음악이 재생중인 상태이며,
백그라운드로 돌렸기 때문에 멀티태스킹이 가능하다.
알림 표시바 사용하기
- 시간이 나온 제일 윗 부분 드래그 해서 나오는 부분 Notification
MainApp.java에서 onclick 메소드 수정
@Override
public void onClick(View v) {
// 알림 표시바 사용
NotificationManager nm =
(NotificationManager)getSystemService(NOTIFICATION_SERVICE);
if(v.getId() == R.id.btnStart) {
startService(new Intent("aa.bb.cc.mbc"));
btnStart.setEnabled(false);
// Notification 처리
Notification notification =
new Notification(R.drawable.noti, "최신음악", System.currentTimeMillis());
Intent intent = new Intent(this, MainApp.class);
PendingIntent pendingIntent = PendingIntent.getService(this, 0, intent, 0);
notification.setLatestEventInfo(this, "노래 서비스", "점심은 맛있게", pendingIntent);
nm.notify(0, notification); // 상태표시바에 등장
}else if(v.getId() == R.id.btnStop) {
stopService(new Intent("aa.bb.cc.mbc"));
btnStart.setEnabled(true);
nm.cancel(0); // 상태 표시바에서 해제
}else if(v.getId() == R.id.btnExit) {
stopService(new Intent("aa.bb.cc.mbc"));
btnStart.setEnabled(true);
nm.cancel(0);
finish();
}
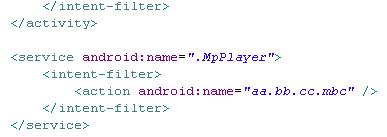
MpPlayer.java
package aa.serviceEx;
import android.app.*;
import android.content.*;
import android.media.*;
import android.os.*;
public class MpPlayer extends Service {
MediaPlayer mp;
@Override
public IBinder onBind(Intent intent) {
return null;
}
@Override
public void onStart(Intent intent, int startId) {
super.onStart(intent, startId);
mp = MediaPlayer.create(this, R.raw.man);
mp.start();
}
@Override
public void onDestroy() {
super.onDestroy();
mp.stop();
mp.release(); // 자원 반납
}
}
| MediaPlayer 순환표 (0) | 2010.12.03 |
|---|---|
| [안드로이드]롤오버 이미지 만들기 (0) | 2010.12.03 |
| [펌]mediaplayer로 mp3돌리는 팁 (0) | 2010.12.03 |
| [펌]안드로이드 개발 팁 및 소스 링크 (0) | 2010.12.02 |
| Handling Screen On or Off intent (0) | 2010.12.02 |
2010/08/04 16:11
출처 : http://blog.naver.com/romistudio/50093624442
http://blog.naver.com/romistudio/50093624442
01.try { 02. MediaPlayer mediaPlayer = new MediaPlayer(); 03. mediaPlayer.setDataSource(pathinlocal+FileName); 04. mediaPlayer.prepare(); ---- 여기에서 런타임 에러 발생 Prepare failed : status = 0x105. mediaPlayer.start(); 06.} catch (IOException e) { 07. // handle exception 08. //((EditText) ((Activity) mMain).findViewById(R.id.txtStatus)).setText(e.getMessage()); 09.}01.try { 02. MediaPlayer mediaPlayer = new MediaPlayer(); 03. FileInputStream fis = new FileInputStream(pathinlocal+FileName); 04. FileDescriptor fd = fis.getFD(); 05. mediaPlayer.setDataSource(fd); 06. mediaPlayer.prepare(); 07. mediaPlayer.start(); 08.} catch (IOException e) { 09. // handle exception 10. //((EditText) ((Activity) mMain).findViewById(R.id.txtStatus)).setText(e.getMessage()); | [안드로이드]롤오버 이미지 만들기 (0) | 2010.12.03 |
|---|---|
| [펌]Mediaplayer Service - 백그라운드 음악 실행 (0) | 2010.12.03 |
| [펌]안드로이드 개발 팁 및 소스 링크 (0) | 2010.12.02 |
| Handling Screen On or Off intent (0) | 2010.12.02 |
| [퍼옴]기본 리니어 레이아웃 정렬 방식 (0) | 2010.12.02 |
출처 : http://cafe.naver.com/ccjmaster.cafe?iframe_url=/ArticleRead.nhn%3Farticleid=133
=========================================================================================
자바에서 처리하는 입력과 출력은 스트림(Stream)에 의존하다.
다시 말해 모든 형태의 입력과 출력은 1byte의 흐름으로 이루어져 있다는 이야기이다.
그런데 이러한 작업 처리를 텍스트 기반으로 한 형태로 바꿔 준다든지, 객체 기반으로 한 형태로 바꾸어 준다든지 하는 클래스가 있다.
우리는 먼저 1byte의 기본 입력과 출력 클래스 몇 가지를 공부하고 다음으로 각 형태로 변경시키는 클래스를 살펴보도록 할 것이다.
우선 1byte의 입력과 출력 기본 클래스는 InputStream과 OutputStream이다. 각 클래스의 상속관계는 다음과 같다.
OutputStream
▶ FileOutputStream
▶ ByteArrayOutputStream
▶ PipedOutputStream
▶ ObjectOutputStream
▶ FilterOutputStream - BufferedOutputStream
▶ PaintStream
▶ DataOutputStream
InputStream
▶ FileInputStream
▶ ByteArrayInputStream
▶ PipedInputStream
▶ ObjectInputStream
▶ SequenceInputStream
▶ AudioInputStream
▶ StringBufferInputStream
▶ FilterInputStream - BufferedInputStream
▶ LineNumberInputStream
▶ PushbackInputStream
▶ DataInputStream
여기에 표시된 많은 클래스를 다 공부한다는 것은 우리가 배우고자 하는 범위를 벗어나는 것이므로
실제로 파일 입·출력에서 많이 쓰는 형식을 한 가지씩만 외우도록 하자.
1byte 출력
(1) 콘솔 출력용
FileOutputStream fos = new FileOutputStream(FileDescriptor.out);
BufferedOutputStream bos = new BufferedOutputStream(fos);
DataOutputStream dos = new DataOutputStream(bos);
dos.write…
(2) 파일 출력용
File file = new File("파일명");
FileOutputStream fos = new FileOutputStream(file);
BufferedOutputStream bos = new BufferedOutputStream(fos);
DataOutputStream dos = new DataOutputStream(bos);
dos.write…
(3) 네트워크 출력용
Socket soc = new Socket(…);
BufferedOutputStream bos = new BufferedOutputStream(soc.getOutputStream());
DataOutputStream bos = new DataOutputStream(bos);
dos.write…
1byte 입력
(1) 콘솔 입력용
FileInputStream fis = new FileInputStream(FileDescriptor.in);
BufferedInputStream bis = new BufferedInputStream(fis);
DataInputStream dis = new DataInputStream(bis);
dis.read()…
(2) 파일 입력용
File file = new File("파일명");
FileInputStream fis = new FileInputStream(file);
BufferedInputStream bis = new BufferedInputStream(fis);
DataInputStream dis = new DataInputStream(bis);
dis.read()…
(3) 네트워크 입력용
Socket soc = new Socket(…);
BufferedInputStream bis = new BufferedInputStream(soc.getInputStream());
DataInputStream bis = new DataInputStream(bis);
dis.read()…
이제 간단한 형태의 입·출력 예제를 처리해 보도록 하자.
EX 01
import java.io.*;
public class Java {
public static void main(String[] args) {
File file = new File("C:\\java\\work\\abc.txt"); // C:\\java\\work\\abc.txt 에 대한 객체를 생성한다.
try {
FileOutputStream fos = new FileOutputStream(FileDescriptor.out); // 콘솔에 대한 출력 스트림을 생성한다.
FileOutputStream fos1 = new FileOutputStream(file); // 파일에 대한 출력 스트림을 생성한다.
byte[] data = {66, 68, 70, 72, (byte) '!'}; // B, D, F, H, ! 에 대한 배열을 생성한다.
fos.write(data);
fos1.write(data);
// fos.close();
// fos1.close();
}catch(FileNotFoundException fnfe){
System.err.println("파일을 못찾겠다.");
System.exit(1);
}catch(IOException io){
System.err.println("파일 입출력 에러");
System.exit(1);
}
System.out.println("실행 끝");
}
}
EX 02
import java.io.*;
public class Java {
public static void main(String[] args) throws FileNotFoundException, IOException{
/*
FileInputStream fis = new FileInputStream(FileDescriptor.in); // 키보드로부터 입력 객체를 생성한다.
System.out.print("입력 = ");
byte by = fis.read();
*/
File file = new File("C:\\java\\work\\abc.txt"); // 파일로부터의 입력 객체를 생성한다.
FileInputStream fis = new FileInputStream(file);
byte[] by = new byte[65536];
int count = fis.read(by);
for(int i = 0; i < count; i++){
System.out.println(i + " : " + (char)by[i]);
}
}
}
EX03
import java.io.*;
public class Java {
public static void main(String[] args) throws FileNotFoundException, IOException{
/*
< DataOutputStream을 풀어서 썼을 때의 코딩>
File file = new File("c:\\java\\work");
FileOutputStream fos = new FileOutputStream(file);
BufferedOutputStream bos = new BufferedOutputStream(fos); // 512byte
DataOutputStream dos = new DataOutputStream(bos);
*/
// 1byte 출력을 위한 객체
DataOutputStream dos1 = new DataOutputStream(new BufferedOutputStream(new FileOutputStream
(new File(new File "c:\\java\\wordk"),"HJH.txt")))); // 파일에 대한 출력 객체를 생성
dos1.writeInt(23); // int형 숫자를 출력한다. 이것은 출력하면 파일에는 4byte의 영역을 확보하고 데이터가 표시된다.
// 그래서 결과가 이상하게 보인다.
dos1.writeDouble(12.345); // double형 숫자를 출력한다. 역시 int형과 마찬가지로 8byte의 영역을 확보 후 데이터 표시
dos1.writeBytes("ABCDEFG"); // 1byte씩 문자 형태로 출력한다. 정상적으로 보인다.
dos1.close();
}
}
EX04
import java.io.*;
public class Java {
public static void main(String[] args) {
DataInputStream dis1 = null;
try{
dis1 = new DataInputStream(new BufferedInputStream(new FileInputStream
(new File(new File("c:\\java\\wordk"),"HJH.txt")))); // DataInputStream 입력 객체를 생성한다.
} catch (FileNotFoundException fnfe){}
int a = 0;
double b = 0.0;
byte[] c = null;
try{
a = dis1.readInt(); // int형 데이터를 입력받는다. 처음 4byte를 입력받아 저장해 둔다.
b = dis1.readDouble(); // double형으로 데이터를 입력받는다. 다음 8byte를 입력받아 double형으로 변환한다.
c = new byte[10]; // 문자 배열을 선언한 후 그곳에 결과를 입력받는다.
dis1.read(c);
dis1.close();
}catch(IOException ie){}
System.out.println("a = " + a);
System.out.println("b = " + b);
System.out.println("c = " + new String(c));
}
}
| 네이버 svn 설치방법 참고 (0) | 2010.12.09 |
|---|---|
| 네이버 svn 설치방법 (0) | 2010.12.08 |
| 색상표 (0) | 2010.12.02 |
| [펌]압축 관련 스트림 팁 (0) | 2010.12.01 |
| javax.swing.event 에서의 ListDataEvent 에 관한 설명 (1) | 2010.11.17 |
| [펌]안드로이드 Custom View를 이용하여 Custom Android Button 만들기 (0) | 2010.12.08 |
|---|---|
| 안드로이스 소스 받아보기 (0) | 2010.12.07 |
| [안드로이드]서비스와 알람 설명 괜찮은 곳 (0) | 2010.11.25 |
| 구글의 인터넷주소 축약서비스 (0) | 2010.11.25 |
| 안드로이드 기본 어플 소스모음(Alarm Clock 도 포함) (5) | 2010.11.25 |
안드로이드_개발_팁
<merge> 태그 설명
소스코드
| [펌]Mediaplayer Service - 백그라운드 음악 실행 (0) | 2010.12.03 |
|---|---|
| [펌]mediaplayer로 mp3돌리는 팁 (0) | 2010.12.03 |
| Handling Screen On or Off intent (0) | 2010.12.02 |
| [퍼옴]기본 리니어 레이아웃 정렬 방식 (0) | 2010.12.02 |
| [안드로이드]화면전환 에니메이션 설정 (0) | 2010.12.01 |
Hey everyone,
Haven’t posted in a while – sorry school has been busy. Any who, this little code snippet/example will be on how to deal with the Intent.ACTION_SCREEN_OFF and the Intent.ACTION_SCREEN_ON, which will come in nifty if you’re making an application that might need to save state or respond to the user’s screen going to sleep/waking up, etc.
First, unlike other broad casted intents, for Intent.ACTION_SCREEN_OFF and Intent.ACTION_SCREEN_ON you CANNOT declare them in your Android Manifest! I’m not sure exactly why, but they must be registered in an IntentFilter in your JAVA code. And so, for this example we are going to have a receiver called ScreenReceiver, and I’m going to walk you through the differences between implementing it in a Service vs. in an Activity.
So, the receiver will simply look like:
01 |
public class ScreenReceiver extends BroadcastReceiver { |
02 |
03 |
// THANKS JASON |
04 |
public static boolean wasScreenOn = true; |
05 |
06 |
@Override |
07 |
public void onReceive(Context context, Intent intent) { |
08 |
if (intent.getAction().equals(Intent.ACTION_SCREEN_OFF)) { |
09 |
// DO WHATEVER YOU NEED TO DO HERE |
10 |
wasScreenOn = false; |
11 |
} else if (intent.getAction().equals(Intent.ACTION_SCREEN_ON)) { |
12 |
// AND DO WHATEVER YOU NEED TO DO HERE |
13 |
wasScreenOn = true; |
14 |
} |
15 |
} |
16 |
17 |
} |
Now, the first example will be for an Activity. Because of the life-cycle of an Activity, an Activity is actually easier to deal with as right before the screen turns off onPause() is called and right when the screen turns on onResume() is called, and so naturally we will handle the screen on/off events here:
01 |
public class ExampleActivity extends Activity { |
02 |
03 |
@Override |
04 |
protected void onCreate() { |
05 |
// INITIALIZE RECEIVER |
06 |
IntentFilter filter = new IntentFilter(Intent.ACTION_SCREEN_ON); |
07 |
filter.addAction(Intent.ACTION_SCREEN_OFF); |
08 |
BroadcastReceiver mReceiver = new ScreenReceiver(); |
09 |
registerReceiver(mReceiver, filter); |
10 |
// YOUR CODE |
11 |
} |
12 |
13 |
@Override |
14 |
protected void onPause() { |
15 |
// WHEN THE SCREEN IS ABOUT TO TURN OFF |
16 |
if (ScreenReceiver.wasScreenOn) { |
17 |
// THIS IS THE CASE WHEN ONPAUSE() IS CALLED BY THE SYSTEM DUE TO A SCREEN STATE CHANGE |
18 |
System.out.println("SCREEN TURNED OFF"); |
19 |
} else { |
20 |
// THIS IS WHEN ONPAUSE() IS CALLED WHEN THE SCREEN STATE HAS NOT CHANGED |
21 |
} |
22 |
super.onPause(); |
23 |
} |
24 |
25 |
@Override |
26 |
protected void onResume() { |
27 |
// ONLY WHEN SCREEN TURNS ON |
28 |
if (!ScreenReceiver.wasScreenOn) { |
29 |
// THIS IS WHEN ONRESUME() IS CALLED DUE TO A SCREEN STATE CHANGE |
30 |
System.out.println("SCREEN TURNED ON"); |
31 |
} else { |
32 |
// THIS IS WHEN ONRESUME() IS CALLED WHEN THE SCREEN STATE HAS NOT CHANGED |
33 |
} |
34 |
super.onResume(); |
35 |
} |
36 |
37 |
} |
Now, note that in my onPause() and onResume() methods I run a check to see that the method was called DUE TO A SCREEN STATE CHANGE. This is important as often onPause() or onResume() will get called because of other reasons – i.e. a new activity is being started on top of this one, or an incoming call might be coming in, etc – and you want to make sure that your screen change logic is only called when the screen has actually changed.
Now, something to keep in mind, is that the order of events before the system screen turns off is:
ExampleActivity.onPause() –> ScreenReceiver.onReceive()
Which is a little unintuitive as you’d think the receiver would get hit first – and so when you play around with setting booleans, etc, be aware of this little fact, and likewise when the screen turns on the order of events is:
ExampleActivity.onResume() –> ScreenReceiver.onReceive()
And so again the order of events seems a little “backwards”.
Now, for a Service, it’s a little bit different since there is no onResume() or onPause() that gets called as the Service is always “running” in the background, and so instead what you’re going to have to do is modify your receiver a little to look like:
01 |
public class ScreenReceiver extends BroadcastReceiver { |
02 |
03 |
private boolean screenOff; |
04 |
05 |
@Override |
06 |
public void onReceive(Context context, Intent intent) { |
07 |
if (intent.getAction().equals(Intent.ACTION_SCREEN_OFF)) { |
08 |
screenOff = true; |
09 |
} else if (intent.getAction().equals(Intent.ACTION_SCREEN_ON)) { |
10 |
screenOff = false; |
11 |
} |
12 |
Intent i = new Intent(context, UpdateService.class); |
13 |
i.putExtra("screen_state", screenOff); |
14 |
context.startService(i); |
15 |
} |
16 |
17 |
} |
And your service will look like:
01 |
public static class UpdateService extends Service { |
02 |
03 |
@Override |
04 |
public void onCreate() { |
05 |
super.onCreate(); |
06 |
// REGISTER RECEIVER THAT HANDLES SCREEN ON AND SCREEN OFF LOGIC |
07 |
IntentFilter filter = new IntentFilter(Intent.ACTION_SCREEN_ON); |
08 |
filter.addAction(Intent.ACTION_SCREEN_OFF); |
09 |
BroadcastReceiver mReceiver = new ScreenReceiver(); |
10 |
registerReceiver(mReceiver, filter); |
11 |
} |
12 |
13 |
@Override |
14 |
public void onStart(Intent intent, int startId) { |
15 |
boolean screenOn = intent.getBooleanExtra("screen_state", false); |
16 |
if (!screenOn) { |
17 |
// YOUR CODE |
18 |
} else { |
19 |
// YOUR CODE |
20 |
} |
21 |
} |
22 |
} |
And so this is pretty self explanatory. When the screen state changes, it will notify your ScreenReceiver and from there you can set the state information into an Intent and send that data to your Service which can then handle it appropriately.
Hopefully this was useful. Let me know if you have questions.
Happy coding.
- jwei
| [펌]mediaplayer로 mp3돌리는 팁 (0) | 2010.12.03 |
|---|---|
| [펌]안드로이드 개발 팁 및 소스 링크 (0) | 2010.12.02 |
| [퍼옴]기본 리니어 레이아웃 정렬 방식 (0) | 2010.12.02 |
| [안드로이드]화면전환 에니메이션 설정 (0) | 2010.12.01 |
| [펌]안드로이드 전체 전역변수 사용하기 (0) | 2010.12.01 |
[출처] http://cafe.naver.com/ccjmaster.cafe?iframe_url=/ArticleRead.nhn%3Farticleid=168
<리니어 레이아웃>
방향 설정
차일드 뷰를 일렬로 배치하는 레이아웃이다.
부모 뷰는 화면 전체, 차일드 뷰는 화면 하나하나를 구성하는 요소라고 보면 된다.
...
리니어의 가장 중요한 속성은 배치 방향을 결정하는 orientation이다.
차일드를 배치하는 방법은 수평(horizontal)·수직(vertical) 2가지가 있다.
별도로 지정하지 않으면, default 속성은 수평(horizontal)이 적용된다.
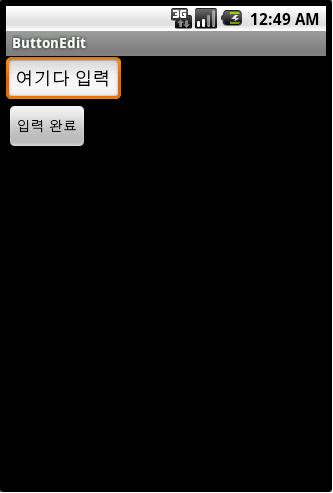
<Button&Edit>
앞서 우리가 했던 Button&Edit 에제에서
orientation 속성만 vertical에서 horizontal로 바꾸어보자.
Layout/Buttonedit.xml
<?xml version="1.0" encoding="utf-8"?>
<LinearLayout xmlns:android="http://schemas.android.com/apk/res/android"
android:orientation="vertical" // horizontal로 바꾸어보자.
android:layout_width="fill_parent"
android:layout_height="fill_parent"
>
<EditText
android:layout_width="wrap_content"
android:layout_height="wrap_content"
android:id="@+id/edit"
android:text="여기다 입력"
/>
<Button
android:layout_width="wrap_content"
android:layout_height="wrap_content"
android:id="@+id/btn"
android:text="입력 완료"
/>
</LinearLayout>
기존의 verticla이었던 Button&Edit 예제 horizontal로 수정한 예제

<TextView>
기존의 했던 TextVeiw도 해보도록 하자.
<?xml version="1.0" encoding="utf-8"?>
<LinearLayout xmlns:android="http://schemas.android.com/apk/res/android"
android:orientation="vertical" // 마찬가지로 horizontal로 해본다.
android:layout_width="fill_parent"
android:layout_height="fill_parent"
>
<TextView
android:layout_width="fill_parent"
android:layout_height="wrap_content"
android:text="@string/insa"
android:textColor="#ff0000"
android:textSize="20pt"
android:textStyle="italic"
/>
<TextView
android:layout_width="fill_parent"
android:layout_height="wrap_content"
android:text="@string/anyoung"
android:textSize="20sp"
android:textColor="#0000ff"
/>
<TextView
android:layout_width="fill_parent"
android:layout_height="wrap_content"
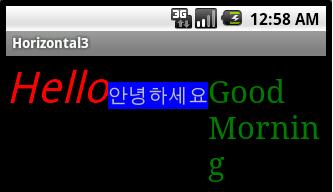
android:text="Good Morning"
android:textColor="#8000ff00"
android:textSize="5mm"
android:typeface="serif"
/>
</LinearLayout>
그리고 실행해보면 Hello 텍스트 하나만 나오고, 두 문자열을 화면에서 사라져 버렸다.
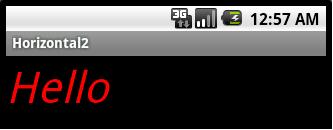
왜냐하면 텍스트 뷰의 layout_width 속성이 fill_parent로 되어 있어 부모의 폭 전체를 다 차지하기 때문이다.
셋 모두 보이게 하려면, 텍스트 뷰의 layout_width의 속성을 wrap_content로 바꿔 자신의 폭만큼 차지하도록 수정해야 한다.
<?xml version="1.0" encoding="utf-8"?> // xml 문서에서는 주석이 통하지 않으므로 복사 후 제거하고 실행한다.
<LinearLayout xmlns:android="http://schemas.android.com/apk/res/android"
android:orientation="vertical"
android:layout_width="fill_parent"
android:layout_height="fill_parent"
>
<TextView
android:layout_width="wrap_content"
android:layout_height="wrap_content"
android:text="@string/insa"
android:textColor="#ff0000"
android:textSize="20pt"
android:textStyle="italic"
/>
<TextView
android:layout_width="wrap_content"
android:layout_height="wrap_content"
android:text="@string/anyoung"
android:textSize="20sp"
android:textColor="#0000ff"
/>
<TextView
android:layout_width="wrap_content"
android:layout_height="wrap_content"
android:text="Good Morning"
android:textColor="#8000ff00"
android:textSize="5mm"
android:typeface="serif"
/>
</LinearLayout>
바꾸고 실행해보면 이렇게 나온다.
-----------
정렬지정
뷰의 영역이 충분히 크면 상하좌우에 넓은 여백이 생긴다.
하지만 뷰가 커진다고 해서 내용물도 같이 커지는 것은 아니며, 이때 내용물을 뷰의 어느 쪽에 배치할 것인지의 문제가 생긴다.
...
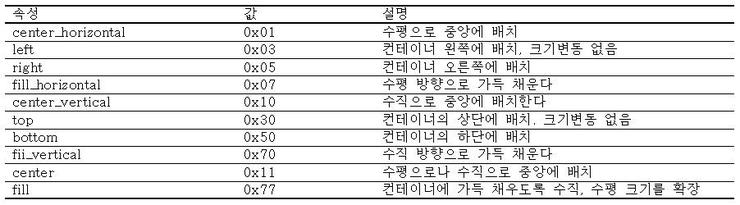
내용물을 뷰의 어느 쪽에 배치할 것인가는 gravity 속성으로 지정한다. 즉, 내용물의 정렬 방식은 gravity로 통제한다.
수평, 수직 방향에 대해 각각 정렬 방식을 지정할 수 있으며 '|' 연산자로 두 개의 속성을 묶어서 지정할 수도 있다.
두 속성을 같이 지정할 때는 '|' 연산자 양쪽으로 공백이 전혀 없어야 한다.
...
각 정렬은 비트 필드로 정의 되어 있으며
contet와 fill은 수평, 수직 정렬 상태 플래그의 조합으로 정의되어 있다.
이 속성을 테스트하기 위해 예제를 만들어보자.
리니어 레이아웃 안에 폭과 높이를 둘 다 fill_parent로 지정했다.
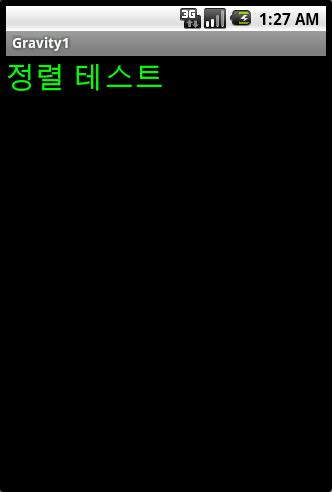
리니어 전체를 텍스트 뷰로 가득 채웠으므로, 텍스트 뷰의 넓이는 화면 전체와 같으며 여백이 굉장히 많은 상황이다.
Layout/gravity1.xml
<?xml version="1.0" encoding="utf-8"?>
<LinearLayout xmlns:android="http://schemas.android.com/apk/res/android"
android:orientation="vertical"
android:layout_width="fill_parent"
android:layout_height="fill_parent"
>
<TextView
android:layout_width="fill_parent"
android:layout_height="fill_parent"
android:text="정렬 테스트"
android:textSize="30px"
android:textColor="#00ff00"
/>
</LinearLayout>
gravity 속성을 따로 지정하지 않았으므로, 디폴트인 좌상단이 적용되며 문자열이 텍스트 뷰의 왼쪽 위에 출력된다.
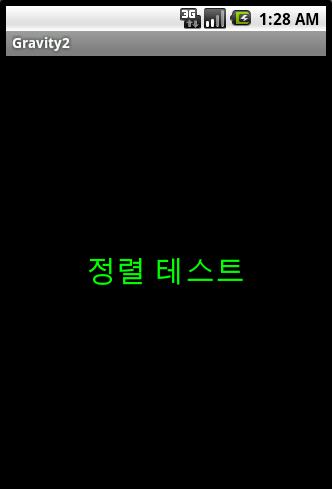
다음과 같이 gravity 속성을 center로 지정해 보자.
Layout/gravity2.xml
<?xml version="1.0" encoding="utf-8"?>
<LinearLayout xmlns:android="http://schemas.android.com/apk/res/android"
android:orientation="vertical"
android:layout_width="fill_parent"
android:layout_height="fill_parent"
>
<TextView
android:layout_width="fill_parent"
android:layout_height="fill_parent"
android:text="정렬 테스트"
android:textSize="30px"
android:textColor="#00ff00"
android:gravity="center"
/>
</LinearLayout>
실행해보면 center는 center_horizontal|center_vertical과 같음을 알 수 있다.
수평, 수직, 모두 중앙이므로 문자열이 텍스트 뷰의 정중앙에 나타날 것이다.
수평, 수직 각각에 대해 다른 정렬 방향을 지정할 수도 있다. 이번에는 다음과 같이 바꿔보자.
Layout/gravity3.xml
<?xml version="1.0" encoding="utf-8"?>
<LinearLayout xmlns:android="http://schemas.android.com/apk/res/android"
android:orientation="vertical"
android:layout_width="fill_parent"
android:layout_height="fill_parent"
>
<TextView
android:layout_width="fill_parent"
android:layout_height="fill_parent"
android:text="정렬 테스트"
android:textSize="30px"
android:textColor="#00ff00"
android:gravity="center_vertical"
/>
</LinearLayout>
Layout/gravity4.xml
<?xml version="1.0" encoding="utf-8"?>
<LinearLayout xmlns:android="http://schemas.android.com/apk/res/android"
android:orientation="vertical"
android:layout_width="fill_parent"
android:layout_height="fill_parent"
>
<TextView
android:layout_width="fill_parent"
android:layout_height="fill_parent"
android:text="정렬 테스트"
android:textSize="30px"
android:textColor="#00ff00"
android:gravity="center_vertical|right"
/>
</LinearLayout>
center_vertical을 지정하면 수직으로는 중앙이 되고, 수평쪽으로는 디폴트인 왼쪽이 적용되어 중앙 왼쪽에 문자열이 나타난다.
물론 '|' 연산자로 묶어 별도의 정렬 방식을 지정할 수 있다. 수직으로는 중앙, 오른쪽에 정렬하면 오른쪽에 붙는다.
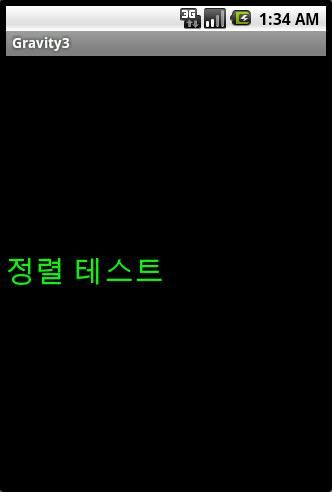
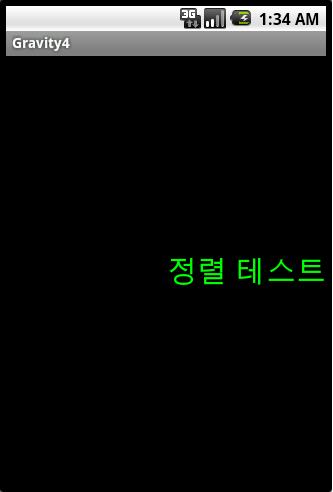
문자열을 오른쪽 바닥에 정렬하려면 "bottom|right"으로 지정하면 되고, 상단 중앙은 "center_horizontal|top"으로 지정하면 된다.
그렇다고 아무 조합이나 다 되는 것은 아니고, 수평·수직 한 방향에 대해 플래그 하나씩 2개만 조합이 가능하다.
gravity 속성 하나만 놓고 보면 어렵지 않을 것이다.
...
그런데 gravity와 유사한 속성으로 layout_gravity 라는 속성이 또 있다.
사용할 수 있는 속성 값은 gravity와 동일하나, 적용되는 대상이 다르다.
· gravity : 뷰 안의 내용물을 어디에 배치할 것인가?
· layout_gravity : 뷰를 부모의 어디에 둘 것인가?
방금 전에 했던 gravity2의 예제와 비교를 한다면, 이해가 빠를 것이다.
Layout/gravity2 // 텍스트 뷰를 리니어에 가득 채우고, 내용물을 center에 옮긴다.
<?xml version="1.0" encoding="utf-8"?>
<LinearLayout xmlns:android="http://schemas.android.com/apk/res/android"
android:orientation="vertical"
android:layout_width="fill_parent"
android:layout_height="fill_parent"
>
<TextView
android:layout_width="fill_parent"
android:layout_height="fill_parent"
android:text="정렬 테스트"
android:textSize="30px"
android:textColor="#00ff00"
android:gravity="center"
/>
</LinearLayout>
Layout/layout_gravity2 // 텍스트 뷰를 문자열 크기로 설정하고, 텍스트 뷰 자체를 리니어의 중아에 배치한다.
<?xml version="1.0" encoding="utf-8"?>
<LinearLayout xmlns:android="http://schemas.android.com/apk/res/android"
android:orientation="vertical"
android:layout_width="fill_parent"
android:layout_height="fill_parent"
android:gravity="center"
>
<TextView
android:layout_width="wrap_content"
android:layout_height="wrap_content"
android:text="정렬 테스트"
android:textSize="30px"
android:textColor="#00ff00"
android:background="#ff0000"
/>
</LinearLayout>

분명 같은 그림이지만, 내용은 다르다.
두 방법은 분명한 차이가 있는데, 리니어의 gravity의 속성을 사용하면
두 개 이상의 차일드 뷰를 묶어서 원하는 곳에 배치할 수 있다는 점이다.
Layout/lgravity3.xml
<?xml version="1.0" encoding="utf-8"?>
<LinearLayout xmlns:android="http://schemas.android.com/apk/res/android"
android:orientation="vertical"
android:layout_width="fill_parent"
android:layout_height="fill_parent"
android:gravity="center"
>
<TextView
android:layout_width="wrap_content"
android:layout_height="wrap_content"
android:text="정렬 테스트"
android:textSize="30px"
android:textColor="#00ff00"
android:background="#ff0000"
/>
<Button
android:layout_width="wrap_content"
android:layout_height="wrap_content"
android:text="버튼이다."
/>
</LinearLayout>
두 차일드 뷰가 중앙에 수직으로 나란히 배치되며 겹치지도 않는다.
두 차일드의 집합이 리니어의 입장에서 볼 때는 내용물이며, 따라서 center 속성이 적용되어 중앙에 온다.
차일드 집합 내부에서는 수직 리니어의 배치 규칙에 따라, 두 위젯이 수직으로 나란히 놓인다.
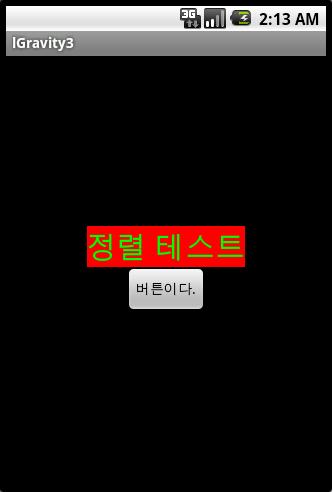
gravity는 내용물의 정렬 상태를 지정하며, layout_gravity는 뷰 자체의 정렬 상태를 지정한다.
다음 예를 보면 이 두 속성의 차이점과 적절한 활용처를 분명히 알 수 있을 것이다.
Layout/lgravity4.xml
<?xml version="1.0" encoding="utf-8"?>
<LinearLayout xmlns:android="http://schemas.android.com/apk/res/android"
android:orientation="vertical"
android:layout_width="fill_parent"
android:layout_height="fill_parent"
>
<TextView
android:layout_width="200px"
android:layout_height="100px"
android:text="정렬 테스트"
android:textSize="30px"
android:textColor="#00ff00"
android:background="#ff0000"
android:layout_gravity="center_horizontal"
android:gravity="right|bottom"
/>
</LinearLayout>
layout_gravity는 차일드 뷰를 정렬하므로, 수평으로 중앙에 놓았다.
gravity는 내용을 정렬하므로, 차일드 뷰의 오른쪽 아래에 놓았다.
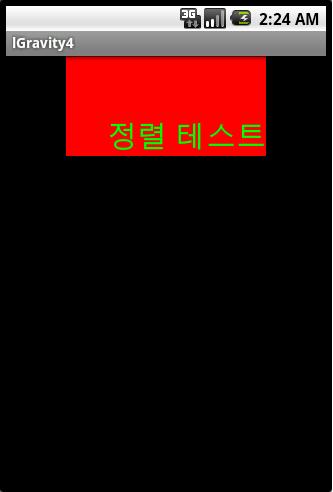
알고보니 차~암 쉽죠?
| [펌]안드로이드 개발 팁 및 소스 링크 (0) | 2010.12.02 |
|---|---|
| Handling Screen On or Off intent (0) | 2010.12.02 |
| [안드로이드]화면전환 에니메이션 설정 (0) | 2010.12.01 |
| [펌]안드로이드 전체 전역변수 사용하기 (0) | 2010.12.01 |
| intent 객체 직렬화 해서 보내기(Bundle이용 포함) (0) | 2010.11.30 |
|
| 네이버 svn 설치방법 (0) | 2010.12.08 |
|---|---|
| [펌]자바 IO 대충 정리..(필요할때 쓰자) (0) | 2010.12.03 |
| [펌]압축 관련 스트림 팁 (0) | 2010.12.01 |
| javax.swing.event 에서의 ListDataEvent 에 관한 설명 (1) | 2010.11.17 |
| 파일이름 중복 검사하는 policy 파일 만들기 (0) | 2010.11.17 |
[출처] : http://bluejames77.blog.me/80015770905
자바에서 압축을 할려면 ZipInputStream과 GZIPInputStream을 써야 합니다.
이것을 이용해서 압축하는 예제를 JUNIT으로 만들어 보았습니다.
일단 예제를 보여드리기에 설명을 드리겠습니다.
1. ZipInputStream과 GZIPInputStream과의 차이점은 무엇인가요?
=> 쉽게 zip은 원도우에서 gzip은 유닉스나 리눅스에서 쓴다고 보시면 됩니다.
그러나 원도우에서도 gzip으로 압축해도 됩니다. gzip으로 하면 한글도 잘 압축됩니다.
zip은 한글 압축이 안되는데 이것은 따로 말씀드리도록 하겠습니다.
그리고 zip은 여러개를 한꺼번에 압축이 가능합니다. gzip은 지원이 안됩니다.
2. java.util.zip.ZipInputStream은 왜 한글 문서는 압축할 수가 없나요?
=> 이것은 썬의 버그라고 합니다. 썬것으로는 영문파일밖에는 안됩니다 -0-;
그래서 만약 한글 문서도 압축할려고 할려면 외국 개발자가 픽스해 놓은 클래스를 써야 합니다.
이것은 제가 첨부파일로 올려 놓겠습니다.
자세한 것은 이 URL을 참조하세요 마지막 덧글에 제 아이디도 보입니다 -_-a
아래는 okjsp에서 pistos님이 답변해준 내용입니다.
java.util.zip은 압축파일내의 파일명 인코딩을 UTF-8로 처리해서 그래요..
zip 포맷이라는게 압축파일내의 파일명에 사용하는 인코딩을 지정하지 않았고, OS마다 encoding이 달라서 썬에서는 요걸 UTF-8로 정해놓고 쓰기로 한거라네요..
다음 버그리포트를 참고하시면 될거구요..
http://bugs.sun.com/bugdatabase/view_bug.do?bug_id=4244499
3. flush()와 close()의 차이점과 쓰는 용도를 알고 싶습니다.
=> 스트림은 하나의 관이라고 보시면 됩니다 예를 들어 하수관 -_-;
즉 바이트의 흐름입니다. 중요한게 입력스트림은 입력만 가능하고 출력 스트림은 출력만 가능합니다.
생각해보세요 물을 받는 호스에서 갑자기 물이 역류한다면? 이 무슨 황당한 시츄에이션? 말이 안되죠? ^^;
flush()는 있는 물을 쏟아 버린다고 생각하시면 됩니다.
그래서 출력스트림에서 flush()를 해버리면.. 있는것을 다 털어 버리는거죠 예를 들면 호수를 탈탈 터는것!
그리고 close()는 수도 꼭지를 잠그는 것이라고 생각하면 됩니다. 우리가 보통 수도꼭지 잠글때 호스도 털죠?
호스 다 썼으니깐 털어야 하잖아요. ^^;
그래서 close()를 하면 호스를 털고[flush()] 수도꼭지를 잠근것[close()]한 것과 같은 의미입니다.
close()하고 다시 쓸려면? open은 따로 없습니다. ^^; 다시 생성하셔야 합니다.
4. ZipInputStream에만 있는 ZipEntry가 무슨 역할을 하는 것인가요?
=> ZipInputStream은 1번에서 말씀드렸다시피 여러개의 파일을 한꺼번에 압축할 수 있습니다.
원래 ZIP 파일이란 것이 하나 이상의 압축 파일을 포함하는데, 이때 각각의 파일은 ZIP 엔트리(Zip Entry)라고 합니다
Zip 엔트리는 ZipEntry 클래스의 객체로 표현되며, ZipEntry는 엔트리의 이름인 String 객체를 취하는 생성자를 가집니다.
이것도 예제(testFileZipComplex)를 보시면 금방 이해가 가실것입니다.
5. 이것도 디비처럼 꼭 close() 해줘야 하나요?
=> 넵 말이 필요없습니다!. 철저한 자원관리! ^-^;
예제를 보시면 제가 앞의 메소드들은 안하다가 뒤로 갈수록 했는데요.. 사실 이러시면 안됩니다!!
실전에서는 꼭 finally에서 닫아주는 센스!! 잊지마세요.
예제는 총 7개가 있습니다.
1. atestFileCopy
-> 파일카피 (스트림의 기본이라서 넣어 봤습니다 ^^;)
2. atestFileZipSimple
-> 단순한 파일 압축. 한글깨지는 문제가 있음. 썬의 버그임 외국개발자가 버그 픽스한 라이브러리로 처리.
3. btestFileZipSimple2
-> // 간단 압축된 파일 풀깅~
4. atestFileZipInOut2()
-> ZipOutputStream을 이용한 압축 및 해제. 순서 1. 원본파일 -> 압축 -> 압축해제 후 원본파일 복귀
5. atestArrayFileZip()
-> ZipOutputStream의 setLevel을 1-9까지 돌려보며 속도와 압축률 비교.
6. atestFileGZipInOut()
-> GZIPOutputStream을 이용한 압축 및 해제. 순서 1.원본파일->압축->압축해제 후 원본파일복귀
7. testFileZipComplex
-> 여러개의 파일을 하나의 zip파일로 압축.
소스 보시면 다 이해가 갈것입니다. 맛배기로 5번의 결과값을 보여드립니다. ^-^;
자바 디폴트 압축레벨8
Catalysis소개0.zip make Sucessed
Catalysis소개0.zip Size = 2086874 byte
압축에 걸린 시간 측정 220 millisecond
Catalysis소개1.zip make Sucessed
Catalysis소개1.zip Size = 1548156 byte
압축에 걸린 시간 측정 421 millisecond
Catalysis소개2.zip make Sucessed
Catalysis소개2.zip Size = 1541146 byte
압축에 걸린 시간 측정 411 millisecond
Catalysis소개3.zip make Sucessed
Catalysis소개3.zip Size = 1534771 byte
압축에 걸린 시간 측정 440 millisecond
Catalysis소개4.zip make Sucessed
Catalysis소개4.zip Size = 1526945 byte
압축에 걸린 시간 측정 481 millisecond
Catalysis소개5.zip make Sucessed
Catalysis소개5.zip Size = 1520943 byte
압축에 걸린 시간 측정 541 millisecond
Catalysis소개6.zip make Sucessed
Catalysis소개6.zip Size = 1516023 byte
압축에 걸린 시간 측정 510 millisecond
Catalysis소개7.zip make Sucessed
Catalysis소개7.zip Size = 1515002 byte
압축에 걸린 시간 측정 561 millisecond
Catalysis소개8.zip make Sucessed
Catalysis소개8.zip Size = 1513484 byte
압축에 걸린 시간 측정 922 millisecond
Catalysis소개9.zip make Sucessed
Catalysis소개9.zip Size = 1512840 byte
압축에 걸린 시간 측정 1081 millisecond
보시면 알겠지만 setLevel이 높을수록 압축률이 높고 속도가 떨어집니다. ^^;
디폴트는 8입니다.
ZipInputStream을 이해하는데 많은 도움이 되었으면 합니다. ^-^;
ps1 jazzlib_0.07은 외국개발자가 픽스해 놓은 소스.
jazzlib.zip은 제가 위의 소스를 jar로 묶은것.
ps2 틀린점이나 추가할 사항이 있으시면 지적해 주는 센스!! 아시죠? ^^
[출처] ZipInputStream과 GZIPInputStream의 고찰.|작성자 협객
| [펌]자바 IO 대충 정리..(필요할때 쓰자) (0) | 2010.12.03 |
|---|---|
| 색상표 (0) | 2010.12.02 |
| javax.swing.event 에서의 ListDataEvent 에 관한 설명 (1) | 2010.11.17 |
| 파일이름 중복 검사하는 policy 파일 만들기 (0) | 2010.11.17 |
| Introduction to Object Serialization(객체직렬화를 통한 파일 저장 및 DB저장 튜터리얼) (1) | 2010.11.16 |

| UDP 에코 서비랑 클라이언트 (0) | 2011.01.02 |
|---|---|
| [왕초보팁]서비스연결후 현재 보여지고 있는 엑티비티에 값 넘겨줄때 (5) | 2010.12.08 |
| (왕초보시리즈1)그림메모어플 (3) | 2010.11.29 |
| (왕초보시리즈2)매시간 알리미 (4) | 2010.11.29 |
| [안드로이드]아주 간단한 로그인화면 구현하기 (1) | 2010.11.03 |
안드로이드의 기본적인 액티비티간 화면 전환 효과는 우에서 좌로 새로운 액티비티가 넘어와
화면이 전환되는 형태로 굉장히 심플하고 어떻게 보면 볼품 없다고 생각할 수도 있다 -_-ㅋ
이에 간단한 방법으로 액티비티 전환 시 Fade효과를 주어 좀 더 부드럽고 고급스러운
화면 전환 효과를 이용해 보자.
- 첨부파일 2개 (fade.xml, hold.xml)를 다운 받는다.
- res 폴더 밑에anim라는 폴더를 생성해준다음 그 밑에 위에서 다운 받은 파일 2개를 넣어준다.
- 이동전 액티비티의 소스코드에서 다음 액티비티를 호출하는 부분인 startActivity(intent);
밑에 다음의 코드를 넣어준다.
overridePendingTransition(R.anim.fade, R.anim.hold);
이 외에도 다양한 xml파일을 이용하여 액티비티 전환 시 다양한 화면 효과가 연출 가능하다.
[출처] [안드로이드 프로그래밍] 액티비티 화면 전환 시 Fade효과 주기|작성자 Jess
| Handling Screen On or Off intent (0) | 2010.12.02 |
|---|---|
| [퍼옴]기본 리니어 레이아웃 정렬 방식 (0) | 2010.12.02 |
| [펌]안드로이드 전체 전역변수 사용하기 (0) | 2010.12.01 |
| intent 객체 직렬화 해서 보내기(Bundle이용 포함) (0) | 2010.11.30 |
| [안드로이드] Preference – UI 정보, 간단한 변수 저장하기 (0) | 2010.11.28 |
| [퍼옴]기본 리니어 레이아웃 정렬 방식 (0) | 2010.12.02 |
|---|---|
| [안드로이드]화면전환 에니메이션 설정 (0) | 2010.12.01 |
| intent 객체 직렬화 해서 보내기(Bundle이용 포함) (0) | 2010.11.30 |
| [안드로이드] Preference – UI 정보, 간단한 변수 저장하기 (0) | 2010.11.28 |
| 안드로이드에서 사운드 재생시 멀티 채널 수용하는 SoundManager 구현 (0) | 2010.11.26 |
1 |
Vector<LOGINDATA> vvv = new Vector<LOGINDATA>(); |
2 |
Intent intent = new Intent(); |
3 |
intent.putExtra("key", vvv); |
1 |
Vector<LOGINDATA> rrr = (Vector<LOGINDATA>)intent.getExtras().getSerializable("key"); |
| [안드로이드]화면전환 에니메이션 설정 (0) | 2010.12.01 |
|---|---|
| [펌]안드로이드 전체 전역변수 사용하기 (0) | 2010.12.01 |
| [안드로이드] Preference – UI 정보, 간단한 변수 저장하기 (0) | 2010.11.28 |
| 안드로이드에서 사운드 재생시 멀티 채널 수용하는 SoundManager 구현 (0) | 2010.11.26 |
| [펌]안드로이드 효과음 재생시 유용한 팁 (0) | 2010.11.26 |
작성자의 티스토리 : http://javaexpert.tistory.com
다름이 아니라 이번에 처음으로 만든 어플이 있어서 올려봅니다.
올리는 이유는 펍가족님들에게 조언 좀 얻을려구영..^^;


용기있는 왕초보의 프로젝트입니다..이름은 허접한 그림메모 어플..^^;;;;;; ==;
어플 기능 소개
1.기본적인 리스트
2.미리보기 기능 구현
3.프리드로우 기능 구현(자바 그대로 구현)
4.옵션 메뉴 기능 구현
학습된 내용
1.커스텀 CursorAdapter 공부
2.인텐트 기본 공부
3.Bitmap 기본 변환 공부
4.기본 입출력 공부
5.기본 직렬화 IO 공부
6.DB 기본 컨트롤 공부 등등
단 2장짜리 어플이지만 상당히 공부된 걸로 판단됩니다..^^;;
최적화는 못했습니다..아직 실력이..T.T
사인안된 .apk하나랑 (unsigned랑 sign이랑 있는데 뭔지 잘 모르겠음..ㅋ)
풀소스 올려봅니다. 아주 초보분들은 조금이라도 도움될듯..고수분들에게 보이기엔 상당히 부끄럽습니다..^^;
이제 몇개월만 더 하면 과정 끝나서 안드로이드 취업해야 하는데.... 더 분발해야 할듯..
혹시 여기 올리면 안되면 바로 지우겠습니다..
| UDP 에코 서비랑 클라이언트 (0) | 2011.01.02 |
|---|---|
| [왕초보팁]서비스연결후 현재 보여지고 있는 엑티비티에 값 넘겨줄때 (5) | 2010.12.08 |
| [왕초보시리즈3]간단한 탐색기 (14) | 2010.12.01 |
| (왕초보시리즈2)매시간 알리미 (4) | 2010.11.29 |
| [안드로이드]아주 간단한 로그인화면 구현하기 (1) | 2010.11.03 |
작성자 블로그 : http://javaexpert.tistory.com
작성자 메일주소 : bear2u@naver.com
저번 발로 만든 어플 첫번째인 그림메모에 이어 두번째 어플을 만들긴 했습니다.
너무 소스가 부끄러워 그냥 제 블로그에다 넣을려고 했으나 저랑 비슷한 왕초보분들이 상당히 많이 계신것 같아서 또 용기있게 올려봅니다.
개략 설명============================================================================
일반 핸드폰에 있는 매시간 알림
서비스입니다.
기본 UI는 한장이며(솔직히 디자인도 어려운 안드로이드임..==;)


소스또한 그리 어렵지는
않습니다..하지만 이걸 구현하기 위한 저의 개발시간은 또 일주일..^^;
그리고 AlarmManager 의 setRepeating도
있는 데 Interval로 주기적으로 하는 건데 이상하게 하다 꼬여
서 그냥 주기적으로 Set하면 다시 Set하는 방식으로
했는데..참 난감합니다..^^;;
학습내용
1.broadreceive 기본적인 사용방법 숙지
2.Service 기본
구현방법 숙지
3.인텐트 필터 공부
4.알람메니저 기본 구현방법 숙지
5.Preference 사용방법 숙지..(이것도 하다
BroadReceive에서 받아올줄 몰라서 DB로 바꿔서 이 소스에선 안씀..^^;;
아무튼 간단한 거라도 만드니 상당한 공부가
되는 건 확실하네요^^
그럼 간략하게 소스 설명해드리겠습니다.
하지만 먼저..버그가 좀 있습니다.
1.알람시간이 정확하게 정해지지가 않습니다.
예)5시에 올려야 하는 데 5시 10초정도에 울린다던가..그런경우..도저히 못 잡겠음..T.T
...아시는 분 댓글 부탁..
2.BroadReceive나 Service에서 preference에 접근할려면 어떻게 해야 하는 지 모르겠네요
(아시는 분 댓글 부탁드립니다)
소스는 다음과 같습니다..
대략적인 프로세스 흐름은
1.엑티비티를 실행하면 위와 같은 한장의 UI가 나옵니다.
2. 그럼 실행 클릭합니다.
3.인텐트 액션명을 지정해서 Broad합니다.그럼 Receiver가 받겠죠?
1.intent = new Intent();2.intent.setAction("org.exam.Alarm_action");3.this.sendBroadcast(intent);4.Receiver에선 서비스를 실행합니다.
1.Intent mIntent = new Intent(context,AlarmService.class); 2. mIntent.setFlags(Intent.FLAG_ACTIVITY_NEW_TASK);3. if(!dbHandler.getIsFirst())4. new MyThread(context).start();1.context.startService(mIntent);1. 5.서비스에서 AlarmManager를 객체 생성후 배운대로 PendingIntent를 설정합니다..(책보고 하긴 했지만 아직 머하는 놈인지 자세히는..)
1.AlarmManager manager =2. (AlarmManager)getSystemService(Context.ALARM_SERVICE);3. 4. Intent mIntent = new Intent(AlarmService.this,BroadAlarmManager.class);5. mIntent.putExtra("id",1);6. PendingIntent sender = PendingIntent.getBroadcast(AlarmService.this,0,mIntent,0);6.이제 문제의 Calendar를 설정합니다..(솔직히 이부분에서 조언을 받았으면 합니다..)
01.Calendar calendar = Calendar.getInstance();02.calendar.setTimeInMillis(System.currentTimeMillis());03. 04.int mHour = calendar.get(Calendar.HOUR);05.int mHin = calendar.get(Calendar.MINUTE);06.int mSec = calendar.get(Calendar.HOUR);07. 08.Log.i("Time","1:"+mHour);09.Log.i("Time","2:"+mHin);10.Log.i("Time","3:"+mSec);11. 12.calendar.add(Calendar.MINUTE, 59-mHin);13.calendar.add(Calendar.SECOND, 60-mSec);14. 15.mHour = calendar.get(Calendar.HOUR);16.mHin = calendar.get(Calendar.MINUTE);17.mSec = calendar.get(Calendar.HOUR);대략 위의 소스대로 하면 다음 알람 시간은 예) 6시 00분 07초에서 10초사이에 설정됨
7.이제 AlarmManager으 Set으로 설정합니다.
1.manager.set(AlarmManager.RTC_WAKEUP, calendar.getTimeInMillis(), sender);2. 3.Toast.makeText(this, "알람등록완료", Toast.LENGTH_SHORT).show();8.그럼 시간이 지나고 또 지나고 매시간 정각이 되는 순간이 아니라..좀 몇초지나서..ㅋㅋ 소리가 나옵니다..(띵똥 몇시..)
소리 나오는 건 Receiver에서 옵션을 잡아서 재생하게 합니다.
여기선 쓰레드를 이용해서 하긴 했지만 뭐 굳이 안해도 될것 같더군요...^^;
01.MyThread(Context ctx){02. this.mCtx = ctx;03. calendar = Calendar.getInstance();04. calendar.setTimeInMillis(System.currentTimeMillis());05. AudioManager mAudioManager = (AudioManager) ctx.getSystemService(Context.AUDIO_SERVICE);06. volume = mAudioManager.getStreamVolume(AudioManager.STREAM_MUSIC);07. }08. public void run(){09. 10. 11. /*12. int hour = calendar.get(Calendar.MINUTE);13. 14. String sHour = String.valueOf(hour);15. 16. if(sHour.length() >1)17. sHour = sHour.substring(1, sHour.length());18. 19. Log.i("Receive","hour:"+sHour);20. */21. //int am = calendar.get(Calendar.AM);22. 23. int tHour = calendar.get(Calendar.HOUR);24. Log.i("Time","thread hour : "+tHour);25. //if(am==0)26. //tHour--;27. MediaPlayer mp = MediaPlayer.create(mCtx, getHourVal(tHour));1.mp.setVolume(volume, volume);2. mp.start();3. 4. 5.}
그럼 여기서 생기는 의문은 왜 Activity에서 바로 알람을 실행안하고 이렇게 약간 복잡하게 할까..
그건 부팅후에도 실행할려고 하기 때문입니다.
인텐트 필터를 적용해 액션 및 부팅 후 Broad도 잡게끔 되어있습니다.
서비스 등록및 filter 적용한 부분입니다.
1.<service android:name="AlarmService"/>2.<receiver android:name=".BroadAlarmManager">3. <intent-filter>4. <action android:name="android.intent.action.BOOT_COMPLETED" />5. <action android:name="org.exam.Alarm_action" />6. 7. </intent-filter>8.</receiver>
이상으로 간략적인 흐름은 끝냈습니다.
적다보니 상당히 간단하지만....하지만..힘들지만 재미있네요^^
풀소스는 여전히 밑에 첨부되어 있으니 보고 마구 지적해주세요. 지적은 대환영입니다..^^
여담이지만 이 어플은 항상 요양원에 계시는 아버지께서 갤럭시를 사드렸는데 시간알리미가 없어서 불편하다가 해서 기존에 있는 걸 까는 것 보다 자식이 만든 걸 깔아 드리게 되었습니다. 지금 만족하시네요^^
그럼 다들 수고하세요.
| UDP 에코 서비랑 클라이언트 (0) | 2011.01.02 |
|---|---|
| [왕초보팁]서비스연결후 현재 보여지고 있는 엑티비티에 값 넘겨줄때 (5) | 2010.12.08 |
| [왕초보시리즈3]간단한 탐색기 (14) | 2010.12.01 |
| (왕초보시리즈1)그림메모어플 (3) | 2010.11.29 |
| [안드로이드]아주 간단한 로그인화면 구현하기 (1) | 2010.11.03 |
<목표> [안드로이드] Preference – UI 정보, 간단한 변수 저장하기
이번에는 Preference에 대해 다루어 보겠습니다. Preference(이하 프리퍼런스)는 화면 이동 시 간에 발생하는 데이터 손실을 방지하기 위해 사용되는 자료형입니다. 간단한 예로 들자면, 친구에게 메시지를 보내기 위해 열심히 문자를 쓰고 있는 와중에, 전화와 온다고 가정합시다. 전화를 받고 나서 긴 장문의 메시지가 날라간다면 어떤 느낌이 들까요? 이런 일을 방지하기 위해서 프리퍼런스라는 자료형을 사용합니다. 화면 전환 시, UI 정보를 저장하고, 다시 그 화면으로 돌아왔을 때의 UI 정보를 불러와서 다시 화면에 뿌려주는 역할을 합니다. 이 밖에도 화면 전환 시에 저장하고 싶은 데이터를 저장할 수도 있습니다. 즉 간단하게 말하면, 임시 저장소라고 생각하시면 될 것 같습니다.
[핵심코드] Preference
|
엑티비티 변환 시 데이터를 저장합니다. |
|
SharedPreferences prefs = getSharedPreferences("PrefName", MODE_PRIVATE); SharedPreferences.Editor editor = prefs.edit(); editor.putString(KEY_MY_PREFERENCE, text); editor.commit(); |
|
엑티비티를 다시 실행하였을 때 데이터를 불러옵니다. |
|
SharedPreferences prefs = getSharedPreferences("PrefName", MODE_PRIVATE); String text = prefs.getString(KEY_MY_PREFERENCE, ""); |
아래의 예제에서는 간단하게 두 엑티비티 간의 화면이 바뀌었다가 다시 돌아왔을 때 제대로 프리퍼런스가 동작이 되고 있는지 확인합니다.
STEP 1 Java Source Code
자바 코드는 두 가지를 다루게 됩니다. 첫 엑티비티는 시작화면으로, 간단히 데이터를 입력하고 화면을 전환시킵니다. 두 번째 엑티비티는 별다른 기능없이 다시 첫번째 엑티비티로 돌아가는 역할만 수행합니다.
[[Activity]] Preference 를 이용한 첫 번째 엑티비티
|
package example.preference;
import android.app.Activity; import android.content.Intent; import android.content.SharedPreferences; import android.os.Bundle; import android.view.View; import android.widget.Button; import android.widget.EditText;
public class PreferenceTestActivity extends Activity {
public static final String KEY_MY_PREFERENCE = "my_preference"; @Override public void onCreate(Bundle savedInstanceState) { super.onCreate(savedInstanceState); setContentView(R.layout.main);
Button bt = (Button)findViewById(R.id.nextButton); bt.setOnClickListener(new View.OnClickListener() {
@Override public void onClick(View v) { Intent intent = new Intent(PreferenceTestActivity.this, NextActivity.class); startActivity(intent); } });
SharedPreferences prefs = getSharedPreferences("PrefName", MODE_PRIVATE); String text = prefs.getString(KEY_MY_PREFERENCE, ""); // 첫 번째인자는 키, 두번째 인자는 키에 대한 데이터가 존재하지 않을 경우의 디폴트값 final EditText edit =(EditText)findViewById(R.id.text); edit.setText(text); }
// onStop() : 더 이상 엑티비티가 사용저에게 보여지지 않을 때 불립니다. // 기존에 존재하는 데이터를 저장합니다. protected void onStop() { super.onStop();
EditText editText =(EditText)findViewById(R.id.text); String text = editText.getText().toString();
// 데이타를 저장합니다. SharedPreferences prefs = getSharedPreferences("PrefName", MODE_PRIVATE); SharedPreferences.Editor editor = prefs.edit(); editor.putString(KEY_MY_PREFERENCE, text); editor.commit(); } } |
[Activity ①] SharedPreferences 이용하여 데이터 저장하기
첫 번째 엑티비티로 화면에서 간단한 UI를 조작하고 있습니다. 버튼을 클릭하면 Intent를 이용하여 다음 엑티비티로 전환합니다. 화면을 전환하게 되면 onStop()이 호출이 되게 되며, 이 상태에서 저희가 사용할 프리퍼런스를 이용해서 데이터를 저장해야합니다. 위의 코드에서 보는 것처럼 SharedPreFerences라는 데이터 유형을 사용해야 합니다. 안드로이드 자체에서 제공해주는 자료형으로써, getSharedPreferences( Key값, Permission값 ) 메서드를 호출하여 자료형의 속성을 지정할 수 있습니다.
"PrefName" 은 말그대로 자신이 정하고 싶은 Key 값이라고 보시면 됩니다. 다음에 데이터를 호출할 때 이 Key 값을 이용하여 그 자료형을 불러올 수 있습니다. 다음 인자는 이 자료형에 대한 권한 설정을 해주는 부분입니다. MODE_PRIVATE, MODE_WORLD_READABLE, MODE_WORLD_WRITEABLE 을 이용하여 이 파일에 대한 접근 권한을 설정합니다.
|
MODE_PRIVATE |
-rw-rw---- | |
|
MODE_WORLD_READABLE |
-rw-rw-r-- | |
|
MODE_WORLD_WRITEABLE |
-rw-rw--w- | |
위에서 보시는 것과 같이 이 데이터에 대한 권한을 설정할 수 있습니다. 리눅스 개발을 한번이라도 접해신분들이라면 곧바로 이해가 되실 겁니다. 이렇게 저장된 프리퍼런스는 xml 형태로 저장이 됩니다. (소스 내에 존재하진 않습니다.) 패키지 파일 내에 있는 shared_prefs 영역에 선언된 SharedPreferences 자료가 저장되어 있는 것을 확인하실 수 있습니다.
이렇게 저장된 프리퍼런스를 이용하여 Editor라는 자료형으로 선언합니다. 말 그대도 편집하기 위해서 선언을 한 뒤에, 자신이 저장하고 싶은 데이터 이름을 설정해주고, 저장하고 싶은 변수를 넣으면 저장이 됩니다. 그리고 마지막으로 commit()을 호출하면 데이터가 저장됩니다.
[[Activity ②]] SharedPreferences 이용하여 데이터 불러오기
이제 저장한 데이터를 이용하여 불러와야 합니다. 불러오는 부분은 엑티비티가 생성 시, 즉 onCreate( ) 부분에 넣으면 됩니다. SharedPreferences를 설정해주고, 미리 정해둔 Key 값을 넣어 데이터를 불러오면 됩니다. 아주 간단하게 작업이 이루어집니다.
엑티비티의 라이프 사이클을 고려하여, 해당하는 부분에 알맞도록 프리퍼런스가 동작하도록 설정해주면, 입맛에 맞게 이용할 수 있습니다.
[[Activity]] 단순히 뒤로갈 수 있게 만드는 두 번째 화면 엑티비티
두 번째 화면 엑티비티는 테스트를 위해 필요한 부분입니다. 단순히 다시 화면으로 돌아갔을 때 원래의 값이 남아 있는지 확인 하는 부분입니다. 엑티비티를 생성하시고 간단히 뒤로 가는 버튼을 넣어주면 됩니다. 별다른 어려운 점이 없는 부분이니 넘어가겠습니다.
|
class NextActivity extends Activity {
public void onCreate(Bundle savedInstanceState) { super.onCreate(savedInstanceState); setContentView(R.layout.next);
Button bt = (Button)findViewById(R.id.previousButton); bt.setOnClickListener(new View.OnClickListener() {
@Override public void onClick(View v) { Intent intent = new Intent(NextActivity.this, PreferenceTestActivity.class); startActivity(intent); } }); } } |
STEP 2 Xml Code
첫 번째 엑티비티는 텍스트뷰와 에디트박스, 버튼으로 구성되어 있습니다. 에디트박스에 있는 데이터가 저장되고 다시 돌아왔을 때 저장되었는지를 확인합니다. 제대로 저장이 되어 있다면, 쓰고 있던 메시지가 그대로 저장이 되어야 합니다.
|
<?xml version="1.0" encoding="utf-8"?> <LinearLayout xmlns:android="http://schemas.android.com/apk/res/android" android:orientation="vertical" android:layout_width="fill_parent" android:layout_height="fill_parent" > <TextView android:layout_width="fill_parent" android:layout_height="wrap_content" android:text="첫 엑티비티" /> <EditText android:id="@+id/text" android:layout_width="fill_parent" android:layout_height="wrap_content" /> <Button android:text="다음으로" android:id="@+id/nextButton" android:layout_width="wrap_content" android:layout_height="wrap_content"></Button> </LinearLayout> |
두 번 째 엑티비티는 첫 번째 엑티비티를 이용하여 돌아가기 위해 버튼만 구현해 놓았습니다.
|
<?xml version="1.0" encoding="utf-8"?> <LinearLayout xmlns:android="http://schemas.android.com/apk/res/android" android:orientation="vertical" android:layout_width="fill_parent" android:layout_height="fill_parent" > <TextView android:layout_width="fill_parent" android:layout_height="wrap_content" android:text="다음 엑티비티" /> <Button android:text="이전으로" android:id="@+id/previousButton" android:layout_width="wrap_content" android:layout_height="wrap_content"> </> </LinearLayout> |
STEP 3 AndroidManifest.xml Code
메니페스트에는 다음 엑티비티를 허용하겠다는 퍼미션만 추가하면 됩니다.
|
<?xml version="1.0" encoding="utf-8"?> <manifest xmlns:android="http://schemas.android.com/apk/res/android" package="example.preference" android:versionCode="1" android:versionName="1.0"> <application android:icon="@drawable/icon" android:label="@string/app_name"> <activity android:name=".PreferenceTestActivity" android:label="@string/app_name"> <intent-filter> <action android:name="android.intent.action.MAIN" /> <category android:name="android.intent.category.LAUNCHER" /> </intent-filter> </activity> <activity android:name=".NextActivity"></activity> </application> </manifest> |
< 마무리 > 프리퍼런스(Preference)를 이용하여 간단한 데이터 저장하기
화면 이동 시 일어날 수 있는 데이터 손실을 미리 방지하기 위해 프리퍼런스를 사용합니다. 이러한 간단한 정보를 데이터베이스를 이용하여 접근하는 것은 속도와 효율적인 면에서 큰 손실이 아닐 수 없습니다. 그렇기 때문에 안드로이드에서 제공해주는 SharedPreferencs라는 데이터 유형으로 프로그래밍 내에서의 변수 선언처럼 간단히 데이터를 저장하고 불러 올 수 있습니다. 엑티비티의 각각의 라이프 사이클에 맞게 데이터를 저장, 불러오기를 한다면 조금 더 사용성에 이점이 있도록 어플리케이션을 개발할 수 있습니다.
| [펌]안드로이드 전체 전역변수 사용하기 (0) | 2010.12.01 |
|---|---|
| intent 객체 직렬화 해서 보내기(Bundle이용 포함) (0) | 2010.11.30 |
| 안드로이드에서 사운드 재생시 멀티 채널 수용하는 SoundManager 구현 (0) | 2010.11.26 |
| [펌]안드로이드 효과음 재생시 유용한 팁 (0) | 2010.11.26 |
| 안드로이드 백그라운드 설명서 pdf (0) | 2010.11.25 |
소스는 구글링중에 예제소스 수정하였습니다.
[SoundManager.java]
package kr.co.joynuri.animalorchestra;
import java.util.Collection;
import java.util.HashMap;
import android.content.Context;
import android.media.AudioManager;
import android.media.SoundPool;
import android.util.Log;
public class SoundManager {
private static final String LOG_TAG = SoundManager.class.getSimpleName();
private Context mContext;
private SoundPool mSoundPool;
private HashMap<Integer, Integer> mSoundPoolMap;
private AudioManager mAudioManager;
public SoundManager(Context context) {
mContext = context;
}
public void create() {
mSoundPool = new SoundPool(16, AudioManager.STREAM_MUSIC, 0);
mSoundPoolMap = new HashMap<Integer, Integer>();
mAudioManager = (AudioManager) mContext.getSystemService(Context.AUDIO_SERVICE);
}
public void destroy() {
if (mSoundPoolMap != null) {
Collection<Integer> soundIds = mSoundPoolMap.values();
for (int soundId : soundIds) {
mSoundPool.unload(soundId);
Log.d(LOG_TAG, "destroy sound id " + soundId);
}
mSoundPoolMap = null;
}
}
public void load(int key, int resId) {
Log.d(LOG_TAG, "load...START");
mSoundPoolMap.put(key, mSoundPool.load(mContext, resId, 1));
Log.d(LOG_TAG, "load...END");
}
public void play(int key) {
Log.d(LOG_TAG, "play...START");
int streamVolume = mAudioManager.getStreamVolume(AudioManager.STREAM_MUSIC);
mSoundPool.play(
mSoundPoolMap.get(key),
streamVolume, streamVolume,
1, 0, 1f);
Log.d(LOG_TAG, "play...END");
}
public void playLoop(int key) {
Log.d(LOG_TAG, "playLoop...START");
int streamVolume = mAudioManager.getStreamVolume(AudioManager.STREAM_MUSIC);
mSoundPool.play(
mSoundPoolMap.get(key),
streamVolume, streamVolume,
1, -1, 1f);
Log.d(LOG_TAG, "playLoop...END");
}
public void stop(int key) {
mSoundPool.stop(mSoundPoolMap.get(key));
}
public void pause(int key) {
mSoundPool.pause(mSoundPoolMap.get(key));
}
public void resume(int key) {
mSoundPool.resume(mSoundPoolMap.get(key));
}
}
사용예) 사운드 등록
int coundIndex = 0;
mSoundManager = new SoundManager(mContext);
mSoundManager.create();
mSoundManager.load(coundIndex++, R.raw.snd_animal_0);
mSoundManager.load(coundIndex++, R.raw.snd_animal_1);
mSoundManager.load(coundIndex++, R.raw.snd_animal_2);
mSoundManager.load(coundIndex++, R.raw.snd_animal_3);
mSoundManager.load(coundIndex++, R.raw.snd_animal_4);
mSoundManager.load(coundIndex++, R.raw.snd_animal_5);
mSoundManager.load(coundIndex++, R.raw.snd_animal_6);
mSoundManager.load(coundIndex++, R.raw.snd_animal_7);
mSoundManager.load(coundIndex++, R.raw.snd_animal_8);
사용예) 사운드 해제
mSoundManager.destroy();
사용예) 사운드 플레이
mSoundManager.play(index);
| intent 객체 직렬화 해서 보내기(Bundle이용 포함) (0) | 2010.11.30 |
|---|---|
| [안드로이드] Preference – UI 정보, 간단한 변수 저장하기 (0) | 2010.11.28 |
| [펌]안드로이드 효과음 재생시 유용한 팁 (0) | 2010.11.26 |
| 안드로이드 백그라운드 설명서 pdf (0) | 2010.11.25 |
| wifi를 이용한 심플싱크 (0) | 2010.11.25 |
| [안드로이드] Preference – UI 정보, 간단한 변수 저장하기 (0) | 2010.11.28 |
|---|---|
| 안드로이드에서 사운드 재생시 멀티 채널 수용하는 SoundManager 구현 (0) | 2010.11.26 |
| 안드로이드 백그라운드 설명서 pdf (0) | 2010.11.25 |
| wifi를 이용한 심플싱크 (0) | 2010.11.25 |
| [펌]AlarmManager 사용하기 기본팁 (0) | 2010.11.25 |
| 안드로이드 조그버튼(휠) 예제소스 (0) | 2017.11.07 |
|---|---|
| 자바 스윙 화면 중간에 보이는 클래스 (0) | 2010.10.25 |
| 자바메모장추천소스 (0) | 2010.10.20 |
| 안드로이스 소스 받아보기 (0) | 2010.12.07 |
|---|---|
| 안드로이드 추천 팁 있는 사이트 (0) | 2010.12.03 |
| 구글의 인터넷주소 축약서비스 (0) | 2010.11.25 |
| 안드로이드 기본 어플 소스모음(Alarm Clock 도 포함) (5) | 2010.11.25 |
| 기본 안드로이드 게임 따라하기 추천 사이트 (0) | 2010.11.24 |
| 안드로이드에서 사운드 재생시 멀티 채널 수용하는 SoundManager 구현 (0) | 2010.11.26 |
|---|---|
| [펌]안드로이드 효과음 재생시 유용한 팁 (0) | 2010.11.26 |
| wifi를 이용한 심플싱크 (0) | 2010.11.25 |
| [펌]AlarmManager 사용하기 기본팁 (0) | 2010.11.25 |
| [펌][안드로이드]사운드 재생(sound pool) (0) | 2010.11.25 |
여기에 apk주소 넣은 다음 축약해서 문자메세지로 보낸다음 wifi로 apk다운받음..귀찮아지넹..ㅋ
| 안드로이드 추천 팁 있는 사이트 (0) | 2010.12.03 |
|---|---|
| [안드로이드]서비스와 알람 설명 괜찮은 곳 (0) | 2010.11.25 |
| 안드로이드 기본 어플 소스모음(Alarm Clock 도 포함) (5) | 2010.11.25 |
| 기본 안드로이드 게임 따라하기 추천 사이트 (0) | 2010.11.24 |
| apk 디컴파일 관련 참고 주소 (0) | 2010.11.23 |
| [펌]안드로이드 효과음 재생시 유용한 팁 (0) | 2010.11.26 |
|---|---|
| 안드로이드 백그라운드 설명서 pdf (0) | 2010.11.25 |
| [펌]AlarmManager 사용하기 기본팁 (0) | 2010.11.25 |
| [펌][안드로이드]사운드 재생(sound pool) (0) | 2010.11.25 |
| 안드로이드 2.2 변경사항(안드로이드프로그래밍정복 책참고) (0) | 2010.11.25 |

 ziptest.zip
 fade.xml
 081203_tramm_Download_Background_Service.pdf