
- IT (1747)

오늘도 공부
Seedance 2.0 프롬프트의 핵심: @ 레퍼런스 시스템 이해하기 본문
AI 영상 제작에서 좋은 결과를 얻기 위해 가장 중요한 것은 “무엇을 만들 것인가”보다 “무엇을 어떻게 참고하게 할 것인가”입니다.
Seedance 2.0은 텍스트만으로 영상을 만드는 도구가 아닙니다. 이미지, 영상, 오디오를 함께 활용해 더 구체적인 결과물을 만들 수 있는 멀티모달 영상 생성 도구입니다.
이때 핵심이 되는 기능이 바로 @ 레퍼런스 시스템입니다.
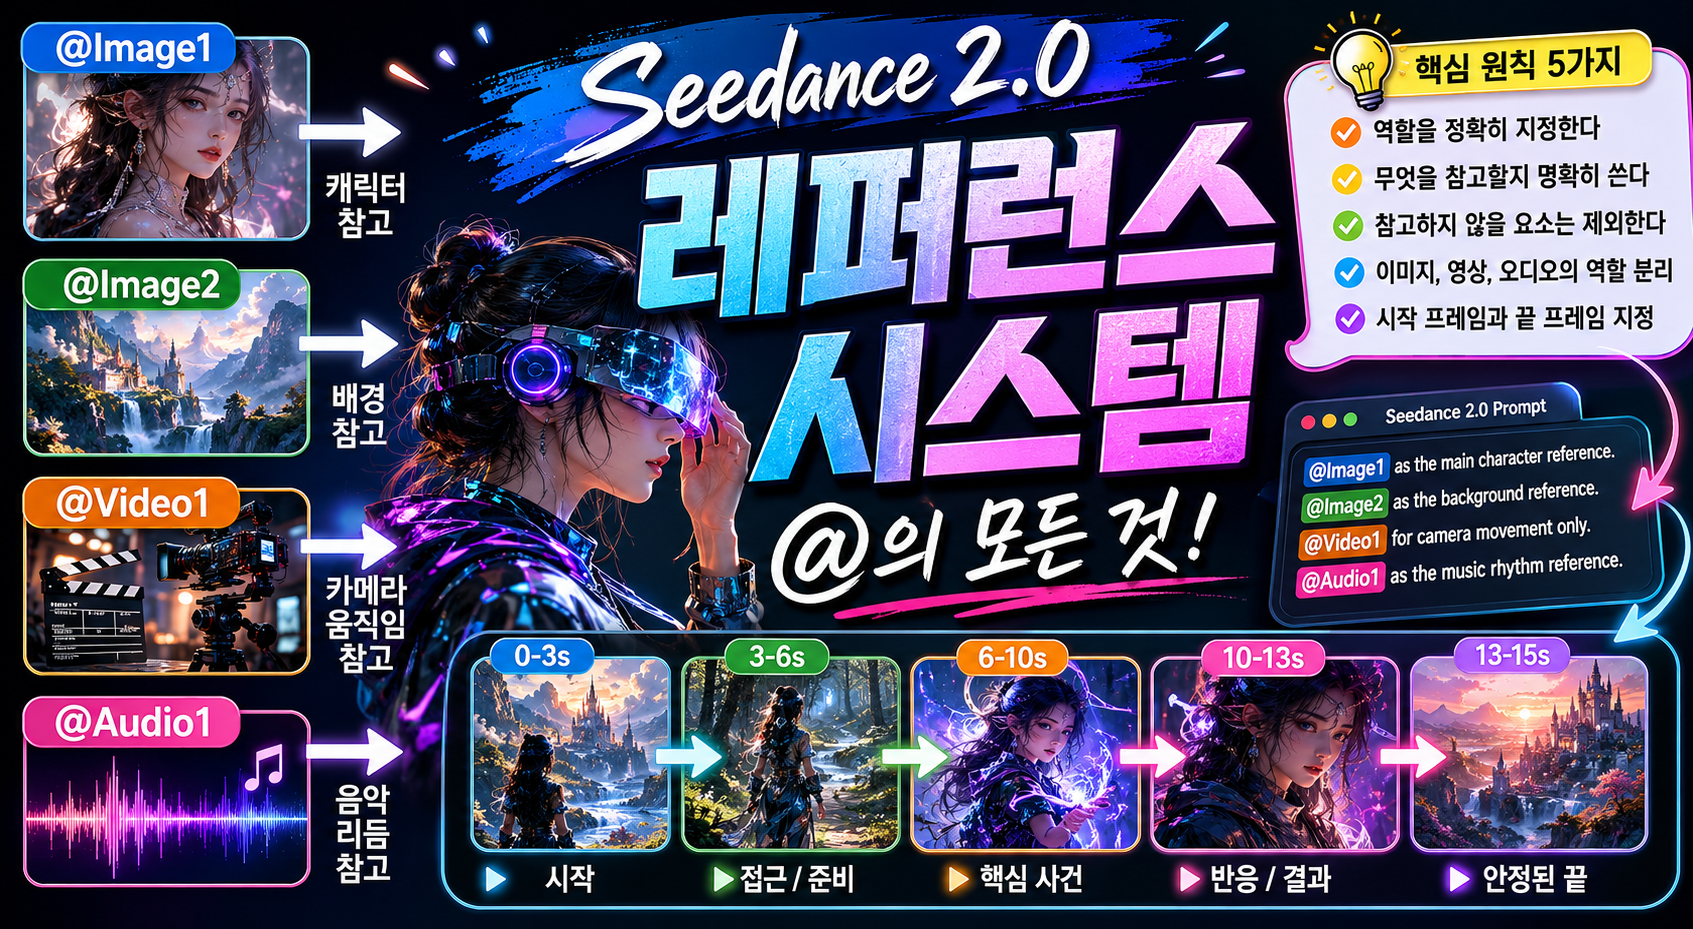
1. @ 레퍼런스 시스템이란?
Seedance 2.0에서는 업로드한 자료를 프롬프트 안에서 다음과 같이 부를 수 있습니다.
@Image1
@Image2
@Video1
@Audio1
예를 들어 이미지를 2장 올렸다면 첫 번째 이미지는 @Image1, 두 번째 이미지는 @Image2로 지칭할 수 있습니다.
영상을 올렸다면 @Video1, 오디오를 올렸다면 @Audio1처럼 사용할 수 있습니다.
하지만 중요한 것은 단순히 자료를 부르는 것이 아닙니다.
진짜 핵심은 각 자료가 어떤 역할을 하는지 명확히 지정하는 것입니다.
2. 나쁜 예: 그냥 참고하라고 하기
많은 사람이 처음에는 이렇게 프롬프트를 씁니다.
Reference @Image1.
Reference @Video1.
이 문장은 너무 모호합니다.
@Image1에서 캐릭터를 참고하라는 것인지, 배경을 참고하라는 것인지, 색감만 참고하라는 것인지 알 수 없습니다.
@Video1도 마찬가지입니다. 카메라 움직임을 참고하라는 것인지, 인물의 동작을 참고하라는 것인지, 편집 리듬을 참고하라는 것인지 불분명합니다.
AI 영상 프롬프트에서는 “참고해줘”보다 “무엇을 참고해줘”가 훨씬 중요합니다.
3. 좋은 예: 역할을 분리해서 지정하기
좋은 프롬프트는 다음처럼 각 레퍼런스의 역할을 나눕니다.
@Image1 as the main character reference.
@Image2 as the first frame.
@Image3 as the last frame.
@Video1 for camera movement only.
@Audio1 as the music rhythm reference.
이렇게 쓰면 각 자료의 용도가 명확해집니다.
@Image1은 캐릭터 참고용,
@Image2는 시작 프레임,
@Image3은 끝 프레임,
@Video1은 카메라 움직임만 참고,
@Audio1은 음악 리듬 참고용입니다.
자료를 많이 넣는 것보다 중요한 것은 자료의 역할을 정확히 나누는 것입니다.
4. 이미지 레퍼런스는 어떻게 나누면 좋을까?
이미지 레퍼런스는 보통 다음과 같이 사용합니다.
@Image1 as the main character reference.
@Image2 as the first frame.
@Image3 as the last frame.
@Image4 as the background reference.
@Image5 as the outfit reference.
각 역할은 다음과 같습니다.
레퍼런스역할
| @Image1 | 캐릭터 외형 참고 |
| @Image2 | 영상 시작 프레임 |
| @Image3 | 영상 마지막 프레임 |
| @Image4 | 배경 / 장소 참고 |
| @Image5 | 의상 참고 |
이렇게 분리하면 캐릭터, 배경, 의상, 시작 장면, 끝 장면을 각각 제어하기 쉬워집니다.
예를 들어 캐릭터는 유지하고 배경만 바꾸고 싶다면 이렇게 쓸 수 있습니다.
@Image1 as the main character reference.
@Image2 as the background reference.

Keep the character identity from @Image1.
Use only the environment, lighting, and atmosphere from @Image2.
5. 시작 프레임과 끝 프레임 지정하기
AI 영상 제작에서 가장 유용한 방식 중 하나는 시작 프레임과 끝 프레임을 지정하는 것입니다.
@Image1 as the first frame.
@Image2 as the last frame.

Start exactly from @Image1.
End exactly on @Image2.
이 방식은 특히 여러 개의 짧은 영상을 이어붙일 때 유용합니다.
예를 들어 15초짜리 장면을 여러 개 만들고 싶다면, 각 클립의 끝 프레임을 다음 클립의 시작 프레임과 연결할 수 있습니다.
이렇게 하면 장면 간 연결감이 좋아지고, 하나의 긴 영상처럼 이어붙이기 쉬워집니다.
6. 영상 레퍼런스는 “무엇을 참고할지”가 핵심이다
영상 레퍼런스는 이미지보다 더 주의해서 사용해야 합니다.
영상 안에는 여러 정보가 들어 있습니다.
카메라 움직임, 인물 동작, 배경, 편집 리듬, 색감, 효과, 사운드가 모두 섞여 있기 때문입니다.
그래서 단순히 이렇게 쓰면 좋지 않습니다.
Reference @Video1.
대신 다음처럼 범위를 좁혀야 합니다.
@Video1 for camera movement only.
@Video1 for action choreography only.
@Video1 for editing rhythm only.
@Video1 for visual effects and transitions.
예를 들어 카메라 움직임만 참고하고 싶다면 이렇게 씁니다.
Reference @Video1's camera movement only.
Do not copy the original character, background, color, or story.
Apply the same push-in speed, orbit timing, handheld feeling, and shot rhythm.
이렇게 쓰면 영상의 내용 전체를 따라가는 것이 아니라, 카메라 워크만 참고하도록 방향을 줄 수 있습니다.
기존 영상을 뒤로 이어 만들 때:
Extend @Video1 by 15 seconds.

0–5s: Continue from the final frame of @Video1. The camera slowly pushes forward while the light shifts across the scene.
5–10s: The subject moves deeper into the environment. Add subtle wind, footsteps, and ambient sound.
10–15s: The camera settles into a stable ending frame, ready for the next scene.
앞부분을 새로 붙이고 싶으면:
Extend backward 10 seconds.7. 오디오 레퍼런스는 리듬과 감정선을 잡는 데 유용하다
오디오도 마찬가지로 역할을 정확히 정해야 합니다.
@Audio1 as the background music reference.
@Audio1 as the music rhythm reference.
@Audio1 as the emotional tone reference.
뮤직비디오처럼 음악에 맞춰 영상을 만들고 싶다면 다음처럼 쓸 수 있습니다.
@Audio1 as the music rhythm reference.
Camera movement, lighting pulses, character motion, and transition timing should match the beat of @Audio1.
음악 자체보다 분위기만 참고하고 싶다면 이렇게 씁니다.
@Audio1 as the emotional tone reference only.
Do not copy the exact melody.
Match the mood, pacing, intensity, and emotional rise of @Audio1.
오디오 레퍼런스는 단순한 배경음악 지시가 아니라, 영상의 속도와 감정선을 설계하는 도구로 사용할 수 있습니다.
8. 실전 예시: 캐릭터 + 배경 + 카메라
아래는 캐릭터, 배경, 카메라 움직임을 분리한 예시입니다.
@Image1 as the main character reference.
@Image2 as the fantasy forest background reference.
@Video1 for camera movement only.

Create a 15-second cinematic fantasy scene.
The character from @Image1 walks through the forest environment from @Image2.
Apply @Video1's slow tracking shot and gentle handheld movement.
Do not copy @Video1's character or background.

Style:
Cinematic fantasy, soft light, atmospheric depth, natural movement.

Constraints:
Keep character identity consistent. No random outfit changes. No subtitles, no logos, no watermarks.
이 프롬프트의 구조는 명확합니다.
캐릭터는 @Image1,
배경은 @Image2,
카메라 움직임은 @Video1에서 가져옵니다.
각 자료의 역할이 겹치지 않기 때문에 결과를 제어하기 쉽습니다.
9. 실전 예시: 시작 프레임과 끝 프레임 연결
@Image1 as the first frame.
@Image2 as the last frame.

Create a 15-second video.

0–3s:
Start exactly from @Image1. The camera slowly pushes forward.

3–8s:
The environment gradually changes. Add subtle wind, light movement, and natural atmosphere.

8–12s:
The main visual transformation becomes clear. Keep the motion smooth and physically readable.

12–15s:
Slowly arrive at @Image2. End exactly on @Image2 with a stable final composition.

Sound:
Soft wind, footsteps, distant ambience.

Constraints:
No subtitles, no logos, no watermarks, no random text, no unrealistic camera jumps.
이 구조는 장면 전환, 여행 영상, 판타지 이동 장면, 뮤직비디오 컷 연결에 잘 맞습니다.
10. 실전 예시: 음악 리듬에 맞춘 뮤직비디오
@Image1 as the main character reference.
@Image2 as the stage background reference.
@Audio1 as the music rhythm reference.

Create a 15-second cinematic music video shot.

0–3s:
The character stands in the environment from @Image2 as the music begins. Camera slowly pushes in.

3–6s:
The character starts moving to the rhythm of @Audio1. Lighting subtly pulses with the beat.

6–10s:
Main performance moment. Character motion, camera movement, and visual accents match the downbeats.

10–13s:
The motion resolves. The environment reacts with light, wind, or particles.

13–15s:
End on a strong cinematic hero frame.

Constraints:
Keep character identity and outfit consistent. No subtitles, no logos, no watermarks, no extra limbs, no face morphing.
이 예시는 @Audio1을 단순한 배경음악이 아니라 영상 전체의 리듬 기준으로 사용합니다.
11. @ 레퍼런스 시스템의 핵심 원칙
Seedance 2.0의 @ 레퍼런스 시스템은 “자료를 많이 넣는 기술”이 아닙니다.
핵심은 자료의 역할을 정확히 나누는 기술입니다.
정리하면 다음과 같습니다.
@Image1 = 캐릭터
@Image2 = 시작 프레임
@Image3 = 끝 프레임
@Image4 = 배경
@Video1 = 카메라 움직임
@Audio1 = 음악 리듬
그리고 프롬프트 안에서는 항상 다음을 명확히 해야 합니다.
무엇을 참고할지
무엇은 참고하지 말아야 할지
어떤 요소를 유지해야 할지
어떤 요소를 바꿔야 할지
마지막에 어떤 프레임으로 끝나야 할지
12. 가장 기본이 되는 템플릿
마지막으로, 가장 실전적인 기본 템플릿입니다.
@Image1 as the main character reference.
@Image2 as the first frame.
@Image3 as the last frame.
@Image4 as the background reference.
@Video1 for camera movement only.
@Audio1 as the music rhythm reference.

Create a 15-second video.

Start exactly from @Image2.
Keep the character identity from @Image1.
Use the environment style from @Image4.
Apply @Video1's camera movement only.
Match motion and transitions to @Audio1's rhythm.
End exactly on @Image3.

Camera:
Smooth cinematic movement, no random shake, no unrealistic camera jumps.

Sound:
Natural ambience, footsteps, wind, subtle cinematic sound effects.

Style:
Cinematic quality, detailed lighting, coherent motion, stable visual continuity.

Constraints:
No random characters, no outfit changes, no face morphing, no subtitles, no logos, no watermarks, no distorted hands, no extra limbs.
마무리
Seedance 2.0 프롬프트에서 @ 레퍼런스 시스템을 잘 쓰려면, 업로드한 자료를 단순히 “참고 이미지”나 “참고 영상”으로만 생각하면 안 됩니다.
각 자료에 구체적인 역할을 부여해야 합니다.
이미지는 캐릭터, 배경, 의상, 시작 프레임, 끝 프레임으로 나눌 수 있습니다.
영상은 카메라 움직임, 액션, 편집 리듬, 효과 전환으로 나눌 수 있습니다.
오디오는 배경음악, 리듬, 감정선으로 나눌 수 있습니다.
좋은 프롬프트는 길어서 좋은 것이 아니라, 역할이 분명해서 좋은 것입니다.
Seedance2 기초인 프롬프트 작성법이 궁금하시면 참고바랍니다.
Seedance 2.0을 처음 쓰는 사람을 위한 프롬프트 작성법
예쁜 문장보다 중요한 것은 ‘영상 콘티처럼 쓰는 것’AI 영상 제작 도구를 처음 사용할 때 가장 많이 하는 실수가 있습니다.바로 프롬프트를 소설처럼 길고 감성적으로 쓰는 것입니다.예를 들
javaexpert.tistory.com
'Seedance2' 카테고리의 다른 글
| Seedance 2.0 영상 프롬프트 작성 가이드 (0) | 2026.05.25 |
|---|---|
| Seedance 2.0을 처음 쓰는 사람을 위한 프롬프트 작성법 (1) | 2026.05.21 |
| AI 영상 제작자를 위한 20가지 프롬프트 추천 스킬 (1) | 2026.05.19 |
| Seedance2 프롬프트 단계별 설계 (0) | 2026.04.23 |
| Seedance 2.0 프롬프트, 왜 자꾸 애매하게 나올까 (0) | 2026.04.23 |