
- IT (1732)

목록2018/11 (15)
오늘도 공부
No toolchains found in the NDK toolchains folder for ABI with prefix: mips64el-linux-android 원인 : 오래된 flutter 플젝을 열때 나오는 버그이다. Open android/gradle/gradle-wrapper.properties and change this line:distributionUrl=https\://services.gradle.org/distributions/gradle-4.1-all.zip to this line:distributionUrl=https\://services.gradle.org/distributions/gradle-4.4-all.zip Open android/build.gradle and chang..
NodeJS Advance 2주차 스터디부산에서 매주 진행되는 NodeJS Advance 스터디입니다.더 많은 스터디는 네이버 카페에서 확인 부탁드립니다.스터디 내용은 Udemy 강좌를 같이 보고 정리를 한 글입니다.1주차 스터디 내용NodeJS 내부 구조 정리 #1NodeJS 내부 구조 정리 #2이번 스터디에서는 노드의 성능향상에 대해서 공부하도록 한다.Cluster 모드를 사용Worker Threads를 사용우선 테스트를 위해 express 를 사용해보자.const express = require('express'); const app = express(); app.get('/', (req, res) => { res.send('Hi there'); }); app.listen(3000);위와 같이 구성..
 도커&쿠버네티스 7주차 스터디 정리내용
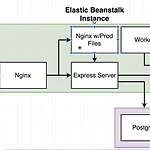
도커&쿠버네티스 7주차 스터디 정리내용부산에서 매주 진행되는 스터디입니다.부산에서 다른 스터디 내용을 보실려면 카페 에서 보실수 있습니다.https://www.udemy.com/docker-and-kubernetes-the-complete-guide 을 공부하고 있습니다1주차 스터디Dockerfile을 이용한 서버 배포2주차 스터디Docker-compose 입문3주차 스터디github를 통해 aws beanstalk로 자동 배포 #14주차 스터디github를 통해 aws beanstalk로 자동 배포 #25주차 스터디복잡한 형태의 서비스를 도커로 배포하기6주차 스터디Docker hub를 Travis를 통해서 자동 배포하기이번주 스터디 내용이번주는 저번 시간에 이어서 Dockerhub로 올린 이미지를 aw..
 NodeJS Advance 1주차 스터디 정리 #2
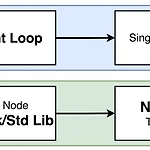
NodeJS Advance 1주차 스터디 정리 #2부산에서 매주 진행되는 NodeJS Advance 스터디입니다.더 많은 스터디는 네이버 카페에서 확인 부탁드립니다.스터디 내용은 Udemy 강좌를 같이 보고 정리를 한 글입니다.NodeJS 내부 구조 정리이벤트 루프 내부 구조이전 글에도 있지만 다시 내용을 살펴보자.pendingTimerspendingOSTaskspendingOperations// node myFile.js const pendingTimers = []; const pendingOSTasks = []; const pendingOperations = []; // New timbers, tasks, operations are recorded from myFile running myFile.ru..
 NodeJS 내부 구조 스터디 정리 #1
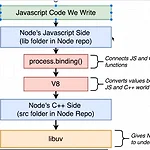
NodeJS Advance 1주차 스터디 정리부산에서 매주 진행되는 NodeJS Advance 스터디입니다.더 많은 스터디는 네이버 카페에서 확인 부탁드립니다.스터디 내용은 Udemy 강좌를 같이 보고 정리를 한 글입니다.들어가며Node를 안지 벌써 2년이 넘은것 같다. 하지만 늘 express 로 rest api 서버로만 개발만 하다 좀 더 알고 싶은 마음이 항상 있었다. 그래서 스터디 주제도 중급 노드JS로 정해서 진행하기로 했다.NodeJS 기본 구조Javascript code 작성NodeJSV8 또는 libuv 에서 처리Crypto 안에 있는 pbkdf2 함수를 통해서 동작원리를 파악할 예정이다.NodeJS 소스내에 pbkdf2.js 파일을 살펴보자.소스위치crypto 라는 걸 통해서 proces..
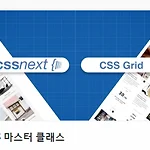
CSS Next grid 클론 ( 1 ~ 5 )부산에서 매주 진행되는 CSS 초중급 스터디입니다.더 많은 스터디는 네이버 카페에서 확인 부탁드립니다.이 내용은 니콜라스님의 CSS 마스터 클래스를 공부하고 정리한 글입니다.이번주는 1 ~ 5번 페이지까지 공부했습니다. Github 소스12345
 Flutter WhatsApp 클론 (부산 4주차 스터디)
Flutter WhatsApp 클론 (부산 4주차 스터디)부산에서 매주 진행되는 Flutter 스터디 4주차 내용입니다.더 많은 부산에서 스터디 정보는 네이버 카페 에서 확인 가능합니다.소스는 Github 에서 확인 가능합니다. 1주차TODO 리스트 앱 개발2주차Youtube 화면 클론3주차WhatsApp 화면 개발스터디 내용이번주차는 저번 스터디에 이어서 로직부분을 진행하도록 하겠다.FirestoreFireBase AuthGoogle SiginFireBase Storage - 이미지 업로드FireStoreFirebase 에서 제공하는 Collection - Document 형태의 nosql realdb 이다.자세한 설치 및 내용은 공식문서를 참조하자.시나리오 #1채팅방에서 텍스트박스에 내용을 입력하면 ..
 PostCSS 스터디 정리 ( 2주차 )
PostCSS 공부 ( 부산 스터디 2주차 ) 정리부산에서 매주 진행되는 CSS 초중급 스터디입니다.더 많은 스터디는 네이버 카페에서 확인 부탁드립니다. 이 내용은 니콜라스님의 CSS 마스터 클래스를 공부하고 정리한 글입니다. Github 소스링크저번 시간에는 CSS Next 에 대해서 정리를 했었다. 1주차 정리 바로가기 FlexCSS Next이번 스터디는 PostCSS 에 대해서 공부 하도록 한다. 공부할 내용은 아래와 같다. ParcelPostCSS & Parcelpseudo classCss Variables@custom media and media query rangescolor-mod, gray(), System-uiNesting Rules기타 추천 사이트들Parcel코드를 압축,변환등을 해주는..
 도커&쿠버네티스 6주차 스터디 정리내용
도커&쿠버네티스 6주차 스터디 정리내용부산에서 매주 진행되는 스터디입니다.부산에서 다른 스터디 내용을 보실려면 카페 에서 보실수 있습니다.https://www.udemy.com/docker-and-kubernetes-the-complete-guide 을 공부하고 있습니다1주차 스터디Dockerfile을 이용한 서버 배포2주차 스터디Docker-compose 입문3주차 스터디github를 통해 aws ec2로 자동 배포 #14주차 스터디github를 통해 aws ec2로 자동 배포 #25주차 스터디복잡한 형태의 서비스를 도커로 배포하기스터디 내용이번 6주차에는 이전 주차에서 공부한 내용을 기반으로 Client Production 을 Docker Hub 로 Travis를 통해서 자동 배포하는 걸 배울 예정이..
Web 디자인시 유의 할 점 정리이 내용은 유데미 강좌를 보고 정리한 글입니다. 웹에 필요한 리소스들을 정리해둔 사이트 http://codingheroes.io/resources/요약대부분의 콘텐츠는 텍스트이므로 멋진 타이포그래피는 멋진 웹 사이트의 핵심 요소입니다.이미지는 웹 디자인에서 점점 더 중요 해지고 있습니다. 따라서 훌륭한 이미지를 선택하고 그 위에 텍스트를 넣는 것이 작업의 필수적인 부분입니다.아이콘은 웹 사이트의 친숙한 음색을 설정하는 좋은 방법이지만 신중하게 사용하십시오.공백을 적절하게 사용하면 전문적으로 디자인 된 웹 사이트가 만들어 지므로 올바른 방법으로 많이 사용하십시오.콘텐츠의 시각적 계층 구조를 정의하여 레이아웃을 작성하십시오. 공백은 또한 이것을 위해 중요합니다.웹 사이트는 사..
 CSS Next 정리 ( 부산 1주차 HTML + CSS 스터디 )
HTML + CSS 스터디 1주차 스터디 정리내용 #2부산에서 매주 진행되는 CSS 초중급 스터디입니다.더 많은 스터디는 네이버 카페에서 확인 부탁드립니다.저번 시간은 Flex 에 대해서 공부했다.Flex로 화면 배치 하는데 불편함이 다소 있다. 그래서 Css Grid 라는 게 나왔다.CSS Grid 에 대해서 하나씩 정리해보도록 하겠다.이 내용은 니콜라스님의 CSS 마스터 클래스를 공부하고 정리한 글이다. CSS Grid 가 필요한 이유?우선 FlexBox 가 부족한 부분이 뭔지 살펴보자.만약 여러개의 박스가 들어올 경우 overflow 되면서 배치가 되기 때문에 보기가 안좋을 수 있다.CSS Grid System 이라고 하는 테이블같은 걸 쉽게 짤 수 있도록 도와준다.CSS Grid BasicGrid..
 Flutter WhatsApp 화면 개발 (부산 3주차 스터디)
Flutter 왓츠앱 클론부산에서 매주 진행되는 Flutter 스터디 3주차 내용입니다.더 많은 부산에서 스터디 정보는 네이버 카페 에서 확인 가능합니다.1주차TODO 리스트 앱 개발2주차Youtube 화면 클론소스는 Github 에서 확인 가능합니다.왓츠앱 클론오늘은 먼저 UI 개발 시간을 가져볼 예정이다.우선 완성된 화면은 다음과 같다. ChatScreen화면은 크게 2개로 나뉜다. 리스트뷰와 하단에 텍스트입력창이다.그리고 하단에 텍스트가 입력이 될 때마다 리스트가 업데이트 되는 구조이기 때문에 StatefuleWidget 으로 간다.class ChatScreen extends StatefulWidget { @override State createState() => ChatState(); } //채팅..
 Flex Css 스터디 정리
HTML + CSS 스터디 1주차 스터디 정리내용부산에서 매주 진행되는 CSS 초중급 스터디입니다. 목차FlexFlex BasicMain Axis and Cross AxisFlex Wrap and Directionwrapflex-directionAlign selfFlexFlex Basic컨테이너들을 가로 또는 세로로 정렬을 쉽게 도와준다. . displayjustify-content Document body{ display: flex; justify-content: space-between; } .box { width: 300px; height: 300px; background-color: red; border: 1px solid white; } Main Axis and Cross AxisMain Axi..
 도커&쿠버네티스 5주차 스터디 정리내용
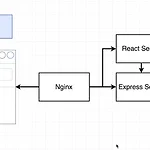
도커 & 쿠버네티스 5주차부산에서 매주 진행되는 스터디입니다. 부산에서 다른 스터디 내용을 보실려면 카페 에서 보실수 있습니다.https://www.udemy.com/docker-and-kubernetes-the-complete-guide 을 공부하고 있습니다.1주차 스터디Dockerfile을 이용한 서버 배포2주차 스터디Docker-compose 입문3주차 스터디github를 통해 aws ec2로 자동 배포 #14주차 스터디github를 통해 aws ec2로 자동 배포 #25주차 스터디 공부 내용이번 차에서는 좀 더 복잡한 형태의 서비스를 구성해볼 예정이다. 인덱스를 넣으면 해당되는 피보나치 수열을 계산하는 출력해주는 앱을 개발할 예정이다. 화면 구성화면은 React 로 작성될 예정이며 아래와 같이 구..
 메모 및 인증앱 유틸 개발 by flutter
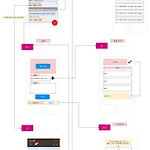
첨부파일 기록하는 습관을 가지자!!https://www.youtube.com/watch?v=Qvjw-5d9oEA 다 적자 ( 마켓에 업로드 예정 )앱제목 : 다 적자앱내용 : 기록하는 노트앱기능 : 1. 인증방에 편하게 복사할 수 있게끔 하는 유틸성 기능2. 사진 포함해서 간단한 기록목적 : 1. 식사하면서 뭐 먹었는지 기록하기2. 운동 일지 기록하기3. 15분방에 인증할때 쉽게 이전 기록 복사해서 붙여넣을 수 있도록 만들기4. 1시간단위로 기록하는 습관 가지기 개발 플랫폼 : Flutter / Android, IOS 을 한꺼번에 출시가능한 하이브리드 플랫폼 1차 전체 로직 스크린샷 이제 15분방에서 열심히 인증하자!!