
- IT (1549)

오늘도 공부
4. Ai Agent에 세션 + MCP까지 적용 본문
GitHub - MiniMax-AI/Mini-Agent: A minimal yet professional single agent demo project that showcases the core execution pipeline
A minimal yet professional single agent demo project that showcases the core execution pipeline and production-grade features of agents. - MiniMax-AI/Mini-Agent
github.com
"""Example 4: Full Agent with All Features
This example demonstrates a complete agent setup with:
- All basic tools (Read, Write, Edit, Bash)
- Session Note tools for memory
- MCP tools (Memory, Search, etc.)
- Skills integration
Based on: tests/test_integration.py
"""
import asyncio
import tempfile
from pathlib import Path
from mini_agent import LLMClient
from mini_agent.agent import Agent
from mini_agent.config import Config
from mini_agent.tools import BashTool, EditTool, ReadTool, WriteTool
from mini_agent.tools.mcp_loader import load_mcp_tools_async
from mini_agent.tools.note_tool import RecallNoteTool, SessionNoteTool
async def demo_full_agent():
"""Demo: Full-featured agent with all capabilities."""
print("\n" + "=" * 60)
print("Full Mini Agent - All Features Enabled")
print("=" * 60)
# Load configuration
config_path = Path("mini_agent/config/config.yaml")
if not config_path.exists():
print("❌ config.yaml not found. Please run:")
print(" cp mini_agent/config/config-example.yaml mini_agent/config/config.yaml")
return
config = Config.from_yaml(config_path)
# Check API key
if not config.llm.api_key or config.llm.api_key.startswith("YOUR_"):
print("❌ API key not configured in config.yaml")
return
# Create workspace
with tempfile.TemporaryDirectory() as workspace_dir:
print(f"📁 Workspace: {workspace_dir}")
# Load system prompt (Agent will auto-inject workspace info)
system_prompt_path = Path("mini_agent/config/system_prompt.md")
if system_prompt_path.exists():
system_prompt = system_prompt_path.read_text(encoding="utf-8")
else:
system_prompt = "You are a helpful AI assistant."
# Add Session Note instructions
note_instructions = """
IMPORTANT - Session Memory:
You have record_note and recall_notes tools. Use them to:
- Save important facts, decisions, and context
- Recall previous information across conversations
"""
system_prompt += note_instructions
# Initialize LLM
llm_client = LLMClient(
api_key=config.llm.api_key,
api_base=config.llm.api_base,
model=config.llm.model,
)
# Initialize basic tools
tools = [
ReadTool(workspace_dir=workspace_dir),
WriteTool(workspace_dir=workspace_dir),
EditTool(workspace_dir=workspace_dir),
BashTool(),
]
print("✓ Loaded 4 basic tools")
# Add Session Note tools
memory_file = Path(workspace_dir) / ".agent_memory.json"
tools.extend(
[
SessionNoteTool(memory_file=str(memory_file)),
RecallNoteTool(memory_file=str(memory_file)),
]
)
print("✓ Loaded 2 Session Note tools")
# Load MCP tools (if configured)
try:
mcp_tools = await load_mcp_tools_async(config_path="mini_agent/config/mcp.json")
if mcp_tools:
tools.extend(mcp_tools)
print(f"✓ Loaded {len(mcp_tools)} MCP tools")
else:
print("⚠️ No MCP tools configured (mcp.json is empty or disabled)")
except Exception as e:
print(f"⚠️ MCP tools not loaded: {e}")
# Create agent
agent = Agent(
llm_client=llm_client,
system_prompt=system_prompt,
tools=tools,
max_steps=config.agent.max_steps,
workspace_dir=workspace_dir,
)
print(f"\n🤖 Agent created with {len(tools)} total tools\n")
# Task: Complex task that uses multiple tools
task = """
Please help me with the following tasks:
1. Create a Python script called 'calculator.py' that:
- Has functions for add, subtract, multiply, divide
- Has a main() function that demonstrates usage
- Includes proper docstrings and type hints
2. Create a README.md file that:
- Describes the calculator script
- Shows how to run it
- Lists the available functions
3. Test the calculator by running it with bash
4. Remember this project info:
- Project: Simple Calculator
- Language: Python
- Purpose: Demonstration of agent capabilities
"""
print("=" * 60)
print("📝 Task:")
print("=" * 60)
print(task)
print("\n" + "=" * 60)
print("🤖 Agent is working...\n")
agent.add_user_message(task)
try:
result = await agent.run()
print("\n" + "=" * 60)
print("✅ Agent completed!")
print("=" * 60)
print(f"\nAgent's final response:\n{result}\n")
# Show created files
print("=" * 60)
print("📄 Created files in workspace:")
print("=" * 60)
workspace = Path(workspace_dir)
for file in workspace.glob("*"):
if file.is_file() and not file.name.startswith("."):
print(f"\n📄 {file.name}:")
print("-" * 60)
content = file.read_text()
# Show first 20 lines
lines = content.split("\n")[:20]
print("\n".join(lines))
if len(content.split("\n")) > 20:
print("... (truncated)")
print("-" * 60)
# Show memory
if memory_file.exists():
import json
notes = json.loads(memory_file.read_text())
print(f"\n💾 Session notes recorded: {len(notes)}")
for note in notes:
print(f" - [{note['category']}] {note['content'][:60]}...")
except Exception as e:
print(f"❌ Error during agent execution: {e}")
import traceback
traceback.print_exc()
async def demo_interactive_mode():
"""Demo: Interactive conversation with agent."""
print("\n" + "=" * 60)
print("Interactive Mini Agent")
print("=" * 60)
print("\nThis demo shows multi-turn conversation.")
print("(In production, use `mini-agent` for full interactive mode)")
# Load config
config_path = Path("mini_agent/config/config.yaml")
if not config_path.exists():
print("❌ config.yaml not found")
return
config = Config.from_yaml(config_path)
if not config.llm.api_key or config.llm.api_key.startswith("YOUR_"):
print("❌ API key not configured")
return
with tempfile.TemporaryDirectory() as workspace_dir:
# Setup
system_prompt = "You are a helpful assistant with access to tools."
llm_client = LLMClient(
api_key=config.llm.api_key,
api_base=config.llm.api_base,
model=config.llm.model,
)
tools = [
WriteTool(workspace_dir=workspace_dir),
ReadTool(workspace_dir=workspace_dir),
BashTool(),
]
agent = Agent(
llm_client=llm_client,
system_prompt=system_prompt,
tools=tools,
max_steps=20,
workspace_dir=workspace_dir,
)
# Conversation turns
conversations = [
"Create a file called 'data.txt' with the numbers 1 to 5, one per line.",
"Now read the file and tell me what's in it.",
"Count how many lines are in the file using bash.",
]
for i, message in enumerate(conversations, 1):
print(f"\n{'=' * 60}")
print(f"Turn {i}:")
print(f"{'=' * 60}")
print(f"User: {message}\n")
agent.add_user_message(message)
try:
result = await agent.run()
print(f"Agent: {result}\n")
except Exception as e:
print(f"Error: {e}")
break
async def main():
"""Run all demos."""
print("=" * 60)
print("Full Agent Examples")
print("=" * 60)
print("\nThese examples demonstrate the complete agent capabilities:")
print("- All basic tools (file operations, bash)")
print("- Session memory (persistent notes)")
print("- MCP tools (if configured)")
print("- Multi-turn conversations\n")
# Run demos
await demo_full_agent()
print("\n" * 2)
await demo_interactive_mode()
print("\n" + "=" * 60)
print("All demos completed! ✅")
print("=" * 60)
print("\n💡 Next step: Try the interactive mode with:")
print(" mini-agent\n")
if __name__ == "__main__":
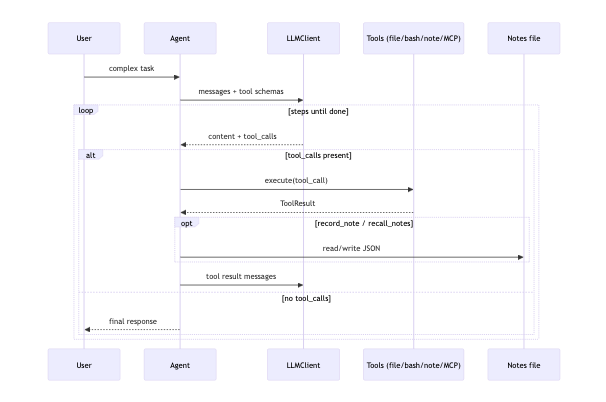
asyncio.run(main())04_full_agent.py 해설: “풀 스택” 에이전트 데모로 확장하기
이 글은 examples/04_full_agent.py를 기반으로, Mini Agent 데모를 “운영에 가까운 구성”으로 확장하는 흐름을 설명합니다.
02가 최소 Agent 루프였다면, 04는 다음을 한 자리에 모읍니다.
- 기본 도구(파일/쉘)
- 세션 노트(지속 메모리)
- MCP(확장 도구, 선택)
- 멀티 턴 대화 시뮬레이션

TL;DR
- demo_full_agent()는 “복합 작업 + 기억 + (선택) MCP”까지 포함한 통합 데모입니다.
- demo_interactive_mode()는 한 Agent 인스턴스로 여러 턴을 흉내냅니다(각 턴마다 agent.run() 호출).
- 핵심 학습 포인트는 “도구가 늘어날수록 프롬프트/스키마/환경 통제가 중요해진다”입니다.
실행 방법
uv run python examples/04_full_agent.py
필수:
- mini_agent/config/config.yaml에 API 키 설정
선택(MCP 실습):
- mini_agent/config/mcp.json 설정(없으면 템플릿 mcp-example.json로 fallback되지만 기본은 disabled)
Demo 1: demo_full_agent() 구조 해부
1) 설정/키 확인은 고정 경로
이 예제도 mini_agent/config/config.yaml을 고정 경로로 찾습니다.
config_path = Path("mini_agent/config/config.yaml")
config = Config.from_yaml(config_path)
즉, CLI(mini-agent)처럼 홈 디렉터리 탐색 로직을 타지 않습니다.
2) 워크스페이스는 임시 디렉터리
with tempfile.TemporaryDirectory() as workspace_dir:
여기서 Agent가 만드는 파일(calculator.py, README.md, .agent_memory.json)은 임시 폴더 안에 생성됩니다.
데모 종료 후엔 사라지는 구조라 “안전하게 실험”하기에 좋습니다.
3) system_prompt + “메모리 정책”을 합성한다
예제는 기본 시스템 프롬프트를 읽은 뒤, 세션 메모리 사용 규칙을 문자열로 덧붙입니다.
- “record_note / recall_notes 도구가 있다”
- “중요한 사실/결정을 저장하고 회상하라”
이 방식의 장점:
- Agent 행동을 바꾸는 가장 빠른 방법이 프롬프트이기 때문
한계:
- 모델이 100% 반드시 실행하는 건 아니므로, 운영에서는 “턴 시작 시 자동 recall” 같은 강제 정책을 고려하게 됩니다.
4) tools를 “기능 묶음”으로 구성한다
이 예제는 도구들을 세 단계로 쌓습니다.
- 기본 도구(파일/쉘)
- 세션 노트 도구(지속 메모리)
- MCP 도구(선택)
여기서 “tools를 늘리는 것” 자체가 목표가 아니라, 도구가 늘수록 모델이 더 헷갈릴 수 있다는 점이 핵심입니다.
따라서 각 도구의 description과 parameters가 더 중요해집니다(06에서 자세히 다룹니다).
5) MCP 도구: 플러그인 시스템의 감각을 잡기
mcp_tools = await load_mcp_tools_async(config_path="mini_agent/config/mcp.json")
이 호출은 다음을 수행합니다(mini_agent/tools/mcp_loader.py 참고).
- mcp.json을 읽고 서버 목록을 확인
- disabled가 아닌 서버에 연결(stdio/sse/http 지원)
- 각 MCP 서버가 제공하는 tool 정의를 받아 Tool로 래핑
중요한 현실 포인트:
- mcp.json이 없어도 mcp-example.json로 fallback될 수 있습니다.
- 예제 템플릿은 대부분 disabled: true이므로, “연결은 안 하고 넘어가는” 상태가 기본입니다.
6) 복합 작업: 모델이 도구를 오케스트레이션하는지 관찰
task는 일부러 “여러 산출물 + 실행 + 기억”을 섞습니다.
- calculator.py 생성(타입힌트/독스트링 포함)
- README.md 작성
- bash로 실행 테스트
- 프로젝트 정보를 record_note로 저장
Agent 관점에서 볼 때 좋은 관찰 포인트:
- 파일 생성: write_file를 쓰는지, edit_file를 쓰는지
- 테스트 실행: bash에서 cd를 어떻게 처리하는지
- BashTool은 기본 cwd에서 실행되므로, 임시 workspace로 이동하려면 cd <workspace>를 명시해야 합니다.
- Agent는 system prompt에 “Current Workspace(절대 경로)”가 주입되므로 이를 활용할 수 있습니다.
- 기억 저장: 어떤 정보를 category로 저장하는지
7) 데모가 끝난 뒤 “증거”를 출력한다
예제는 작업이 끝나면 워크스페이스의 생성 파일을 나열하고, 각 파일의 앞부분을 출력합니다.
이건 에이전트 개발에서 매우 중요한 습관입니다.
- “모델이 완료했다”가 아니라
- “결과물이 실제로 만들어졌는지”를 확인해야 합니다.
Demo 2: demo_interactive_mode()로 멀티 턴 감각 잡기
이 데모는 진짜 인터랙티브 CLI가 아니라, “3턴 대화”를 스크립트로 흉내냅니다.
핵심은:
- 한 Agent 인스턴스를 만들고
- 턴마다 agent.add_user_message(...) 후
- await agent.run()을 호출한다
여기서 Agent 공부 포인트는 다음입니다.
- agent.messages가 계속 누적되므로 “멀티 턴”이 된다
- 턴이 길어지면(많은 턴) 컨텍스트 관리가 필요해지고, 이 프로젝트는 “요약(summarization)”로 대응하는 경로가 있다(mini_agent/agent.py)
실습 과제(공부용)
- MCP 서버를 하나 실제로 켜보기
mini_agent/config/mcp-example.json을 복사한 뒤 특정 서버의 disabled를 false로 바꾸고, 필요한 env를 채워 실행해보세요. - “메모리 회상”을 강제하는 정책을 추가해보기
턴 시작 시 recall_notes를 반드시 호출하도록 프롬프트를 강화하거나, 런타임에서 선행 호출하도록 코드를 바꿔보세요. - tool 수가 늘어날 때의 혼동을 관찰하기
도구를 일부러 더 추가(예: translate, summarize 등)한 뒤, 모델이 “적절한 도구”를 고르는지 확인해보세요.
다음 글 안내
- provider 전환(Anthropic/OpenAI 프로토콜 차이)을 이해하려면 examples/docs/05_provider_selection.md
- 도구 스키마(JSON Schema)가 모델 행동을 어떻게 제약/유도하는지 보려면 examples/docs/06_tool_schema_demo.md
'AI > Agent' 카테고리의 다른 글
| 6. AI Agent가 사용하는 Tool 스키마 (0) | 2026.02.23 |
|---|---|
| 5. Provider 선택자 만들기 (0) | 2026.02.23 |
| 3. session_notes로 공부하는 AI 에이전트 세션 관리 (0) | 2026.02.23 |
| 2. Simple Agent (AI 에이전트 기초) (0) | 2026.02.23 |
| 1. basic_tools (AI 에이전트 기초) (0) | 2026.02.23 |


