
오늘도 공부
Looper Handler Thread [출처] Looper Handler Thread (1)|작성자 커트 본문
Looper Handler Thread [출처] Looper Handler Thread (1)|작성자 커트
행복한 수지아빠 2011. 12. 26. 18:13출처 : http://blog.naver.com/PostView.nhn?blogId=kippee&logNo=130048583564
아직 까지는 이 세개의 관계가 정리가 안된다.
http://codinghard.wordpress.com/2009/05/16/android-thread-messaging/ 에서는
Handler와 Looper의 역할에 대하여 아래와 같이 예를 들어 설명한다.
안드로이드는 Thread간에 통신하기 위해서 Handler와 Looper를 제공하고 있다.
Child Thread가 웹으로 부터 이미지를 가져와 생성하려고 할때의 예를 제시하고 있다. 생성이 끝나고 (아마도 imageView형태로 바꾸어서) Main Thread의 Message Queue와 연동된 Handler를 이용하여 Message를 송신하는것으로 Main Thread에 알려준다. 물론 Child Thread에서 생성된 데이터 (ImageView)는 Message에 포함되어 있다.
그리고 간단한 Coding 예를 보여 주는 데
일단 두개의 Thread를 생성하고 (여기서 이미 Main은 기본적으로 Application이 Start 될때
Run 됨으로 Child Thread만 생성한다)
new ChildThread().start();
또한 들어오는 Message를 Listening 하면서 Looper 가
받아 먹어야 되는데 Main은 기본적으로 항상 Listening 상태이기 때문에 별도의 Looper가
필요 없으며 단지 들어온 Message를 처리할 수 있는 Handler만 생성한다.
mMainHandler = new Handler() { public void handleMessage(Message msg) {
mMainReceiveView.setText( (String)msg.obj );
}
};
이와는 반대로 Child Thread는 계속 Running 하면서 들어오는 Message를 받아 먹고 이를
Handler 하여금 처리해야 하기 때문에 아래의 코드처럼 전형적인 Format으로
Coding 된다.
위에서 Override 된 Method handleMessage는 들어오는 Message를 처리하는 Logic이 들어간다.
class ChildThread extends Thread {
private static final String INNER_TAG = "ChildThread";
public void run() {
this.setName("Child");
/*
* You have to prepare the looper before creating the handler.
*/
Looper.prepare();/*
* Create the child handler on the child thread so it is bound to the
* child thread's message queue.
*/
mChildHandler = new Handler() {public void handleMessage(Message msg) {
/*
* Send the processing result back to the main thread.
*/
mChildReceiveMsg = (String) msg.obj;
showDialog(POPUP_CHILD_THREAD);
}
};/*
* Start looping the message queue of this thread.
*/
Looper.loop();
}
}
여기서는 Message가 들어오면 Dialog 창으로 Popup이 되게 하였다
첨부파일 ThreadMessaging0905227.zip 은 사이트 http://codinghard.wordpress.com/2009/05/16/android-thread-messaging/ 을 Project로 만들어 실행본 것이고
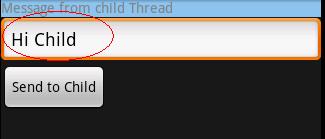
이것을 내 입맛이 조금 Customizing 하여 바꾸어 본것인데 아래 그림은
Child에서 보낼 Message 입력하여 Send to Child를 Click하면
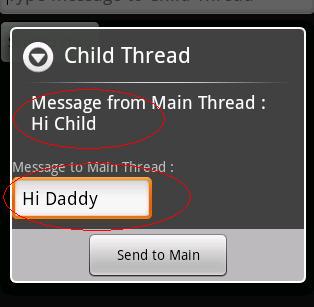
아래와 같은 Dialog 가 뜨고 다시 Main에 보내기 위해 "Hi Daddy"를 입력하고
Send to Main Button을 클릭하면
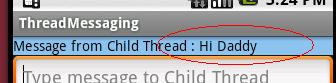
아래 그림과 같이 Main Thread의 UI에 Child가 보낸 Message가 표시된다.
위의 두번째 그림에서 AlertDialog Builder를 사용하였는데 기본적으로는 EditText Widget를 제공안한다. 따라서 별도의 Custom View를 사용하였는데
이에 자세한 내용은 http://openproject.tistory.com/tag/팝업 (내용이 아주 알차다)을 참조하길 바란다.
이 부분도 첨부파일로 올렸다 (두번째 파일)
이제 화두 Looper Handler Thread의 첫발자국인가?
아참!!! 생성된 Child Thread는 직접 UI를 Access 할 수 없다. 즉 Toast나 위의 예처럼 별도의 Dialog로 처리해야 됨.
[출처] Looper Handler Thread (1)|작성자 커트
'Android > Tip&Tech' 카테고리의 다른 글
| Separating Lists with Headers in Android 0.9 (2) | 2012.01.01 |
|---|---|
| listview 제목줄 나누기 (1) | 2011.12.26 |
| Multipart form-date 내용 (0) | 2011.12.26 |
| Android: how to create transparent or opeque background (0) | 2011.12.22 |
| Fragment animation 정의하기 팁#1 (0) | 2011.12.21 |